소개
If you have display assembly , Whether you've encountered a cracked screen, malfunctioning display, or other issues with your laptop or monitor, this step-by-step walkthrough will help you replace the display assembly and get your device back to optimal working condition. With detailed instructions and tips, we'll guide you through the process, ensuring a smooth and successful replacement of your display assembly.
필요한 것
-
-
Use a T5 Torx screwdriver to remove the eleven screws that secure the lower case.
-
-
-
-
Use a Phillips #1 screwdriver to remove the 5.5 mm screws securing the hinges.
-
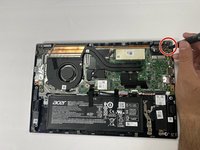
Disconnect the display cable.
-


To reassemble your device, follow these instructions in reverse order.
팀

Gateway, Team 1-2, Pee Fall 2023 Gateway, Team 1-2, Pee Fall 2023 회원
GCC-PEE-F23S1G2
5 회원들
안내서 5개를 작성함