주요 콘텐츠로 건너뛰기

Acer TravelMate P653-V-6882 Keyboard Replacement

필요한 것

  1. Acer TravelMate P653-V-6882 Keyboard Replacement, Battery Pack: 1 단계, 이미지 1/2 Acer TravelMate P653-V-6882 Keyboard Replacement, Battery Pack: 1 단계, 이미지 2/2
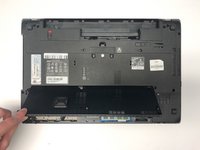
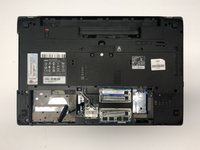
    • Turn the computer over so the base is facing up.

    • Slide the battery lock to unlock position.

  2. Acer TravelMate P653-V-6882 Keyboard Replacement: 2 단계, 이미지 1/1
    • Slide the battery release latch to the right.

    • The battery pack will pop out.

  3. Acer TravelMate P653-V-6882 Keyboard Replacement: 3 단계, 이미지 1/1
    • Lift the battery up.

    • Pull out the battery.

  4. Acer TravelMate P653-V-6882 Keyboard Replacement, Base Door: 4 단계, 이미지 1/1
    • Remove the five 7mm Phillips #1 screws.

  5. Acer TravelMate P653-V-6882 Keyboard Replacement: 5 단계, 이미지 1/1
    • Use the opening tool to separate base door from the bottom of the laptop.

    • Be careful not to bend or crack the plastic back cover.

  6. Acer TravelMate P653-V-6882 Keyboard Replacement: 6 단계, 이미지 1/2 Acer TravelMate P653-V-6882 Keyboard Replacement: 6 단계, 이미지 2/2
    • Gently pry open the base door by pushing up.

    • Pull out the base door.

    • Be careful not to bend or crack the plastic back cover.

  7. Acer TravelMate P653-V-6882 Keyboard Replacement, Keyboard: 7 단계, 이미지 1/1
    • Remove the two 7mm Phillips #1 screws.

  8. Acer TravelMate P653-V-6882 Keyboard Replacement: 8 단계, 이미지 1/1
    • Flip the laptop so that the underside is now facing the bottom.

    • Open the LCD panel.

    • Use the flat end of a spudger to push in the six latches.

    • Be careful not to bend or crack the keyboard.

  9. Acer TravelMate P653-V-6882 Keyboard Replacement: 9 단계, 이미지 1/1
    • When the latches are pushed in, the keyboard will pop out.

    • Gently pry up the keyboard.

    • Be careful not to bend or crack the keyboard.

  10. Acer TravelMate P653-V-6882 Keyboard Replacement: 10 단계, 이미지 1/1
    • Slide the keyboard forward to access the keyboard cable.

    • Flip the connector latch up to open it.

    • Pull out the keyboard cable gently.

    • Be careful not to damage the connector.

결론

To reassemble your device, follow these instructions in reverse order.

Daniel Popovic

회원 가입일: 01/13/20

985 평판

안내서 7개 작성하였습니다

York University, Team S1-G6, Woodhouse Winter 2020 York University, Team S1-G6, Woodhouse Winter 2020 회원

YORK-WOODHOUSE-W20S1G6

3 회원들

안내서 9개 작성하였습니다

댓글 0개

댓글 쓰기

조회 통계:

24 시간 전: 0

7일 전: 1

30일 전: 2

전체 시간: 415