소개
During this guide, we will be removing the component which controls all function of the Guitar Controller.
필요한 것
-
-
The first thing we want to do is remove the neck from the body. This is necessary to access either the inside of the neck or the body.
-
The round tab with a triangle can be turned by inserting a .25" tip Flathead screwdriver and turning. Simultaneously, as the tab turns about a quarter circle, pull the neck and it should slide out with minimal force.
-
Once the neck has been separated from the body remove the eight screws from the back of the neck with a Phillips Head 0 screwdriver. All screws are 12 mm.
-
Next remove the four screws that were covered by the neck.
-
Finally, remove the eight screws from the back of the body.
-
This screw at the bottom of the body is a bit longer than the others.
-
With all the screws out, both the neck and the body shells should open with minimal force.
-
-
-
These are the whammy bar components, we highly recommend removing these components before working on other areas of the body as the whammy bar protrudes making it difficult to rest on a flat surface.
-
To remove the whammy bar, follow the steps included in the whammy bar replacement guide, found on our device.
-
-
-
After opening the controller carefully remove the piece of plastic connected to the strip of wire as shown in the photo.
-
-
-
-
First, identify the Motherboard, it will be the green panel which all five separate white wire wraps connect to.
-
Once the Motherboard has been identified, begin unscrewing the Motherboard by using a Phillips Head 0 Screwdriver. There will be two 9 mm Phillips Head screws with, they are located on opposite corners.
-
To completely remove the motherboard, you must also remove the panel located right next to the Motherboard. There are four additional 12 mm Phillips Head screws with flared edges which connect the separate panel to the Guitar Controller, here we will use the same Phillips Head 0 Screwdriver.
-
-
-
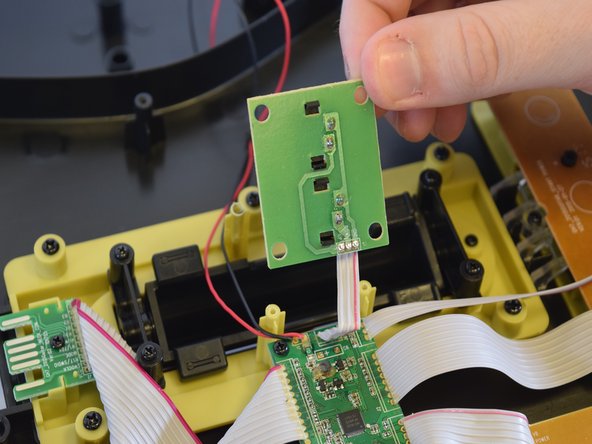
The last component you must remove to replace the Motherboard, is the Body-Neck adapter. This connector controls communication between the Guitar Keys and the body of the Guitar (Strum Bar, Whammy Bar, etc).
-
To remove the Body-Neck adapter, simply unscrew the one 12 mm screw which holds it in place, using a Phillips Head 0 Screwdriver.
-
Lastly, carefully lift all three components you have just unscrewed by the corners. The Motherboard will come off with little force.
-


To reassemble your device, follow these instructions in reverse order.
To reassemble your device, follow these instructions in reverse order.
다른 한 분이 해당 안내서를 완성하였습니다.

팀

UW Tacoma, Team 2-4, Rose Winter 2017 UW Tacoma, Team 2-4, Rose Winter 2017 회원
UWT-ROSE-W17S2G4
4 회원들
안내서 12개 작성하였습니다