주요 콘텐츠로 건너뛰기

AirPods Charging Case Battery Replacement

필요한 것

동영상 개요

  1. AirPods Charging Case Battery Replacement, AirPods charging case battery replacement: 1 단계, 이미지 1/2 AirPods Charging Case Battery Replacement, AirPods charging case battery replacement: 1 단계, 이미지 2/2
    • It is difficult to teardown the AirPods charging case because the charging case features 2 fixed points and the middle part is glued with adhesive. The charging case can easily be damaged by careless methods of dissasembly.

  2. AirPods Charging Case Battery Replacement, Creating a pry tool: 2 단계, 이미지 1/3 AirPods Charging Case Battery Replacement, Creating a pry tool: 2 단계, 이미지 2/3 AirPods Charging Case Battery Replacement, Creating a pry tool: 2 단계, 이미지 3/3
    • There is currently no special repair tool for the AirPods. Therefore, we need to make a set of disassembly tools.

    • Be careful when handling sharp and thin metal as it can easily injure your hands.

    • Make a pry piece with a 0.1mm steel plate. Firstly, cut the steel plate into the shape of a pry piece with a pair of scissors.

    • Grind the edges of the pry piece with a sheet of sandpaper.

  3. AirPods Charging Case Battery Replacement, Preparing the pry tool: 3 단계, 이미지 1/2 AirPods Charging Case Battery Replacement, Preparing the pry tool: 3 단계, 이미지 2/2
    • Bend the pry piece with a cutting nipper.

    • Use tweezers to make a shielding plate.

  4. AirPods Charging Case Battery Replacement, Prepare for opening the case: 4 단계, 이미지 1/3 AirPods Charging Case Battery Replacement, Prepare for opening the case: 4 단계, 이미지 2/3 AirPods Charging Case Battery Replacement, Prepare for opening the case: 4 단계, 이미지 3/3
    • To avoid damaging the charging case, wrap high-temperature tape around it.

    • Next, insert the pry piece into the seam of the two fixed points.

    • Use the pry knife to pry out a gap.

  5. AirPods Charging Case Battery Replacement, Start opening case: 5 단계, 이미지 1/2 AirPods Charging Case Battery Replacement, Start opening case: 5 단계, 이미지 2/2
    • Insert the shielding plate.

    • Insert the tweezers.

  6. AirPods Charging Case Battery Replacement, Removing the docking tubes: 6 단계, 이미지 1/2 AirPods Charging Case Battery Replacement, Removing the docking tubes: 6 단계, 이미지 2/2
    • Wedge the special pry piece into the seam to pull out the docking tubes.

    • Please do not damage the flex cable while pulling out.

  7. AirPods Charging Case Battery Replacement, Optional - Opening case: 7 단계, 이미지 1/3 AirPods Charging Case Battery Replacement, Optional - Opening case: 7 단계, 이미지 2/3 AirPods Charging Case Battery Replacement, Optional - Opening case: 7 단계, 이미지 3/3
    • If you still cannot open the case, you can build an extractor tool with two pieces of cable gland and two screws.

  8. AirPods Charging Case Battery Replacement, Remove the old battery: 8 단계, 이미지 1/3 AirPods Charging Case Battery Replacement, Remove the old battery: 8 단계, 이미지 2/3 AirPods Charging Case Battery Replacement, Remove the old battery: 8 단계, 이미지 3/3
    • Attach the charging case to the holder and dip a small amount of alcohol on the battery.

    • Pry up the battery with the pry knife and the battery connector with tweezers.

    • Then take out the battery flex cable.

  9. AirPods Charging Case Battery Replacement, Test new battery: 9 단계, 이미지 1/3 AirPods Charging Case Battery Replacement, Test new battery: 9 단계, 이미지 2/3 AirPods Charging Case Battery Replacement, Test new battery: 9 단계, 이미지 3/3
    • Take out the battery.

    • Using a multimeter is not required to successfully replace the battery.

    • Measured by the multimeter, the battery is found to have no voltage.

    • Get a new battery that has a stable voltage of 3.6v-4.0v.

  10. AirPods Charging Case Battery Replacement, Put in new battery: 10 단계, 이미지 1/2 AirPods Charging Case Battery Replacement, Put in new battery: 10 단계, 이미지 2/2
    • Attach the double-sided tape to the new battery.

    • Put the new battery into the charging case and connect the battery flex cable.

  11. AirPods Charging Case Battery Replacement, Test charging: 11 단계, 이미지 1/2 AirPods Charging Case Battery Replacement, Test charging: 11 단계, 이미지 2/2
    • Plug in the charging cable. The case should now charge normally once more.

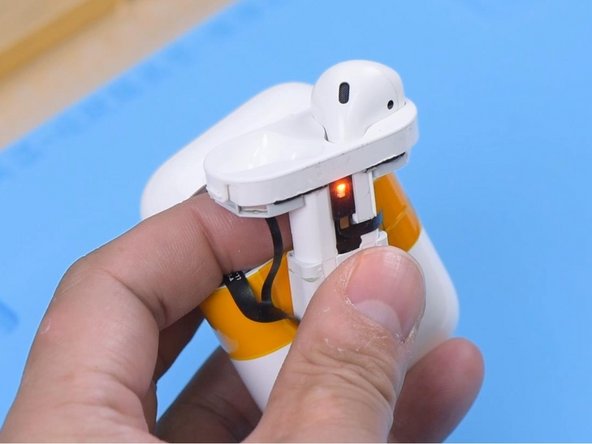
    • Put the earbuds in. The earbuds should charge normally too.

  12. AirPods Charging Case Battery Replacement, Attach new battery: 12 단계, 이미지 1/2 AirPods Charging Case Battery Replacement, Attach new battery: 12 단계, 이미지 2/2
    • Peel off the double-sided tape and attach the battery to the case.

    • Install the docking tubes.

  13. AirPods Charging Case Battery Replacement, Test functionality: 13 단계, 이미지 1/2 AirPods Charging Case Battery Replacement, Test functionality: 13 단계, 이미지 2/2
    • Connect the AirPods to the phone. Both the charging case and AirPods can now be charged and used normally again.

결승점

다른 7명이 해당 안내서를 완성하였습니다.

REWA

회원 가입일: 11/24/20

14,261 평판

안내서 53개 작성하였습니다

댓글 한 개

Opening the case is the most difficult part, did it with two cheap pealing knives. And for inserting the cable you will need tweezers and this will be fiddly. Batteries are available from aliexpress and youre case will be as new.

San der - 답글

댓글 쓰기

조회 통계:

24 시간 전: 41

7일 전: 267

30일 전: 1,364

전체 시간: 25,670