주요 콘텐츠로 건너뛰기

Airox Legendair Turbine Box Replacement

의료 장비
iFixit과 이 수리 안내서는 의료 기기 제조업체가 보증하지 않으며 제휴 관계가 없습니다.

필요한 것

  1. Airox Legendair Turbine Box Replacement, How to Properly Clean the Airox Legendair: 1 단계, 이미지 1/1
    • First, switch off the device.

    • Place the device in a clean and open environment.

  2. Airox Legendair Turbine Box Replacement: 3 단계, 이미지 1/1
    • Using a cloth or a sponge slightly dampened with a bactericide or germicide solution, gently clean the outside of the device.

  3. Airox Legendair Turbine Box Replacement: 4 단계, 이미지 1/1
    • If necessary, spray the device lightly with the germicide solution, taking account of the requirements discussed in the preliminary operations.

    • Do not allow any liquid to enter inside the device (in particular through the cooling apertures).

    • Use a gentle air blast to clear away any remaining liquid from ventilator.

  4. Airox Legendair Turbine Box Replacement, Turbine Box: 6 단계, 이미지 1/1
    • Make sure to turn off the ventilator before starting the repair.

    • Put the device in a clean and open environment.

    • Thoroughly clean the device before beginning any work.

  5. Airox Legendair Turbine Box Replacement: 7 단계, 이미지 1/1
    • Open the device by removing the five attachment screws (Pl1.20) on the bottom casing side (Pl1-280). Lift off the top outer panel.

    • Carefully separate the two casings to avoid tearing off the keypad connections.

  6. Airox Legendair Turbine Box Replacement: 8 단계, 이미지 1/1
    • Unscrew the three attachment screws (Pl1-130) for the CPU board (Pl1-120).

  7. Airox Legendair Turbine Box Replacement: 9 단계, 이미지 1/1
    • Disconnect all connectors Pl1.J1.CT, Pl1.J2.CT of the turbine control board.

  8. Airox Legendair Turbine Box Replacement: 10 단계, 이미지 1/1
    • Extract the turbine casing (Pl1.50) from its housing and uncouple the flow rate measurement block (Pl1-260), the O2 supply pipes and the piezo solenoid valve.

  9. Airox Legendair Turbine Box Replacement: 11 단계, 이미지 1/1
    • Place the turbine box (Pl1-50) in a clean and open environment

    • Remove the four screws, washers and spacers (Pl1.70, Pl1.80, Pl1.90) in order to successfully extract the turbine control board (Pl1.60).

  10. Airox Legendair Turbine Box Replacement: 12 단계, 이미지 1/1
    • Disconnect the box from the turbine control board (Pl1.J6.CT).

  11. Airox Legendair Turbine Box Replacement: 13 단계, 이미지 1/1
    • Replace the turbine box (Pl1-50).

    • Replace the turbine control board (Pl1.60) on the box with four screws, washers and spacers (Pl1.70, Pl1.80, Pl1.90) (Torque 5 Nm max.).

  12. Airox Legendair Turbine Box Replacement: 14 단계, 이미지 1/2 Airox Legendair Turbine Box Replacement: 14 단계, 이미지 2/2
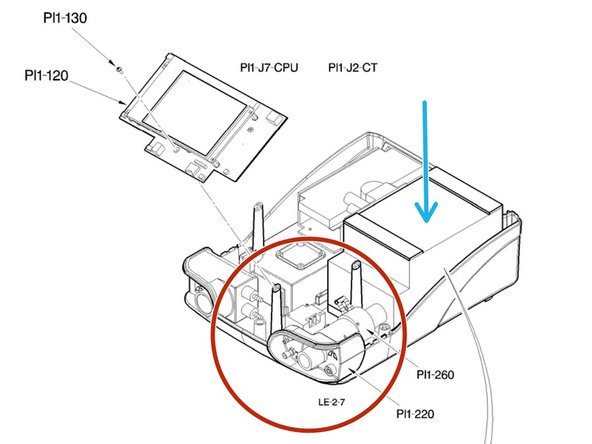
    • Connect the box to the turbine control board (Pl1.J6.CT).

    • Couple the flow rate measurement block (Pl1-260) to the casing and connect the two O2 supply pipes and the piezo solenoid valve.

    • Then, reinsert the assembly into its housing. Put the cone support (Pl1-50) into place. Put the additional cone support (Pl1-220) also into place.

  13. Airox Legendair Turbine Box Replacement: 15 단계, 이미지 1/1
    • Reconnect all connectors (Pl1.J1.CT, Pl1.J2.CT) to the turbine control board.

  14. Airox Legendair Turbine Box Replacement: 16 단계, 이미지 1/1
    • Reinstall the CPU board (Pl1-120) with the three attachment screws (Pl1-130) (Torque 5 Nm max.)

    • Close the device again, taking all necessary precautions (see Step 2-3)

결론

Perform a final inspection of the device before putting back into service.

다른 한 분이 해당 안내서를 완성하였습니다.

Noah Clark

회원 가입일: 04/09/20

243 평판

안내서 1개 작성함

Cal Poly, Team S7-G15, Paton Spring 2020 Cal Poly, Team S7-G15, Paton Spring 2020 회원

CPSU-PATON-S20S7G15

3 회원들

안내서 4개 작성하였습니다

댓글 0개

댓글 쓰기

조회 통계:

24 시간 전: 1

7일 전: 1

30일 전: 2

전체 시간: 249