주요 콘텐츠로 건너뛰기

이 안내서에는 최근 변경 사항이 더 있습니다. 최신 비검증 버전으로 전환하십시오.

Akai MPK25 Selector Knob Replacement

필요한 것

  1. Akai MPK25 Selector Knob Replacement, Face Plate: 1 단계, 이미지 1/1
    • Remove all the selector knob covers by pulling them off.

  2. Akai MPK25 Selector Knob Replacement: 2 단계, 이미지 1/1
    • Using needle nose pliers, remove the washers from the four corner selector knobs.

  3. Akai MPK25 Selector Knob Replacement: 3 단계, 이미지 1/1
    • Flip the device over. Using a Philips #2 screw driver, remove the fourteen 10.3 mm black screws holding the back panel in place.

  4. Akai MPK25 Selector Knob Replacement: 4 단계, 이미지 1/3 Akai MPK25 Selector Knob Replacement: 4 단계, 이미지 2/3 Akai MPK25 Selector Knob Replacement: 4 단계, 이미지 3/3
    • Carefully flip the device to the front making sure you secure the face plate and the chassis together.

    • Please use care in following the step above to avoid ripping the ribbon cables connecting the two sides.

  5. Akai MPK25 Selector Knob Replacement: 5 단계, 이미지 1/3 Akai MPK25 Selector Knob Replacement: 5 단계, 이미지 2/3 Akai MPK25 Selector Knob Replacement: 5 단계, 이미지 3/3
    • Rotate the device 180 degrees and carefully remove the face plate by slightly lifting the screen side towards you and then sliding the bottom out from under the keys.

    • Use care when doing the step above so that the ribbon connectors which connect the top of the chassis to the top of the face plate are not damaged.

  6. Akai MPK25 Selector Knob Replacement, Selector Knob: 6 단계, 이미지 1/1
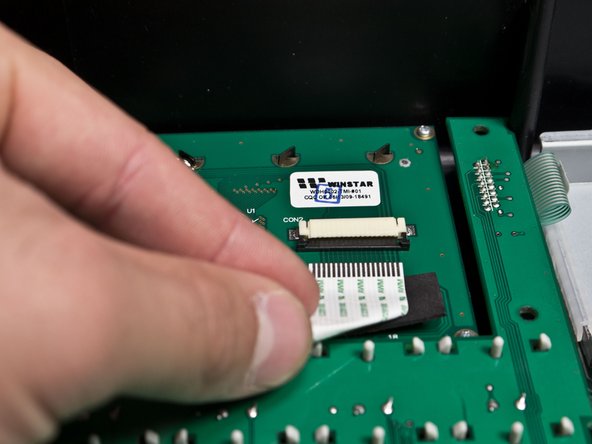
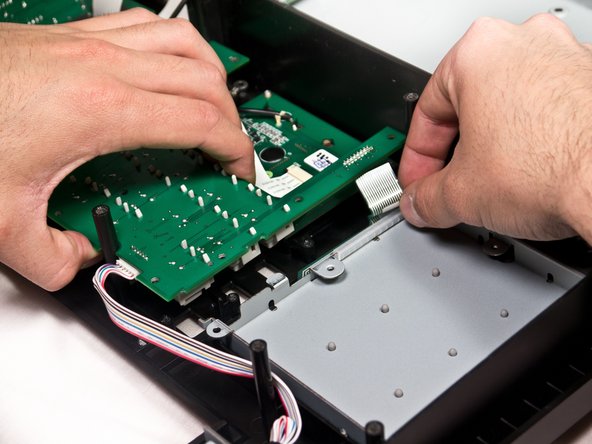
    • Using a Phillips #2 screwdriver, remove the thirteen 9.8mm silver screws holding the mother board to the face plate.

  7. Akai MPK25 Selector Knob Replacement: 7 단계, 이미지 1/2 Akai MPK25 Selector Knob Replacement: 7 단계, 이미지 2/2
    • Using two plastic opening tools, slide the black locking mechanism on the ZIF connector towards you. This will remove the ribbon cable connecting the motherboard to the screen.

  8. Akai MPK25 Selector Knob Replacement: 8 단계, 이미지 1/2 Akai MPK25 Selector Knob Replacement: 8 단계, 이미지 2/2
    • Wiggle and pull out the ribbon cable connecting the mother board to the beat pads.

  9. Akai MPK25 Selector Knob Replacement: 9 단계, 이미지 1/3 Akai MPK25 Selector Knob Replacement: 9 단계, 이미지 2/3 Akai MPK25 Selector Knob Replacement: 9 단계, 이미지 3/3
    • Remove the mother board completely from the face plate and identify the broken potentiometer.

  10. Akai MPK25 Selector Knob Replacement: 10 단계, 이미지 1/1
    • Flip the mother board back over so the potentiometers are facing down and the leads are facing up. Then identify which leads correspond to the broken potentiometer.

    • Use a soldering iron with solder wick (or a solder sucker) in order to free the potentiometer from the mother board.

    • Add some leaded solder to the leads if your having trouble getting the factory solder to draw to the solder wick.

결론

To reassemble your device, follow these instructions in reverse order.

다른 6명이 해당 안내서를 완성하였습니다.

Anthony Zepeda

회원 가입일: 01/30/13

303 평판

안내서 1개 작성함

Cal Poly, Team 20-6, Maness Winter 2013 Cal Poly, Team 20-6, Maness Winter 2013 회원

CPSU-MANESS-W13S20G6

5 회원들

안내서 6개 작성하였습니다

댓글 한 개

Thanks for putting together this great tutorial. Does anybody out there have the part number of the potentiometer?

discodamon - 답글

댓글 쓰기

조회 통계:

24 시간 전: 0

7일 전: 1

30일 전: 10

전체 시간: 3,592