주요 콘텐츠로 건너뛰기
Alcatel OneTouch Pop Icon Screen Replacement

Alcatel OneTouch Pop Icon Screen Replacement

John Halsey

John Halsey4 다른 기여자

최종 수정일 August 23, 2021

20 - 30 분
어려움

Replacing the screen of the Alcatel OneTouch Pop Icon is a difficult task that should not be attempted without proper preparation. Make sure, that when using the metal spudger that may cause electrostatic discharge, to ground yourself by touching a metal object before using the spudger.

필요한 것

도구

더보기...

  1. Alcatel OneTouch Pop Icon Screen Replacement, Battery: 1 단계, 이미지 1개 중 1개
    • Shut down the device

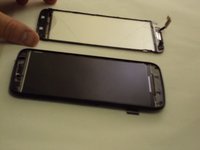
    • Flip the phone so that the screen is facing the surface you are working on

    • Aggressive prying may result in damaging the back panel or the internal contents of the phone.

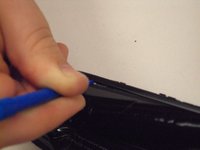
    • Use the plastic opening tool to gently pry off the back panel. There is a small notch in the bottom left corner of the phone that you can use for increased leverage.

  2. Alcatel OneTouch Pop Icon Screen Replacement: 2 단계, 이미지 2개 중 1개 Alcatel OneTouch Pop Icon Screen Replacement: 2 단계, 이미지 2개 중 2개
    • Use your thumbnail to lift the battery from the phone.

  3. Alcatel OneTouch Pop Icon Screen Replacement, Interior Back Panel: 3 단계, 이미지 1개 중 1개
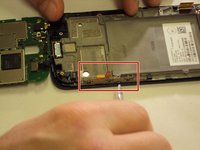
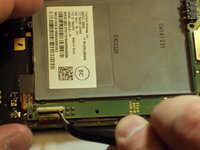
    • Using the J000 Phillips screwdriver, remove the twelve silver 3mm screws.

    • Using the J000 Phillips screwdriver, remove the one green 3mm screw.
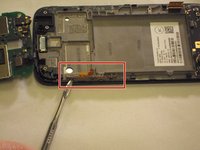
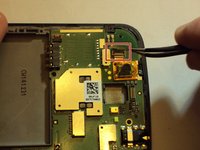
  4. Alcatel OneTouch Pop Icon Screen Replacement: 4 단계, 이미지 1개 중 1개
    • With the screen facing you and the front facing camera to your right, insert the plastic opening tool between the screen and the interior back panel and gently pry it off.

    • Make sure all of the clips come undone when you pry the seam loose.

  5. Alcatel OneTouch Pop Icon Screen Replacement, Control Buttons: 5 단계, 이미지 1개 중 1개
    • Lift the latch and gently remove the ribbon from the latch.

  6. Alcatel OneTouch Pop Icon Screen Replacement: 6 단계, 이미지 2개 중 1개 Alcatel OneTouch Pop Icon Screen Replacement: 6 단계, 이미지 2개 중 2개
    • Use the metal spudger to gently pry the control buttons from the case.

    • The control buttons are glued to the case and are on a computer ribbon. When removing them it is best to move between them so as to avoid damaging them.

    • Make sure to use a plastic opening tool or nylon spudger before attempting to use a metal spudger. Metal spudgers can potentially damage your device.

  7. Alcatel OneTouch Pop Icon Screen Replacement, Motherboard: 7 단계, 이미지 3개 중 1개 Alcatel OneTouch Pop Icon Screen Replacement, Motherboard: 7 단계, 이미지 3개 중 2개 Alcatel OneTouch Pop Icon Screen Replacement, Motherboard: 7 단계, 이미지 3개 중 3개
    이 단계에 사용된 도구:
    Tweezers
    $4.99
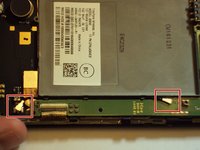
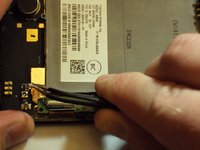
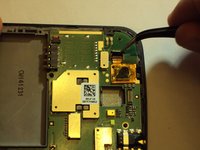
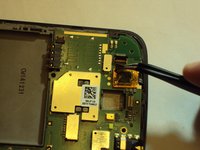
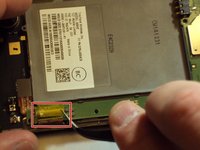
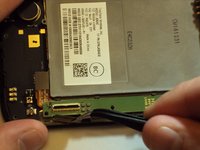
    • Using tweezers, carefully detach the antenna from the motherboard.

  8. Alcatel OneTouch Pop Icon Screen Replacement: 8 단계, 이미지 3개 중 1개 Alcatel OneTouch Pop Icon Screen Replacement: 8 단계, 이미지 3개 중 2개 Alcatel OneTouch Pop Icon Screen Replacement: 8 단계, 이미지 3개 중 3개
    • Remove the tape on top of the ribbon.

    • Lift the black latch to release the ribbon.

    • Remove the ribbon from the latch.

  9. Alcatel OneTouch Pop Icon Screen Replacement: 9 단계, 이미지 1개 중 1개
    • Lift the tab from the casing.

  10. Alcatel OneTouch Pop Icon Screen Replacement: 10 단계, 이미지 3개 중 1개 Alcatel OneTouch Pop Icon Screen Replacement: 10 단계, 이미지 3개 중 2개 Alcatel OneTouch Pop Icon Screen Replacement: 10 단계, 이미지 3개 중 3개
    • Use the tweezers to remove tape the from the top of the latch. Still using the tweezers, lift the black latch to release the ribbon.

    • Remove the ribbon from the latch.

  11. Alcatel OneTouch Pop Icon Screen Replacement: 11 단계, 이미지 1개 중 1개
    • Remove the motherboard from the casing.

  12. Alcatel OneTouch Pop Icon Screen Replacement, Screen: 12 단계, 이미지 1개 중 1개
    • Take a microwavable iOpener and heat it for 30 seconds.

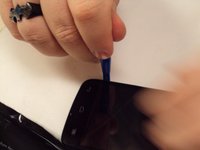
    • Use the hot iOpener to heat up the screen.

  13. Alcatel OneTouch Pop Icon Screen Replacement: 13 단계, 이미지 3개 중 1개 Alcatel OneTouch Pop Icon Screen Replacement: 13 단계, 이미지 3개 중 2개 Alcatel OneTouch Pop Icon Screen Replacement: 13 단계, 이미지 3개 중 3개
    • If caution is not taken, the glass may shatter due to expanding farther than its position and may cause harm

    • Gently insert the plastic opening tool between the screen and the casing and use it to pry the screen loose from the casing.

    • You may need to use more than one tool to lift the entire screen successfully.

    • Continue prying the screen from the casing until it can be fully removed.

    • You may have to re-heat the iOpener multiple times before the screen will fully dislocate from the casing.

결론

To reassemble your device, follow these instructions in reverse order.

다른 10명이 해당 안내서를 완성하였습니다.

작성자

4다른 기여자 명과 함께

John Halsey

회원 가입일: 04/01/16

1,000 평판

안내서 5개를 작성함

2가이드 댓글

No. Not if there fake wemon fixing things. I don't trust your company.

Cancel my order.

Maxx Debolt - 답글

I don't have the tools to complete the job and repair my phone, so I'll have to get a new one but it was a very good tutorial. Lots of good pictures and very concise and clear. Thanks.

Albert Anon - 답글

댓글 쓰기

조회 통계:

지난 24시간: 0

지난 7일: 3

지난 30일: 33

전체 시간: 6,409