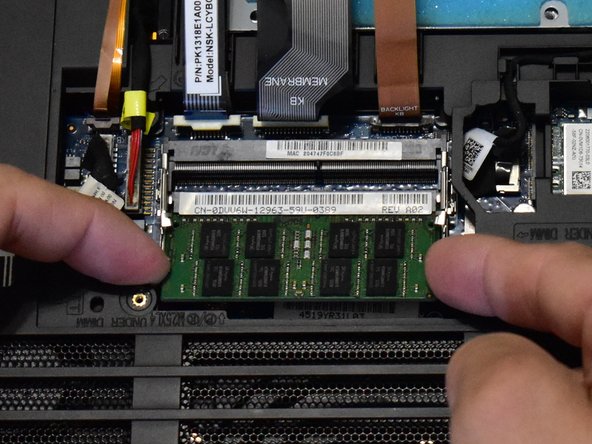
주요 콘텐츠로 건너뛰기

Alienware 15 R2 Battery Replacement

필요한 것

  1. Alienware 15 R2 Battery Replacement, RAM: 1 단계, 이미지 1/3 Alienware 15 R2 Battery Replacement, RAM: 1 단계, 이미지 2/3 Alienware 15 R2 Battery Replacement, RAM: 1 단계, 이미지 3/3
    • Place laptop upside down with the hinge facing you, then remove the two 9mm Phillips #0 screws located in the bottom left and right of the of the rear panel.

    • Remove the rear panel by using the iFixit opening tool to separate it from the back of the laptop.

  2. Alienware 15 R2 Battery Replacement: 2 단계, 이미지 1/2 Alienware 15 R2 Battery Replacement: 2 단계, 이미지 2/2
    • Use the iFixit opening tool to disconnect the battery cable. Put the iFixit tool underneath the cable and then pull it to remove.

  3. Alienware 15 R2 Battery Replacement: 3 단계, 이미지 1/2 Alienware 15 R2 Battery Replacement: 3 단계, 이미지 2/2
    • Find the RAM located near the edge of the computer closest to you. Locate the small latches on either side of the RAM stick and push in the two latches to release. Gently grasp the RAM stick on either side and pull straight out. Repeat for the second RAM stick.

  4. Alienware 15 R2 Battery Replacement, Battery: 4 단계, 이미지 1/2 Alienware 15 R2 Battery Replacement, Battery: 4 단계, 이미지 2/2
    • Using a Phillips #0 remove the small 1X 3mm screw behind where the RAM used to be.

  5. Alienware 15 R2 Battery Replacement: 5 단계, 이미지 1/1
    • Remove all screws from the back casing. (4X 18mm, 4X 10mm, 4X 6mm)

    • Press your finger in the hole next to the hard drive to lift the key board.

  6. Alienware 15 R2 Battery Replacement: 6 단계, 이미지 1/1
    • Disconnect and move aside the left and right wires.

  7. Alienware 15 R2 Battery Replacement: 7 단계, 이미지 1/2 Alienware 15 R2 Battery Replacement: 7 단계, 이미지 2/2
    • Using a Phillips #0 remove the screws holding the battery in. (3X 6mm)

    • You may also remove the ribbon cables on the bottom of the laptop to gain more room to work. (This is not required)

  8. Alienware 15 R2 Battery Replacement: 8 단계, 이미지 1/1
    • Remove the red, white, blue, and black colored wires connected to the motherboard.

  9. Alienware 15 R2 Battery Replacement: 9 단계, 이미지 1/1
    • Lift the battery from the front edge and remove.

결론

To reassemble your device, follow these instructions in reverse order.

다른 2명이 해당 안내서를 완성하였습니다.

Nathaniel Evans

회원 가입일: 09/18/19

417 평판

안내서 3개 작성하였습니다

댓글 한 개

Honestly made an account to comment on this repair guide, this is extremely incomplete. I’d go as far as saying you’re likely to damage the product by relying solely on this guide, I would turn to a breakdown on YouTube instead. I’m not sure if this is listed under the correct product.

mdumtshali - 답글

댓글 쓰기

조회 통계:

24 시간 전: 5

7일 전: 38

30일 전: 179

전체 시간: 9,690