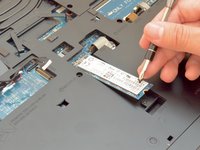
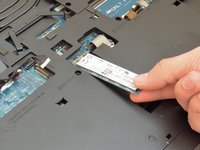
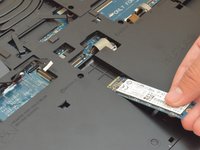
주요 콘텐츠로 건너뛰기

Alienware 17 R4 Solid State Drive (SSD) Replacement

필요한 것

  1. Alienware 17 R4 Solid State Drive (SSD) Replacement, Base Cover: 1 단계, 이미지 1/1
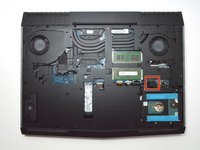
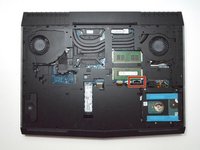
    • Use a PH1 screwdriver bit to remove the six M2.5x13 screws (2.4 mm) on the back of the laptop.

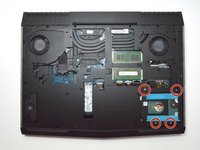
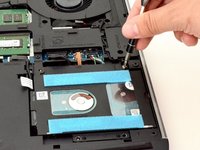
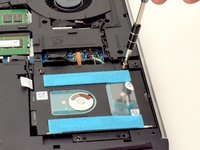
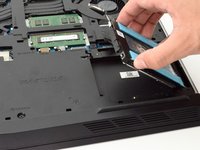
    • Use a PH1 screwdriver bit to loosen the one M2x3 screw (1.9 mm).

    • The M2x3 screw (1.9 mm) does not come out completely.

  2. Alienware 17 R4 Solid State Drive (SSD) Replacement: 2 단계, 이미지 1/2 Alienware 17 R4 Solid State Drive (SSD) Replacement: 2 단계, 이미지 2/2
    • Pull the base cover up to remove it.

    • If you are having trouble, insert a plastic opening tool into the divots along the laptop's edges to loosen.

    • Removing the cover may require some force.

  3. Alienware 17 R4 Solid State Drive (SSD) Replacement, Hard Disk Drive (HDD): 3 단계, 이미지 1/3 Alienware 17 R4 Solid State Drive (SSD) Replacement, Hard Disk Drive (HDD): 3 단계, 이미지 2/3 Alienware 17 R4 Solid State Drive (SSD) Replacement, Hard Disk Drive (HDD): 3 단계, 이미지 3/3
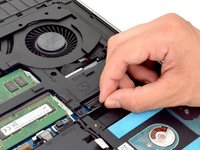
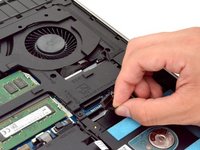
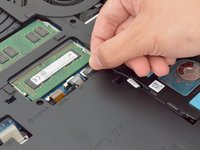
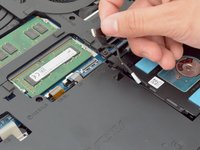
    • Disconnect the battery connector cable, located on the right side of the laptop, above the hard disk drive.

    • Once you have removed the cable, wait 5-10 minutes to allow the laptop to power down.

    • Failure to remove the battery connector cable properly may damage other parts of the laptop.

  4. Alienware 17 R4 Solid State Drive (SSD) Replacement: 4 단계, 이미지 1/3 Alienware 17 R4 Solid State Drive (SSD) Replacement: 4 단계, 이미지 2/3 Alienware 17 R4 Solid State Drive (SSD) Replacement: 4 단계, 이미지 3/3
    • Use a PH1 screwdriver bit to remove the four M2.5x5 screws (2.4 mm) on the hard disk drive.

  5. Alienware 17 R4 Solid State Drive (SSD) Replacement: 5 단계, 이미지 1/3 Alienware 17 R4 Solid State Drive (SSD) Replacement: 5 단계, 이미지 2/3 Alienware 17 R4 Solid State Drive (SSD) Replacement: 5 단계, 이미지 3/3
    • Gently lift the HDD cable to disconnect it from the laptop.

  6. Alienware 17 R4 Solid State Drive (SSD) Replacement: 6 단계, 이미지 1/2 Alienware 17 R4 Solid State Drive (SSD) Replacement: 6 단계, 이미지 2/2
    • Pull the hard drive up to remove.

  7. Alienware 17 R4 Solid State Drive (SSD) Replacement, Solid State Drive: 7 단계, 이미지 1/2 Alienware 17 R4 Solid State Drive (SSD) Replacement, Solid State Drive: 7 단계, 이미지 2/2
    • Remove the one M2x3 screw (1.9 mm) using a PH1 screwdriver bit

  8. Alienware 17 R4 Solid State Drive (SSD) Replacement: 8 단계, 이미지 1/2 Alienware 17 R4 Solid State Drive (SSD) Replacement: 8 단계, 이미지 2/2
    • Slide the solid state drive towards yourself to prevent damage to the card.

결론

To reassemble your device, follow these instructions in reverse order.

다른 3명이 해당 안내서를 완성하였습니다.

Hector Mendez III

회원 가입일: 09/11/17

1,280 평판

안내서 8개 작성하였습니다

CSU Fullerton, Team S2-G4, Bruce Fall 2017 CSU Fullerton, Team S2-G4, Bruce Fall 2017 회원

CSUF-BRUCE-F17S2G4

4 회원들

안내서 9개 작성하였습니다

댓글 한 개

Is it advised to pull the HDD before pulling the SSD or is this guide just written in a way to cover how to remove both of them?

John Crooks - 답글

댓글 쓰기

조회 통계:

24 시간 전: 0

7일 전: 13

30일 전: 42

전체 시간: 6,682