주요 콘텐츠로 건너뛰기

Alienware P18G M14X R1 Hard Drive Replacement

필요한 것

  1. Alienware P18G M14X R1 Hard Drive Replacement, Back Cover: 1 단계, 이미지 1/1
    • Loosen the top left and top right 6.5mm PH1 screws that hold down the back cover.

    • The screws will not be able to be removed from the back cover. They can only be loosened or tightened.

  2. Alienware P18G M14X R1 Hard Drive Replacement: 2 단계, 이미지 1/1
    • Slide back cover forward using your thumbs.

  3. Alienware P18G M14X R1 Hard Drive Replacement: 3 단계, 이미지 1/1
    • Lift up the cover and set aside exposing the internals of the computer.

  4. Alienware P18G M14X R1 Hard Drive Replacement, Battery: 4 단계, 이미지 1/1
    • Make sure the laptop is turned off before starting.

    • Using PH1 screwdriver loosen the two screws on the right of the battery.

    • The screws will not be able to be removed from the battery. They can only be loosened or tightened.

  5. Alienware P18G M14X R1 Hard Drive Replacement: 5 단계, 이미지 1/2 Alienware P18G M14X R1 Hard Drive Replacement: 5 단계, 이미지 2/2
    • Pull battery up using the tab provided.

  6. Alienware P18G M14X R1 Hard Drive Replacement: 6 단계, 이미지 1/1
    • Disconnect the clip connecting the battery to the computer.

    • Set battery aside.

  7. Alienware P18G M14X R1 Hard Drive Replacement, Optical Drive: 7 단계, 이미지 1/1
    • Unscrew the four 6.35mm screws using the PH1, that hold down the optical drive.

  8. Alienware P18G M14X R1 Hard Drive Replacement: 8 단계, 이미지 1/1
    • Using the plastic opening tool unclip the white connector holding down the orange cable.

  9. Alienware P18G M14X R1 Hard Drive Replacement: 9 단계, 이미지 1/1
    • Using the tab on the optical drive, lift the optical drive out of the computer and set it aside.

  10. Alienware P18G M14X R1 Hard Drive Replacement, Hard Drive: 10 단계, 이미지 1/1
    • Loosen the three 6.35 mm screws using the PH1 screw driver, to release the hard drive.

    • The screws will not be able to be removed from the hard drive. They can only be loosened or tightened.

  11. Alienware P18G M14X R1 Hard Drive Replacement: 11 단계, 이미지 1/1
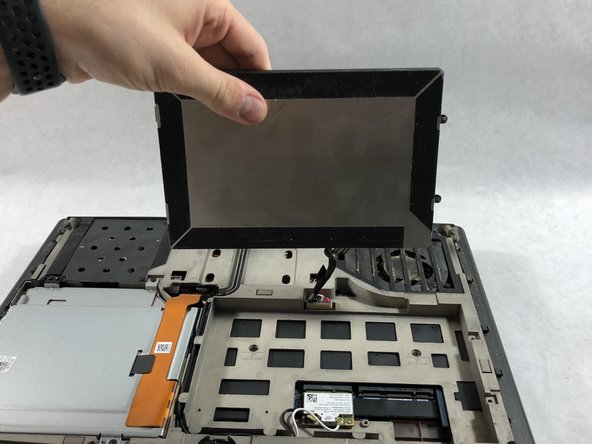
    • Pull the tab on the hard drive slowly and carefuly because there will be a cable attached to it.

  12. Alienware P18G M14X R1 Hard Drive Replacement: 12 단계, 이미지 1/1
    • Pull the clip away from the hard drive to remove it.

결론

To reassemble your device, follow these instructions in reverse order.

다른 6명이 해당 안내서를 완성하였습니다.

Andonaq Grozdani

회원 가입일: 03/01/18

892 평판

안내서 5개 작성하였습니다

UMass Dartmouth, Team S2-G2, Simcock Spring 2018 UMass Dartmouth, Team S2-G2, Simcock Spring 2018 회원

UMASSD-SIMCOCK-S18S2G2

3 회원들

안내서 5개 작성하였습니다

댓글 0개

댓글 쓰기

조회 통계:

24 시간 전: 2

7일 전: 7

30일 전: 23

전체 시간: 2,854