주요 콘텐츠로 건너뛰기

이 버전에는 잘못된 편집 사항이 있을 수 있습니다. 최신 확인된 스냅샷으로 전환하십시오.

필요한 것

  1. 이 단계는 번역되지 않았습니다. 번역을 도와주십시오

    : 1 단계, 이미지 1/1
    • Using your hands, remove the pegs (4+4) from the front and back of the speaker.

  2. 이 단계는 번역되지 않았습니다. 번역을 도와주십시오

    : 2 단계, 이미지 1/1
    • Remove the outer black rubber housing of the speaker.

  3. 이 단계는 번역되지 않았습니다. 번역을 도와주십시오

    : 3 단계, 이미지 1/1
    • Remove the inner blue rubber housing from the speaker.

  4. 이 단계는 번역되지 않았습니다. 번역을 도와주십시오

    : 4 단계, 이미지 1/1
    • Pull out the two black wire meshes using a metal spudger.

    • Be careful not to damage the metal casing.

  5. 이 단계는 번역되지 않았습니다. 번역을 도와주십시오

    : 5 단계, 이미지 1/2 : 5 단계, 이미지 2/2
    이 단계에 사용된 도구:
    Tweezers
    $4.99
    구매
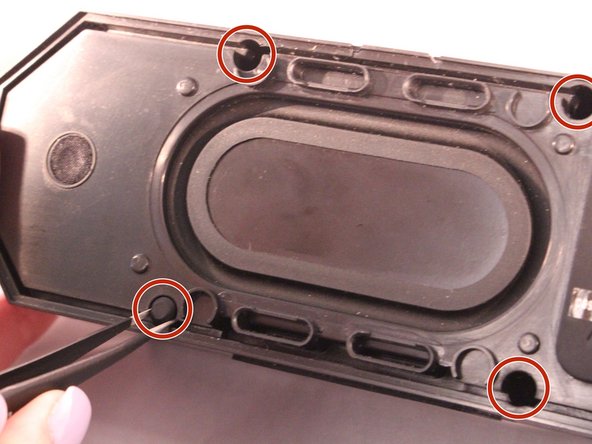
    • Using tweezers remove the rubber stoppers (4 at the back + 2 at the front).

  6. 이 단계는 번역되지 않았습니다. 번역을 도와주십시오

    : 6 단계, 이미지 1/1
    • Using the size PH1 screwdriver remove the screws exposed from the rubber stoppers (4 + 2).

  7. 이 단계는 번역되지 않았습니다. 번역을 도와주십시오

    : 7 단계, 이미지 1/1
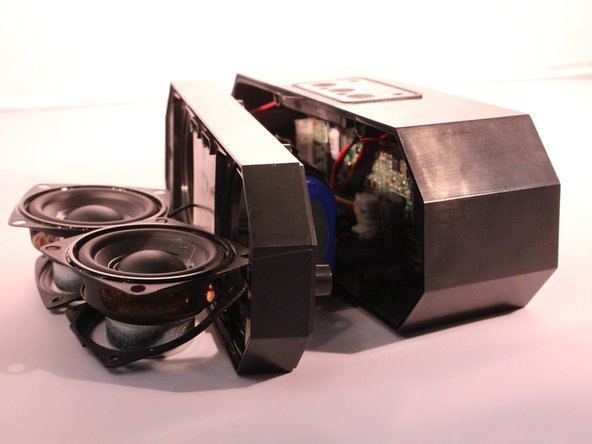
    • Pull the case apart and you will be able to see all the components inside the speaker.

  8. 이 단계는 번역되지 않았습니다. 번역을 도와주십시오

    : 8 단계, 이미지 1/1
    • Now that the case is open look for the small green (NFC) chip on the inside of the case next to the motherboard.

  9. 이 단계는 번역되지 않았습니다. 번역을 도와주십시오

    : 9 단계, 이미지 1/1
    • Disconnect the Bluetooth (NFC) chip from the motherboard.

결승점

다른 2명이 해당 안내서를 완성하였습니다.

Ryan Byrnes

회원 가입일: 04/12/17

872 평판

안내서 5개 작성하였습니다

댓글 한 개

Is this a common issue with the Lifejacket 3? I was able to use my new BT speaker twice, since it was bought last week. The speaker hasn't been dropped, in or around water, outside, left on, damaged, or tampered with.

Kat - 답글

댓글 쓰기

조회 통계:

24 시간 전: 0

7일 전: 10

30일 전: 17

전체 시간: 4,721