주요 콘텐츠로 건너뛰기

Andis 1875-Watt Fold-N-Go Ionic Hair Dryer Outer Casing Replacement

필요한 것

  1. Andis 1875-Watt Fold-N-Go Ionic Hair Dryer Outer Casing Replacement, Outer Casing: 1 단계, 이미지 1/1
    • Remove the two Phillips #00 screws:

    • One Phillips 16mm screw

    • One Phillips 14 mm screw

    • All of the hair dryer's components are held together by these two screws. Parts may quickly separate after screw removal. Tape can be used to hold everything in place.

  2. Andis 1875-Watt Fold-N-Go Ionic Hair Dryer Outer Casing Replacement: 2 단계, 이미지 1/3 Andis 1875-Watt Fold-N-Go Ionic Hair Dryer Outer Casing Replacement: 2 단계, 이미지 2/3 Andis 1875-Watt Fold-N-Go Ionic Hair Dryer Outer Casing Replacement: 2 단계, 이미지 3/3
    • Remove the top portion of the handle.

    • The model information and warnings are engraved on the top portion.

  3. Andis 1875-Watt Fold-N-Go Ionic Hair Dryer Outer Casing Replacement: 3 단계, 이미지 1/2 Andis 1875-Watt Fold-N-Go Ionic Hair Dryer Outer Casing Replacement: 3 단계, 이미지 2/2
    • Remove the settings switch by lifting straight up.

  4. Andis 1875-Watt Fold-N-Go Ionic Hair Dryer Outer Casing Replacement: 4 단계, 이미지 1/3 Andis 1875-Watt Fold-N-Go Ionic Hair Dryer Outer Casing Replacement: 4 단계, 이미지 2/3 Andis 1875-Watt Fold-N-Go Ionic Hair Dryer Outer Casing Replacement: 4 단계, 이미지 3/3
    • Remove the internal components from the rear portion of the handle.

    • Remove the switch

    • Remove the circuitboard

    • Remove the capacitor in black plastic

    • These parts are not secured to the handle by anything, but are all connected to each other by wires. They shouldn't be difficult to remove, but remember that they will come out together.

  5. Andis 1875-Watt Fold-N-Go Ionic Hair Dryer Outer Casing Replacement: 5 단계, 이미지 1/3 Andis 1875-Watt Fold-N-Go Ionic Hair Dryer Outer Casing Replacement: 5 단계, 이미지 2/3 Andis 1875-Watt Fold-N-Go Ionic Hair Dryer Outer Casing Replacement: 5 단계, 이미지 3/3
    • Remove the sliding black cover at the top of the handle.

  6. Andis 1875-Watt Fold-N-Go Ionic Hair Dryer Outer Casing Replacement: 6 단계, 이미지 1/2 Andis 1875-Watt Fold-N-Go Ionic Hair Dryer Outer Casing Replacement: 6 단계, 이미지 2/2
    • Remove the lower portion of the handle by sliding the peg out of the slot at the top of the handle.

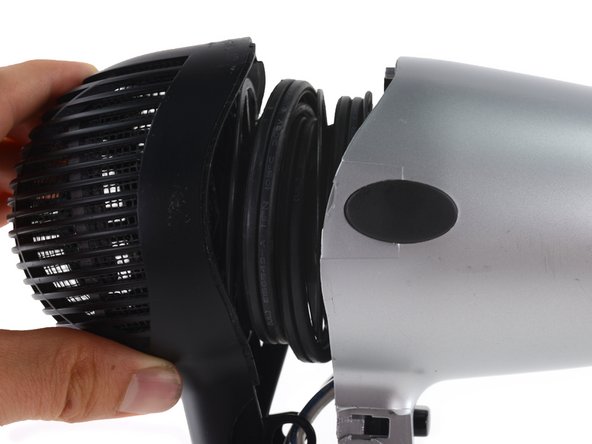
  7. Andis 1875-Watt Fold-N-Go Ionic Hair Dryer Outer Casing Replacement: 7 단계, 이미지 1/2 Andis 1875-Watt Fold-N-Go Ionic Hair Dryer Outer Casing Replacement: 7 단계, 이미지 2/2
    • Separate the silver front casing from the black rear vent.

결론

To reassemble your device, follow these instructions in reverse order.

다른 한 분이 해당 안내서를 완성하였습니다.

Scott Havard

회원 가입일: 06/27/16

49,633 평판

안내서 31개 작성하였습니다

댓글 0개

댓글 쓰기

조회 통계:

24 시간 전: 0

7일 전: 3

30일 전: 15

전체 시간: 2,050