주요 콘텐츠로 건너뛰기

Apex TM772 Touchscreen Replacement

필요한 것

  1. Apex TM772 Touchscreen Replacement, Casing: 1 단계, 이미지 1/1
    • Begin by inserting the plastic opening tool into the seam between the back and front of the case and carefully pry the back from the front.

  2. Apex TM772 Touchscreen Replacement: 2 단계, 이미지 1/1
    • Moving along the seam continue to pry the case apart.

    • The internal speaker is adhered to the inside of the back casing. There are two wires that connect the speaker to the circuit board and may be damaged if care is not taken. Once open the speaker may be removed from the back casing by removing the tape holding the speaker with either tweezers or your fingers.

  3. Apex TM772 Touchscreen Replacement: 3 단계, 이미지 1/1
    • The back panel should now be disconnected from the device. This provides access to the components of the device for repairing and replacing parts of the tablet.

  4. Apex TM772 Touchscreen Replacement, Touchscreen: 4 단계, 이미지 1/2 Apex TM772 Touchscreen Replacement, Touchscreen: 4 단계, 이미지 2/2
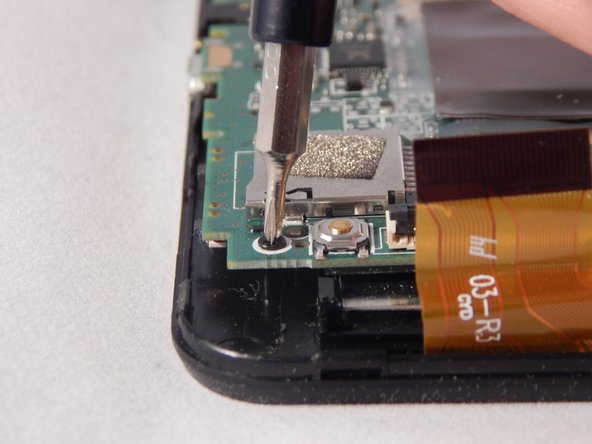
    • Remove the three screws that are located at the top of the circuit board with the screwdriver. (2.4 mm head, 3.9 mm in length)

  5. Apex TM772 Touchscreen Replacement: 5 단계, 이미지 1/2 Apex TM772 Touchscreen Replacement: 5 단계, 이미지 2/2
    • Remove the touchscreen.

    • Replace the touchscreen.

결론

To reassemble your device, follow these instructions in reverse order.

Doran Van Bemmel

회원 가입일: 04/12/17

601 평판

안내서 6개 작성하였습니다

댓글 0개

댓글 쓰기

조회 통계:

24 시간 전: 1

7일 전: 2

30일 전: 3

전체 시간: 269