이 번역은 원본 안내서의 최신 업데이트를 반영하지 않을 수 있습니다. 번역 업데이트를 돕거나 아니면 원본 안내서 보기를 참조하세요.
소개
이 안내서를 사용하여 고장난, 금이 간 또는 불량 Apple Watch Series 6 디스플레이를 교체하세요.
이 안내서는 셀룰러/LTE 버전 시계에 대한 절차를 보여 주지만 표준 GPS-전용 버전도 비슷합니다.
기기를 재조립할 때 부품들을 다시 부착하려면 교체용 접착제가 필요합니다.
필요한 것
-
-
스크린과 시계 본체 사이의 간격이 아주 얇기 때문에 둘을 분리하려면 날카로운 칼날이 필요합니다. 계속진행하기 전에 다음 경고를 주의 깊게 읽으세요.
-
-
-
iOpener를 준비해서 (또는 헤어 드라이어 또는 히트 건을 사용하여) 시계 표면을 가열하여 디스플레이 접착제를 느슨하게 하세요.
-
iOpener를 시계에 2분 이상 올려놓고 스크린에 완전히 열을 가하여 스크린을 케이스에 부착하는 접착제를 부드럽게 하세요.
-
-
-
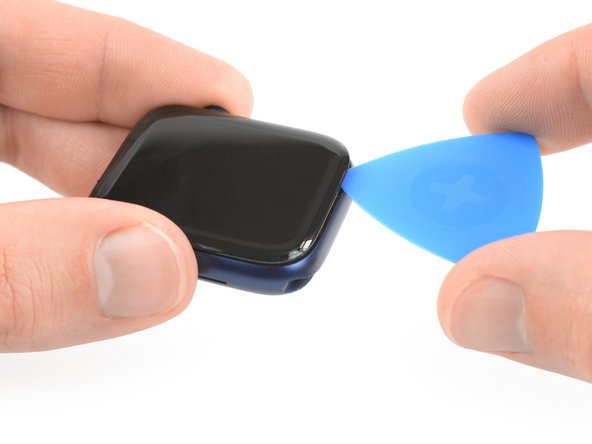
칼날의 굽은 면 가장자리를 디스플레이와 외부 케이스 사이의 얇은 틈으로 넣으세요. 디스플레이의 짧은 면, 디지털 크라운에서 가장 먼 곳에서 시작하세요.
-
틈 사이로 단단히 똑바로 눌러 넣으세요.
-
들어간 칼날을 기울여 디스플레이를 비틀어 약간 여세요.
-
-
-
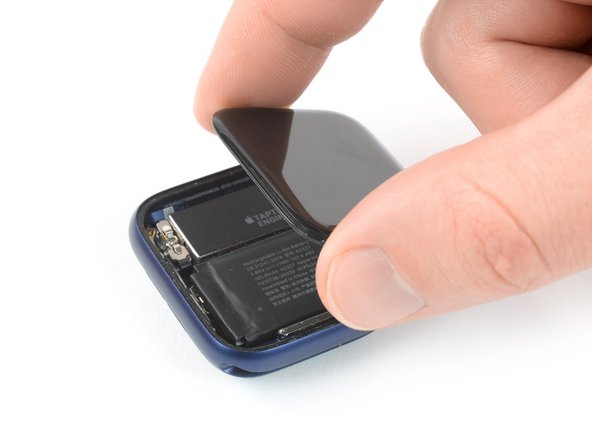
디스플레이를 들어 올려 조심히 시계 크라운을 향해 당기세요.
-
디스플레이를 위로 젖혀 여세요.
When I opened my watch I saw two layers of adhesive or are they gaskets? I broke one accidentally but not sure if I should keep the undamaged one in there? Or should both side be totally bare and the adhesive itself is also the seal?
Also I think I damaged my battery when prying it up since it won’t hold a charge now. I bought a replacement battery and will try that but is there anything else it could be?
-
-
-
-
iOpener를 준비하고 (또는 헤어 드라이어 또는 열선총) 시계 후면을 가열하여 배터리를 느슨하게 하세요. iOpener를 시계에 2분 이상 그대로 놓아 두세요.
-
-
Yeah, bad links in step 11
I have edited the links to stay on the correct guide so they should work right once the edit is approved by the admins.
-
-
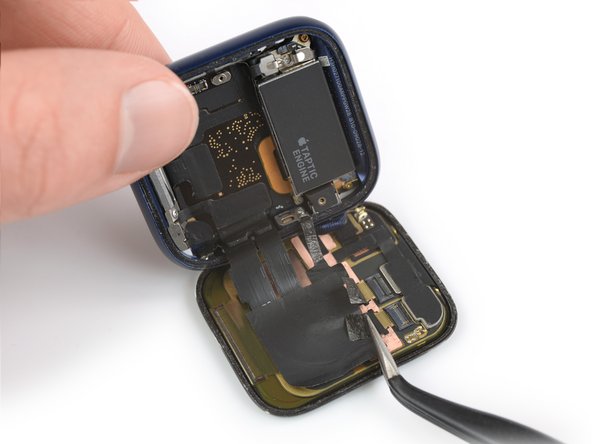
배터리와 Taptic Engine/탭틱 엔진 사이에 여는 픽을 끼우세요.
-
일정한 압력을 사용하여 배터리를 천천히 들어 올려서 메인 보드에 고정하는 접착제를 분리하세요.
-
-
-
배터리와 Taptic Engine/탭틱 엔진 사이에 여는 픽을 끼우세요.
-
일정한 압력을 사용하여 배터리를 천천히 들어 올려서 메인 보드에 고정하는 접착제를 분리하세요.
My watch has a metal shield in between the battery and screen?
Hi Eric,
I assume you own the 40mm version of the Apple Watch series 6 which has a slightly different build. The one you see here is the 44mm version.
Is removing the battery really necessary if you are only replacing the display? I can't see in the following steps where the battery would get in the way of detaching the old screen.
-
-
-
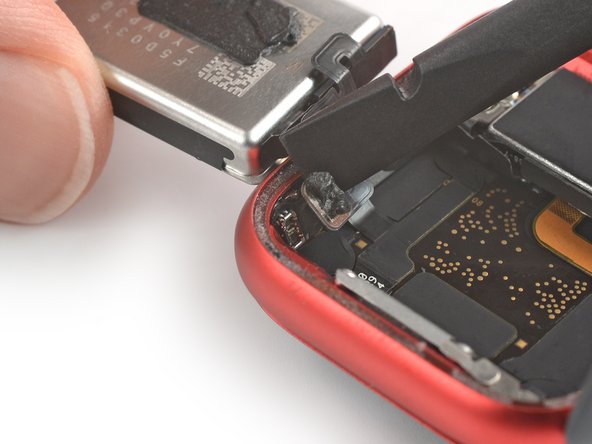
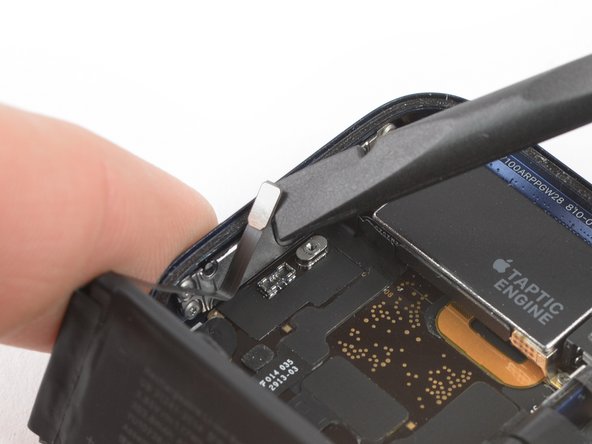
핀셋을 사용하여 양쪽 디스플레이 커넥터에서 검정색 보호 테이프를 조심히 벗기세요.
why do you have to remove the watch back from Face. You're going.to repace it. Isn;t there enough room to get the display positioned right upon re- assembly?
-
-
-
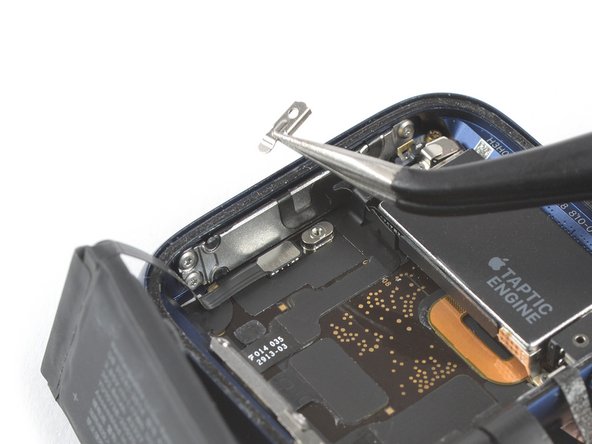
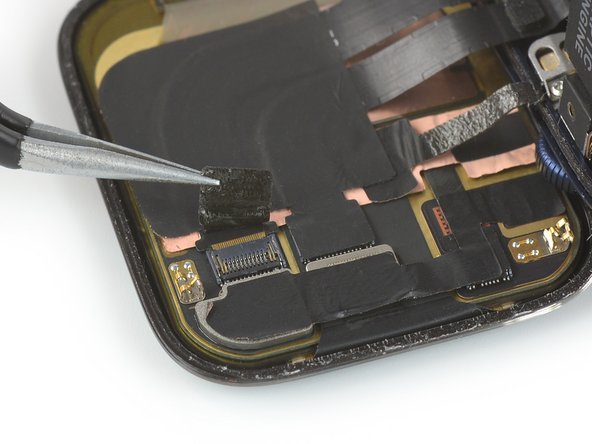
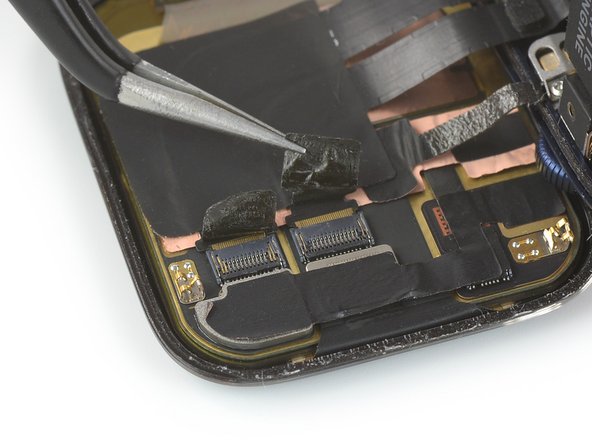
핀셋을 사용하여 디스플레이와 접지 케이블을 스크린 후면에 부착하는 스티커의 가장자리를 조심히 벗기세요.
An dieser Stelle muss ich aufgeben. Die Elemente sind sehr stark miteinander verklebt und das Erdungsband reisst sehr leicht.
-
-
-
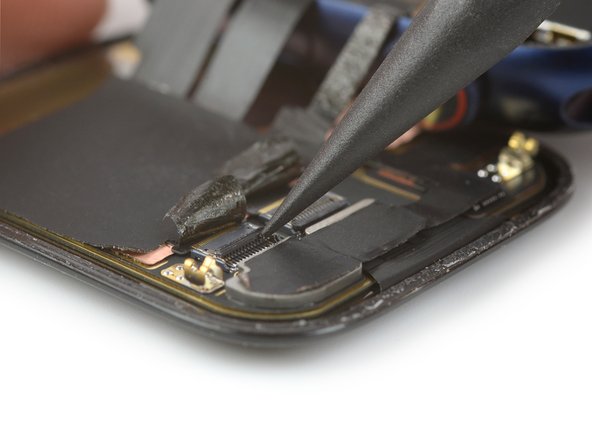
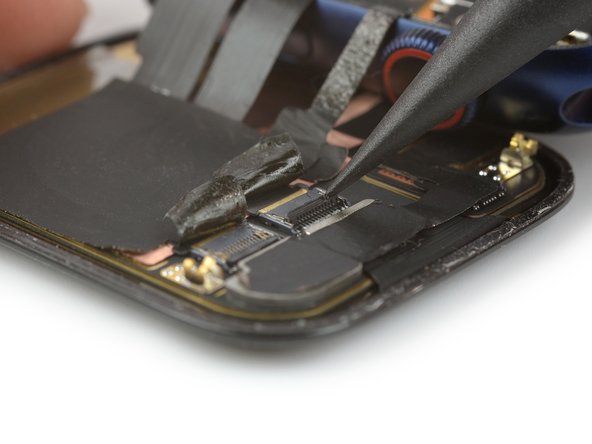
핀셋을 사용하여 디스플레이 케이블 두 개를 ZIF 커넥터에서 당기세요.
This says nothing about the grounding cable..
Oh. Is that was that was. 👀 I knew I wasn't supposed to break this but the device turned on and functions properly. I'll keep an eye on things and see if my wrists sets on fire at some point. Thank you for pointing this out!
Paul B. -
I also have managed to break 👏
Nick -
I damaged the grounding foil/sticker when opening. It’s like tissue paper thin 😱 I was able to reconnect it in a hacky way but is there a replacement part for that available? That part didn’t come up with the rest of the display cable sticky assembly.
@paul is your watch still functioning properly?
-
-
-
시계 어셈블리와 스크린을 분리하세요.
Can we get the application process of the replacement adhesive added to this guide? I ended up messing up my adhesive (completely my fault) and have to buy another set. I thinking adding the guide into this one would be beneficial to the community. Thanks!
-


Apple Watch Series 6를 재조립하려면 이 지침들을 역순으로 따라서 스크린과 배터리를 재부착하세요.
고농도 이소프로필 알코올 (>90%)을 Q-tip에 약간 바르거나 클리닝 패드를 사용하여 새 접착제를 설치하기 전에 시계 케이스와 스크린의 가장자리에 남은 접착제를 조심히 제거하세요.
전자 폐기물을 R2 또는 e-Stewards 인증 재활용 센터로 가져가세요.
수리가 계획대로 진행되지 않았습니까? 자사의 답변 커뮤니티에서 문제 해결 도움을 살펴보세요.
Apple Watch Series 6를 재조립하려면 이 지침들을 역순으로 따라서 스크린과 배터리를 재부착하세요.
고농도 이소프로필 알코올 (>90%)을 Q-tip에 약간 바르거나 클리닝 패드를 사용하여 새 접착제를 설치하기 전에 시계 케이스와 스크린의 가장자리에 남은 접착제를 조심히 제거하세요.
전자 폐기물을 R2 또는 e-Stewards 인증 재활용 센터로 가져가세요.
수리가 계획대로 진행되지 않았습니까? 자사의 답변 커뮤니티에서 문제 해결 도움을 살펴보세요.
다른 35명이 해당 안내서를 완성하였습니다.
다음 번역가들에게 특별히 감사 드립니다:
91%

Christian Kim님은 저희가 세상을 수리하는데 동참하신 분입니다! 기여하시겠습니까?
번역 시작하기 ›


댓글 20개
Can anyone tell me what that 3rd cable is (circled red in the pic linked below)? It’s linked to the metal back in the phone?
gauntletmm - 답글
I think it is just a grounding wire.
Did you ever find out what that third wire is?
I want to know too, I break it while pulling the battery yesterday, but the watch seems working fine
Coco -
It’s a shield (grounding) line to control EMI noise
Dan -
Siete magnifici
Dommage qu’il n’y ai pas de lien d’une batterie à acheter ainsi qu’un lien pour trouver le joint d’étanchéité.
jeremy_110 - 답글
Hello, do we lose the Apple Pay functionality if we replace the screen?
No, i dont think so.
Burak -
Where to buy the replacement glass for series 6 Watch?
Hallo, bei öffnen habe ich versehentlich das Erdungskabel abgerissen. Läuft die Uhr auch ohne dieses Kabel?
Why would you leave out the steps for replacing or reattaching the screen? It’s not the same in reverse as you have to replace adhesive what’s the process or best practice? Do you reheat the adhesive before replacing screen?
Ich finde nirgendwo einen Ersatz Akku für die Apple Watch Series 6, 44mm, steht dieser zur Zeit nicht zur Verfügung oder passt der von der Series 5 ebenfalls, so das dieser nicht separat angeboten wird ?
Mil gracias por Tu generosidad al compartir Tu conocimiento con los demás.
Which Tesa 61395 Tape width should I buy for a 44mm watch?
arno nabos - 답글
Is there a way to just replace the glass, or do you have to replace the whole screen?
Not really, the crystal is glued to the panel with a special optical glue
Someone with the needed heater and vacuum chamber could but one has to have the skills as well. Remember we all can’t be brain surgeons!
Dan -