주요 콘텐츠로 건너뛰기

Asus Chromebook C300MA-DB01 Speaker Replacement Speakers Replacement

필요한 것

  1. Asus Chromebook C300MA-DB01 Speaker Replacement Speakers Replacement, Back Cover: 1 단계, 이미지 1/1
    • Place device bottom-side up.

  2. Asus Chromebook C300MA-DB01 Speaker Replacement Speakers Replacement: 2 단계, 이미지 1/1
    • Remove the three 6.0 mm Philips screws from the center of the case with the #2 screwdriver bit.

    • Remove the eight 9.0 mm Philips screws along the perimeter of the case with the #2 screwdriver bit.

  3. Asus Chromebook C300MA-DB01 Speaker Replacement Speakers Replacement: 3 단계, 이미지 1/1
    • Using a plastic opening tool, separate the bottom case at the seam.

    • Prying open a laptop requires a lot of force but use caution so as to avoid breaking the fragile connectors.

  4. Asus Chromebook C300MA-DB01 Speaker Replacement Speakers Replacement: 4 단계, 이미지 1/2 Asus Chromebook C300MA-DB01 Speaker Replacement Speakers Replacement: 4 단계, 이미지 2/2
    • Lift the keyboard panel away from the components at its hinges, which are located at the back of the laptop.

  5. Asus Chromebook C300MA-DB01 Speaker Replacement Speakers Replacement, Battery: 5 단계, 이미지 1/1
    • Remove the six 6.0mm Philips screws, using the 64 bit driver from around the battery.

  6. Asus Chromebook C300MA-DB01 Speaker Replacement Speakers Replacement: 6 단계, 이미지 1/1
    • Unplug the wire using the plastic opening tool that connects the battery with the board.

  7. Asus Chromebook C300MA-DB01 Speaker Replacement Speakers Replacement: 7 단계, 이미지 1/1
    • Lift the battery out of the laptop

  8. Asus Chromebook C300MA-DB01 Speaker Replacement Speakers Replacement, Speakers: 8 단계, 이미지 1/1
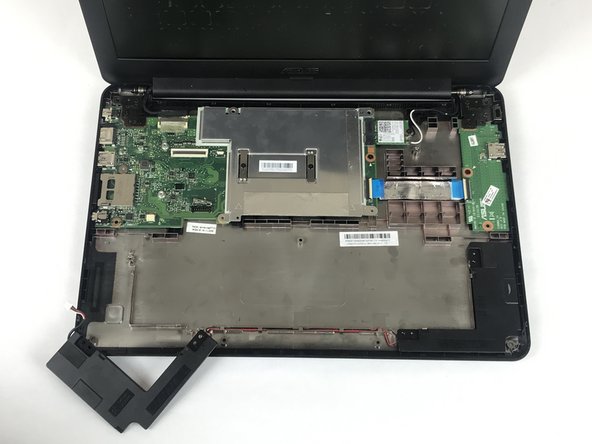
    • Use plastic opening tool to pry off the wire connecting the left side speaker to the circuit board.

  9. Asus Chromebook C300MA-DB01 Speaker Replacement Speakers Replacement: 9 단계, 이미지 1/2 Asus Chromebook C300MA-DB01 Speaker Replacement Speakers Replacement: 9 단계, 이미지 2/2
    • Use plastic opening tool to pry off the left side speaker.

  10. Asus Chromebook C300MA-DB01 Speaker Replacement Speakers Replacement: 10 단계, 이미지 1/1
    • Gently remove the wire connecting the left and right speakers from it's channel. Be careful as to not tear or damage the wire.

  11. Asus Chromebook C300MA-DB01 Speaker Replacement Speakers Replacement: 11 단계, 이미지 1/1
    • Use plastic opening tool to pry off right side speaker.

  12. Asus Chromebook C300MA-DB01 Speaker Replacement Speakers Replacement: 12 단계, 이미지 1/1
    • Lift and remove both speakers and connecting wire.

결론

To reassemble your device, follow these instructions in reverse order.

다른 한 분이 해당 안내서를 완성하였습니다.

wyatt boyatt

회원 가입일: 09/25/17

541 평판

안내서 5개 작성하였습니다

USF Tampa, Team S4-G3, Eyestone Fall 2017 USF Tampa, Team S4-G3, Eyestone Fall 2017 회원

USFT-EYESTONE-F17S4G3

3 회원들

안내서 12개 작성하였습니다

댓글 2개

Bonjour m. Merci pour la présentation. Pourriez-vous m'indiquer l'endroit où je peux me procurer des haut-parleurs pour un hp Omen 15 ? Merci d'avance. Email : dhujardaim@hotmail.com / dhujardaim@gmail.com

dhujardaim@hotmail.com - 답글

Bonjour m. Merci pour la présentation. Pourriez-vous m'indiquer l'endroit où je peux me procurer des haut-parleurs pour un hp Omen 15 ? Merci d'avance. Email : dhujardaim@hotmail.com / dhujardaim@gmail.com

dhujardaim@hotmail.com

dhujardaim@hotmail.com - 답글

댓글 쓰기

조회 통계:

24 시간 전: 0

7일 전: 0

30일 전: 5

전체 시간: 143