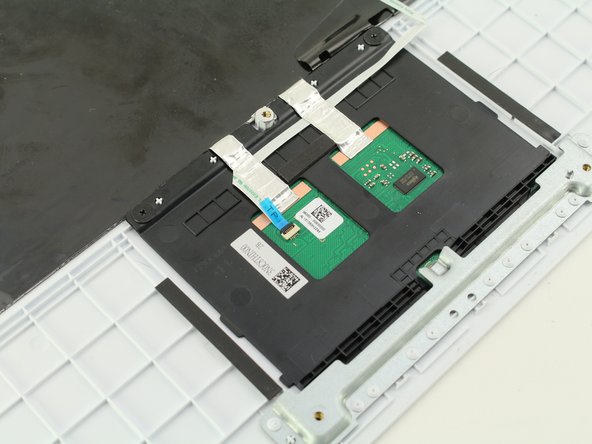
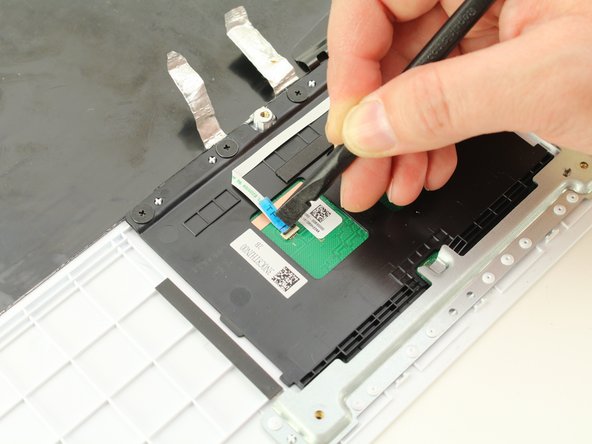
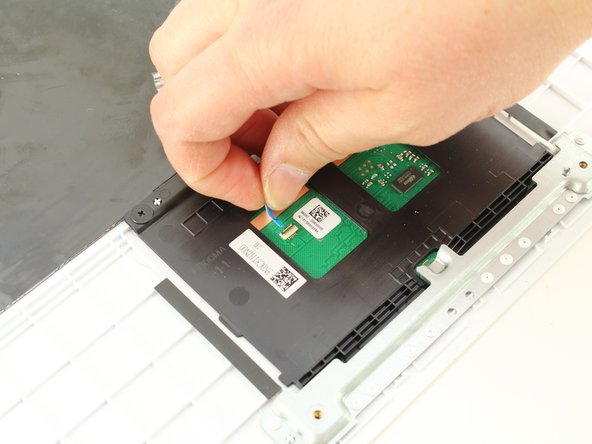
주요 콘텐츠로 건너뛰기

Asus Chromebook C300SA-DS02 Trackpad Replacement

필요한 것

  1. Asus Chromebook C300SA-DS02 Trackpad Replacement, Keyboard: 1 단계, 이미지 1/2 Asus Chromebook C300SA-DS02 Trackpad Replacement, Keyboard: 1 단계, 이미지 2/2
    • Power the laptop off and make sure the charger is unplugged before starting.

    • Remove the eight 8.0mm Phillips #0 screws on the bottom of the laptop.

    • Remove the three 6.0mm Phillips #0 screws.

  2. Asus Chromebook C300SA-DS02 Trackpad Replacement: 2 단계, 이미지 1/3 Asus Chromebook C300SA-DS02 Trackpad Replacement: 2 단계, 이미지 2/3 Asus Chromebook C300SA-DS02 Trackpad Replacement: 2 단계, 이미지 3/3
    • Open the laptop.

    • Using an iFixit opening tool, pry along the edges of the keyboard.

    • Lift the keyboard and slide it gently towards you.

    • Do not completely remove the keyboard. It is still connected to the back panel by a pair of ribbon cables.

  3. Asus Chromebook C300SA-DS02 Trackpad Replacement: 3 단계, 이미지 1/3 Asus Chromebook C300SA-DS02 Trackpad Replacement: 3 단계, 이미지 2/3 Asus Chromebook C300SA-DS02 Trackpad Replacement: 3 단계, 이미지 3/3
    • Disconnect the two ZIF connectors by prying up the locking bar with a spudger and removing the ribbon cable.

  4. Asus Chromebook C300SA-DS02 Trackpad Replacement: 4 단계, 이미지 1/1
    • Remove the keyboard from the laptop.

  5. Asus Chromebook C300SA-DS02 Trackpad Replacement, Trackpad: 5 단계, 이미지 1/2 Asus Chromebook C300SA-DS02 Trackpad Replacement, Trackpad: 5 단계, 이미지 2/2
    • Flip over the keyboard assembly to reveal the trackpad beneath.

  6. Asus Chromebook C300SA-DS02 Trackpad Replacement: 6 단계, 이미지 1/2 Asus Chromebook C300SA-DS02 Trackpad Replacement: 6 단계, 이미지 2/2
    • Peel up the two pieces of foil tape holding down the trackpad.

  7. Asus Chromebook C300SA-DS02 Trackpad Replacement: 7 단계, 이미지 1/3 Asus Chromebook C300SA-DS02 Trackpad Replacement: 7 단계, 이미지 2/3 Asus Chromebook C300SA-DS02 Trackpad Replacement: 7 단계, 이미지 3/3
    • Use a spudger to release the locking bar of the ZIF connector near the center of the trackpad.

    • Slide the cable ribbon from the connector.

  8. Asus Chromebook C300SA-DS02 Trackpad Replacement: 8 단계, 이미지 1/1
    • Peel back the ribbon cable, which is adhered to the trackpad.

  9. Asus Chromebook C300SA-DS02 Trackpad Replacement: 9 단계, 이미지 1/3 Asus Chromebook C300SA-DS02 Trackpad Replacement: 9 단계, 이미지 2/3 Asus Chromebook C300SA-DS02 Trackpad Replacement: 9 단계, 이미지 3/3
    • Remove the four 2.5mm Phillips #0 screws along the top edge of the trackpad.

  10. Asus Chromebook C300SA-DS02 Trackpad Replacement: 10 단계, 이미지 1/2 Asus Chromebook C300SA-DS02 Trackpad Replacement: 10 단계, 이미지 2/2
    • Pry the trackpad from the top edge with a finger or spudger.

    • Lift the trackpad up and away from the keyboard assembly.

결론

To reassemble your device, follow these instructions in reverse order.

Austin Blakely

회원 가입일: 03/11/19

19,506 평판

안내서 53개 작성하였습니다

iFixit iFixit 회원

Staff

135 회원들

안내서 16,817개 작성하였습니다

댓글 0개

댓글 쓰기

조회 통계:

24 시간 전: 0

7일 전: 1

30일 전: 1

전체 시간: 179