주요 콘텐츠로 건너뛰기

Asus Eee PC 1000HA Screen Replacement

필요한 것

  1. Asus Eee PC 1000HA Screen Replacement, Screen: 1 단계, 이미지 1/2 Asus Eee PC 1000HA Screen Replacement, Screen: 1 단계, 이미지 2/2
    • Remove the battery before working on your device. See this LINK for a step-by-step guide.

    • Use the metal tweezers to remove all of the rubber pads from the face of the lap top.

    • Removing the rubber pads will reveal 6 screws.

  2. Asus Eee PC 1000HA Screen Replacement: 2 단계, 이미지 1/1
    • Use a #00 Phillips Head screw driver to remove the 4.8mm screws.

    • There will be 6 screws total.

  3. Asus Eee PC 1000HA Screen Replacement: 3 단계, 이미지 1/2 Asus Eee PC 1000HA Screen Replacement: 3 단계, 이미지 2/2
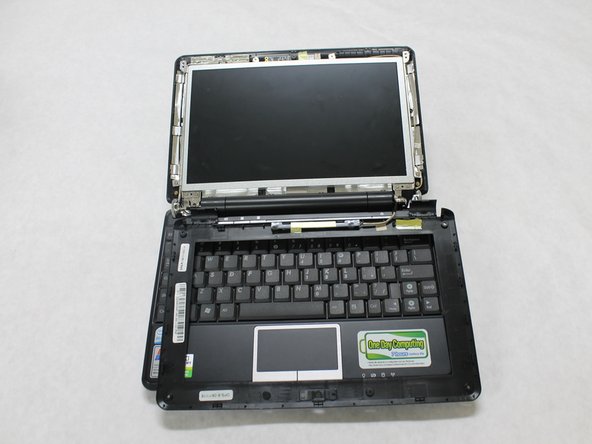
    • Use the metal spudger to pry off the outside frame of the screen.

  4. Asus Eee PC 1000HA Screen Replacement: 4 단계, 이미지 1/1
    • Use the #00 Phillips Head screw driver to remove the 5.44mm screws.

    • There are 6 screws total.

  5. Asus Eee PC 1000HA Screen Replacement: 5 단계, 이미지 1/3 Asus Eee PC 1000HA Screen Replacement: 5 단계, 이미지 2/3 Asus Eee PC 1000HA Screen Replacement: 5 단계, 이미지 3/3
    • Use the metal spudger to gently remove the screen from the laptop.

  6. Asus Eee PC 1000HA Screen Replacement: 6 단계, 이미지 1/3 Asus Eee PC 1000HA Screen Replacement: 6 단계, 이미지 2/3 Asus Eee PC 1000HA Screen Replacement: 6 단계, 이미지 3/3
    • Gently pull the tab that is connecting the laptop to the screen, to fully disconnect the screen from the laptop.

결론

To reassemble your device, follow these instructions in reverse order.

다른 한 분이 해당 안내서를 완성하였습니다.

Ashlee Stickle

회원 가입일: 10/13/15

675 평판

안내서 5개 작성하였습니다

Sam Houston State, Team 1-1, Blackburne Fall 2015 Sam Houston State, Team 1-1, Blackburne Fall 2015 회원

SHSU-BLACKBURNE-F15S1G1

3 회원들

안내서 10개 작성하였습니다

댓글 한 개

Merci beaucoup ! Great tutorial.

Joffrey Abeilard - 답글

댓글 쓰기

조회 통계:

24 시간 전: 1

7일 전: 9

30일 전: 20

전체 시간: 1,176