주요 콘텐츠로 건너뛰기

Asus Eee PC 1005HA SD Card Reader Replacement

필요한 것

  1. Asus Eee PC 1005HA SD Card Reader Replacement, Bluetooth Module: 1 단계, 이미지 1/2 Asus Eee PC 1005HA SD Card Reader Replacement, Bluetooth Module: 1 단계, 이미지 2/2
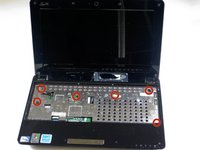
    • Flip the laptop over.

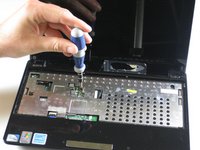
    • Using a Phillips #1 screwdriver, remove the five 5.65 mm screws.

    • The screw that holds the RAM compartment cover may be permanently connected. This screw is the center most screw of the five.

    • Be sure to have a designated place to hold the different sized screws removed in this guide.

  2. Asus Eee PC 1005HA SD Card Reader Replacement: 2 단계, 이미지 1/3 Asus Eee PC 1005HA SD Card Reader Replacement: 2 단계, 이미지 2/3 Asus Eee PC 1005HA SD Card Reader Replacement: 2 단계, 이미지 3/3
    • Remove the lid to the RAM compartment, if possible.

    • To remove the RAM, depress the tabs that are holding it in. These tabs are bound in red in the picture.

    • Use a spudger to unclip the edges of the cover if necessary.

    • The battery is shown still attached in the picture, but it should be removed prior to beginning this guide.

  3. Asus Eee PC 1005HA SD Card Reader Replacement: 3 단계, 이미지 1/1
    • Use a Phillips #1 screwdriver to remove one 6.5 mm screw located next to the RAM.

  4. Asus Eee PC 1005HA SD Card Reader Replacement: 4 단계, 이미지 1/2 Asus Eee PC 1005HA SD Card Reader Replacement: 4 단계, 이미지 2/2
    • Flip the laptop back over, and open the display.

    • Use a Phillips #1 screwdriver to remove the six 5.5 mm screws on the inside covering.

  5. Asus Eee PC 1005HA SD Card Reader Replacement: 5 단계, 이미지 1/2 Asus Eee PC 1005HA SD Card Reader Replacement: 5 단계, 이미지 2/2
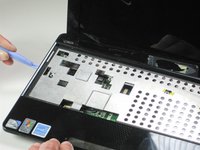
    • Detach the five plastic clips holding the upper and lower halves of the laptop together. These can be undone by carefully running a plastic opening tool between the top and bottom casing. There will be an audible audible "click" as the clips come undone.

    • The top plastic is fragile. There are also two miniature LEDs exposed along the top edge of the bottom casing at the bottom right that are easily damaged.

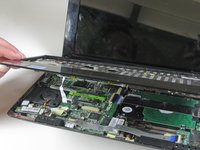
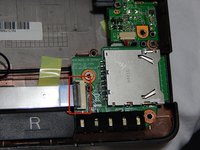
    • Once the five clips have been undone, carefully remove the upper half of the laptop.

  6. Asus Eee PC 1005HA SD Card Reader Replacement: 6 단계, 이미지 1/1
    • Detach the track pad ribbon by using a plastic opening tool to raise up the black pad.

  7. Asus Eee PC 1005HA SD Card Reader Replacement: 7 단계, 이미지 1/2 Asus Eee PC 1005HA SD Card Reader Replacement: 7 단계, 이미지 2/2
    • Detach the Bluetooth wire located below the fan by gently pulling it upward.

  8. Asus Eee PC 1005HA SD Card Reader Replacement, SD Card Reader: 8 단계, 이미지 1/2 Asus Eee PC 1005HA SD Card Reader Replacement, SD Card Reader: 8 단계, 이미지 2/2
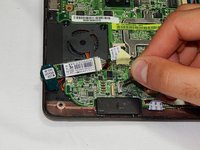
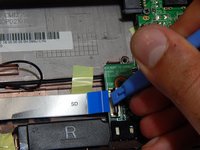
    • Detach the ribbon cable that connects the SD card module and the motherboard by lifting the black clips using the plastic opening tool.

  9. Asus Eee PC 1005HA SD Card Reader Replacement: 9 단계, 이미지 1/1
    • Remove the two screws holding the SD card panel in place.

  10. Asus Eee PC 1005HA SD Card Reader Replacement: 10 단계, 이미지 1/1
    • Gently lift up the SD card reader from its housing.

결론

To reassemble your device, follow these instructions in reverse order.

Maged Hanna

회원 가입일: 03/13/14

666 평판

안내서 4개 작성하였습니다

University of Maryland, Team 3-4, Calaway Spring 2014 University of Maryland, Team 3-4, Calaway Spring 2014 회원

UMD-CALAWAY-S14S3G4

1 회원

안내서 8개 작성하였습니다

댓글 0개

댓글 쓰기

조회 통계:

24 시간 전: 0

7일 전: 4

30일 전: 11

전체 시간: 3,133