이 버전에는 잘못된 편집 사항이 있을 수 있습니다. 최신 확인된 스냅샷으로 전환하십시오.
필요한 것
-
이 단계는 번역되지 않았습니다. 번역을 도와주십시오
-
Using the plastic opening tool, carefully pry the top panel from the base.
-
-
이 단계는 번역되지 않았습니다. 번역을 도와주십시오
-
Lift the side of the keyboard.
-
Disconnect the attached ribbon located underneath the keyboard.
-
Place your index finger in the hole on the right side of the keyboard tray and lift the tray.
-
-
이 단계는 번역되지 않았습니다. 번역을 도와주십시오
-
Use your fingers to lift the battery and gently disconnect the wires from the base.
-
-
-
이 단계는 번역되지 않았습니다. 번역을 도와주십시오
-
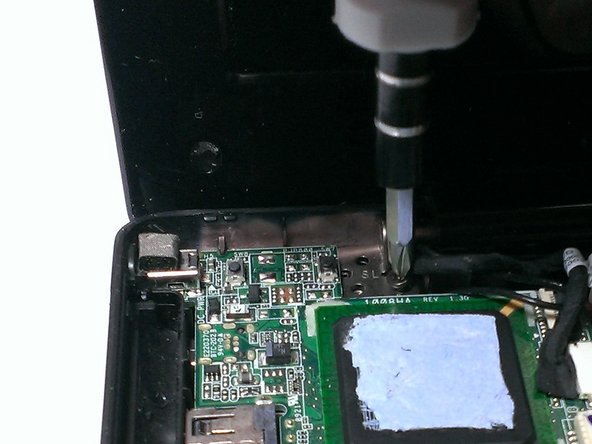
Using the Phillips #00 screwdriver, unscrew the 4mm screws from the rightmost circuit board.
-
Carefully pull the circuit board away from side of device base.
-
-
이 단계는 번역되지 않았습니다. 번역을 도와주십시오
-
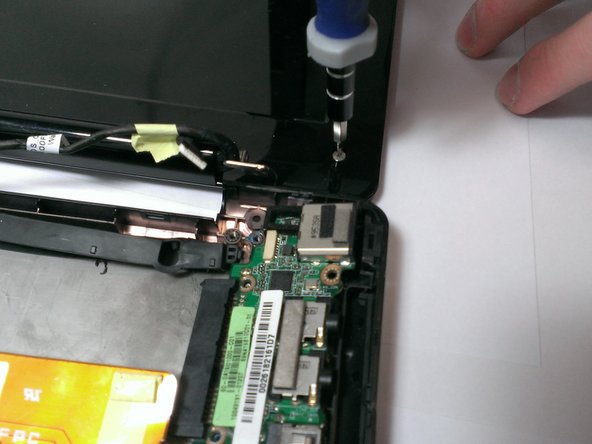
Using the Phillips #00 screwdriver, unscrew the 4mm screws attaching screen to base from both sides.
-
Gently lift the screen portion from the base.
-
-
이 단계는 번역되지 않았습니다. 번역을 도와주십시오
-
Using the Plastic Opening Tool, pry the six small chits from the face of the screen portion.
-
Using the Phillips #00 screwdriver, unscrew the two 2mm and four 4mm screws from underneath the chits.
-
-
이 단계는 번역되지 않았습니다. 번역을 도와주십시오
-
Slide the Plastic Opening Tool under the edge of the screen bezel to release the front panel of the screen.
-
-
이 단계는 번역되지 않았습니다. 번역을 도와주십시오
-
Using the Phillips #00 screwdriver, unscrew the 2mm screws from the perimeter of the screen.
-
Use your fingers to hold the screen and carefully lift it from the base.
-
-
이 단계는 번역되지 않았습니다. 번역을 도와주십시오
-
Use your fingers to peel back the adhesive tape located on the back of the screen.
-
Disconnect the wire from the screen.
-


다른 한 분이 해당 안내서를 완성하였습니다.
팀

Cal Poly, Team 21-52, Johann Spring 2013 Cal Poly, Team 21-52, Johann Spring 2013 회원
CPSU-JOHANN-S13S21G52
4 회원들
안내서 11개 작성하였습니다