주요 콘텐츠로 건너뛰기

Asus EeeBook X205TA LED Screen Panel Chip Replacement

필요한 것

  1. Asus EeeBook X205TA LED Screen Panel Chip Replacement, Battery: 1 단계, 이미지 1/2 Asus EeeBook X205TA LED Screen Panel Chip Replacement, Battery: 1 단계, 이미지 2/2
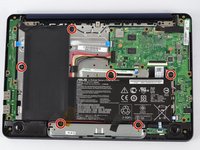
    • Unscrew all ten 2mm screws located on the bottom of the laptop using a Phillips #2 screwdriver.

  2. Asus EeeBook X205TA LED Screen Panel Chip Replacement: 2 단계, 이미지 1/1
    • Insert the plastic opening tool in the crevice between the back of the laptop and the rest of the case.

    • Carefully pry open the case from several points.

    • Slowly remove the back of the laptop, revealing the parts inside.

  3. Asus EeeBook X205TA LED Screen Panel Chip Replacement: 3 단계, 이미지 1/2 Asus EeeBook X205TA LED Screen Panel Chip Replacement: 3 단계, 이미지 2/2
    • Unscrew all six 2mm screws using Philips #2 screws along the edges of the L-Shaped battery.

    • Any tape or cords that run along the battery should be carefully pushed to the side.

  4. Asus EeeBook X205TA LED Screen Panel Chip Replacement: 4 단계, 이미지 1/1
    • Disconnect the battery from the motherboard by pulling the No-Fuss Ribbon cables out of the connector.

  5. Asus EeeBook X205TA LED Screen Panel Chip Replacement: 5 단계, 이미지 1/1
    • Carefully lift the battery out of the laptop.

  6. Asus EeeBook X205TA LED Screen Panel Chip Replacement, LED Screen Panel Chip: 6 단계, 이미지 1/1
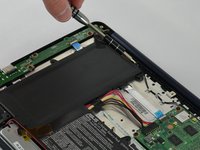
    • Locate and lift the tabs from the LED/motherboard ribbon cable.

    • Remove the cable.

  7. Asus EeeBook X205TA LED Screen Panel Chip Replacement: 7 단계, 이미지 1/1
    • Unscrew the 1 JIS 2mm screw with the J0 bit.

  8. Asus EeeBook X205TA LED Screen Panel Chip Replacement: 8 단계, 이미지 1/1
    • Remove the chip.

결론

To reassemble your device, follow these instructions in reverse order.

Rachael

회원 가입일: 03/20/17

125 평판

안내서 1개 작성함

IUPUI, Team S3-G4, Baechle Spring 2017 IUPUI, Team S3-G4, Baechle Spring 2017 회원

IUPUI-BAECHLE-S17S3G4

4 회원들

안내서 6개 작성하였습니다

댓글 0개

댓글 쓰기

조회 통계:

24 시간 전: 1

7일 전: 5

30일 전: 19

전체 시간: 1,168