주요 콘텐츠로 건너뛰기

Asus MeMO Pad 7 ME176C LCD Screen Assembly Replacement

필요한 것

  1. Asus MeMO Pad 7 ME176C LCD Screen Assembly Replacement, LCD Screen Assembly: 1 단계, 이미지 1/2 Asus MeMO Pad 7 ME176C LCD Screen Assembly Replacement, LCD Screen Assembly: 1 단계, 이미지 2/2
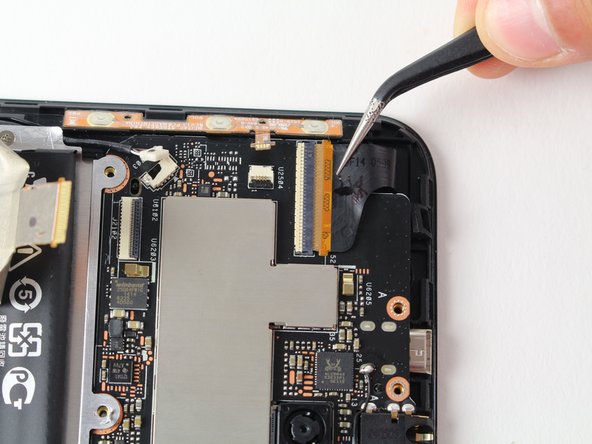
    • Insert plastic opening tool in between screen and back cover to create initial separation between the two.

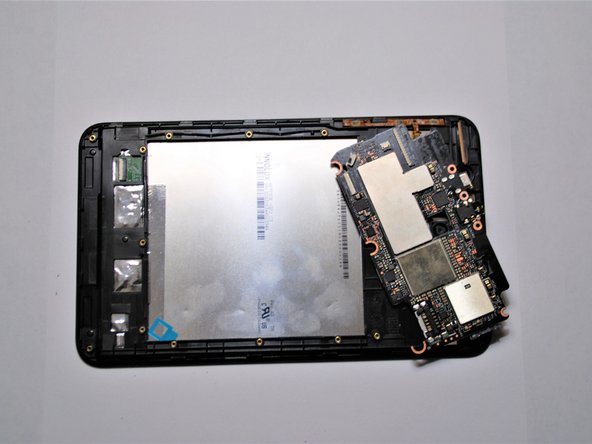
    • Then run plastic opening tool along end of screen to fully separate back cover from screen.

  2. Asus MeMO Pad 7 ME176C LCD Screen Assembly Replacement: 2 단계, 이미지 1/2 Asus MeMO Pad 7 ME176C LCD Screen Assembly Replacement: 2 단계, 이미지 2/2
    • Remove screws (2.6mm) connecting speaker to hard frame with Phillips head screw driver (PH000).

  3. Asus MeMO Pad 7 ME176C LCD Screen Assembly Replacement: 3 단계, 이미지 1/1
    • Disconnect speaker wire from motherboard using metal pronged tweezers.

  4. Asus MeMO Pad 7 ME176C LCD Screen Assembly Replacement: 4 단계, 이미지 1/1
    • Remove the screws (2.6mm) connecting the motherboard and battery tray to the hard frame with Phillip's head screw driver (PH000).

  5. Asus MeMO Pad 7 ME176C LCD Screen Assembly Replacement: 5 단계, 이미지 1/2 Asus MeMO Pad 7 ME176C LCD Screen Assembly Replacement: 5 단계, 이미지 2/2
    • Remove the black bundle battery connector from the motherboard using plastic opening tools.

  6. Asus MeMO Pad 7 ME176C LCD Screen Assembly Replacement: 6 단계, 이미지 1/2 Asus MeMO Pad 7 ME176C LCD Screen Assembly Replacement: 6 단계, 이미지 2/2
    • Use plastic opener tool to disconnect ZIF connectors as shown.

  7. Asus MeMO Pad 7 ME176C LCD Screen Assembly Replacement: 7 단계, 이미지 1/3 Asus MeMO Pad 7 ME176C LCD Screen Assembly Replacement: 7 단계, 이미지 2/3 Asus MeMO Pad 7 ME176C LCD Screen Assembly Replacement: 7 단계, 이미지 3/3
    • Remove speaker housing to expose ZIF connection underneath.

    • Then using metal tweezers disconnect the ZIF connector.

  8. Asus MeMO Pad 7 ME176C LCD Screen Assembly Replacement: 8 단계, 이미지 1/2 Asus MeMO Pad 7 ME176C LCD Screen Assembly Replacement: 8 단계, 이미지 2/2
    • Remove display and button connections from motherboard using metal tweezers.

  9. Asus MeMO Pad 7 ME176C LCD Screen Assembly Replacement: 9 단계, 이미지 1/2 Asus MeMO Pad 7 ME176C LCD Screen Assembly Replacement: 9 단계, 이미지 2/2
    • Remove unscrewed battery tray from main frame.

  10. Asus MeMO Pad 7 ME176C LCD Screen Assembly Replacement: 10 단계, 이미지 1/2 Asus MeMO Pad 7 ME176C LCD Screen Assembly Replacement: 10 단계, 이미지 2/2
    • Remove motherboard from hard frame.

    • When removing the motherboard make sure all screws that attach motherboard to hardframe are removed and to release plastic tab as shown in image.

  11. Asus MeMO Pad 7 ME176C LCD Screen Assembly Replacement: 11 단계, 이미지 1/2 Asus MeMO Pad 7 ME176C LCD Screen Assembly Replacement: 11 단계, 이미지 2/2
    • Peel off button sensors off the side of the hard frame.

  12. Asus MeMO Pad 7 ME176C LCD Screen Assembly Replacement: 12 단계, 이미지 1/3 Asus MeMO Pad 7 ME176C LCD Screen Assembly Replacement: 12 단계, 이미지 2/3 Asus MeMO Pad 7 ME176C LCD Screen Assembly Replacement: 12 단계, 이미지 3/3
    • Apply slight pressure on camera to break adhesive to finish screen disassembly processes.

결론

To reassemble your device, follow these instructions in reverse order.

Nejad Harara

회원 가입일: 09/26/17

110 평판

안내서 1개 작성함

Cal Poly, Team S6-G3, Banghart Fall 2017 Cal Poly, Team S6-G3, Banghart Fall 2017 회원

CPSU-BANGHART-F17S6G3

5 회원들

안내서 9개 작성하였습니다

댓글 0개

댓글 쓰기

조회 통계:

24 시간 전: 0

7일 전: 3

30일 전: 5

전체 시간: 1,679