주요 콘텐츠로 건너뛰기

Asus MeMo Pad 10 ME102A Battery Replacement

필요한 것

  1. Asus MeMo Pad 10 ME102A Battery Replacement, Back Panel: 1 단계, 이미지 1/1
    • Insert the blue plastic opening tool into the seam between the back panel and the chassis.

    • When removing the back panel, remember to keep the device face down on a flat surface in order to prevent dropping the device or anything inside of the device.

  2. Asus MeMo Pad 10 ME102A Battery Replacement: 2 단계, 이미지 1/1
    • Slide the plastic opener around the tablet. There will be spots of resistance. These should gently pop open as the tool slides through the seam.

  3. Asus MeMo Pad 10 ME102A Battery Replacement: 3 단계, 이미지 1/1
    • After all of the clips have been opened, the back panel should be free to remove by hand

  4. Asus MeMo Pad 10 ME102A Battery Replacement, Battery: 4 단계, 이미지 1/2 Asus MeMo Pad 10 ME102A Battery Replacement, Battery: 4 단계, 이미지 2/2
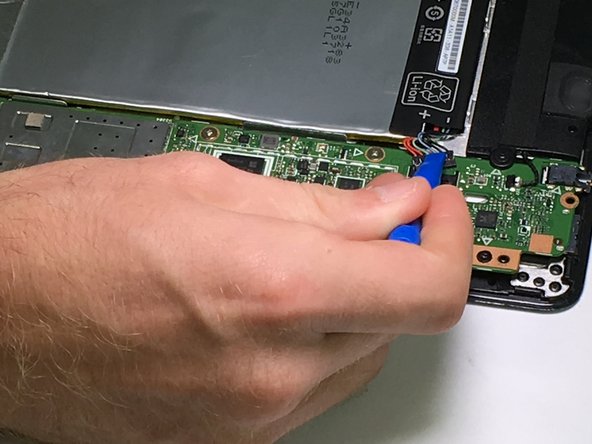
    • Unplug the blue ribbon cable which runs across the top of the battery near the left-hand speaker. It connects by plugging into a white and black plug on each side. To unplug the ribbon cable, gently pull up the black tabs with the small plastic opening tool.

  5. Asus MeMo Pad 10 ME102A Battery Replacement: 5 단계, 이미지 1/2 Asus MeMo Pad 10 ME102A Battery Replacement: 5 단계, 이미지 2/2
    • Unplug the battery cable located on the opposite side of the battery. Use the plastic opening tool to gently push it out of the socket on the motherboard.

  6. Asus MeMo Pad 10 ME102A Battery Replacement: 6 단계, 이미지 1/3 Asus MeMo Pad 10 ME102A Battery Replacement: 6 단계, 이미지 2/3 Asus MeMo Pad 10 ME102A Battery Replacement: 6 단계, 이미지 3/3
    • Separate the battery from the chassis by sliding the nylon spudger under the battery along the 3 glue strips. The glue needs to be gradually separated. The battery will lift free once the glue has been separated.

    • There are 3 glue strips holding the battery to the chassis: One under the blue ribbon cable, one under the center of the battery, and one under the battery by the plug.

    • While slight deformation is normal, do not overly bend the battery.

    • The glue needs to be gradually separated. Slow, persistent work with the spudger will be effective but can take an extended period of time.

결론

To reassemble your device, follow these instructions in reverse order.

다른 2명이 해당 안내서를 완성하였습니다.

Noah Peseckis

회원 가입일: 09/15/16

150 평판

안내서 1개 작성함

USF Tampa, Team 11-3, Blackwell Fall 2016 USF Tampa, Team 11-3, Blackwell Fall 2016 회원

USFT-BLACKWELL-F16S11G3

4 회원들

안내서 10개 작성하였습니다

댓글 0개

댓글 쓰기

조회 통계:

24 시간 전: 0

7일 전: 6

30일 전: 23

전체 시간: 5,257