주요 콘텐츠로 건너뛰기

Asus ROG G74SX-DH73-3D Disc/Optical Drive Replacement

필요한 것

  1. Asus ROG G74SX-DH73-3D Disc/Optical Drive Replacement, Disc/Optical Drive: 1 단계, 이미지 1/2 Asus ROG G74SX-DH73-3D Disc/Optical Drive Replacement, Disc/Optical Drive: 1 단계, 이미지 2/2
    • Place the device upside-down. Unscrew the screw at the top of the cover and remove the cover by using a plastic opening tool.

  2. Asus ROG G74SX-DH73-3D Disc/Optical Drive Replacement: 2 단계, 이미지 1/1
    • Remove the screw that is located on the right edge of the removed cover. The screw is in a small opening.

  3. Asus ROG G74SX-DH73-3D Disc/Optical Drive Replacement: 3 단계, 이미지 1/2 Asus ROG G74SX-DH73-3D Disc/Optical Drive Replacement: 3 단계, 이미지 2/2
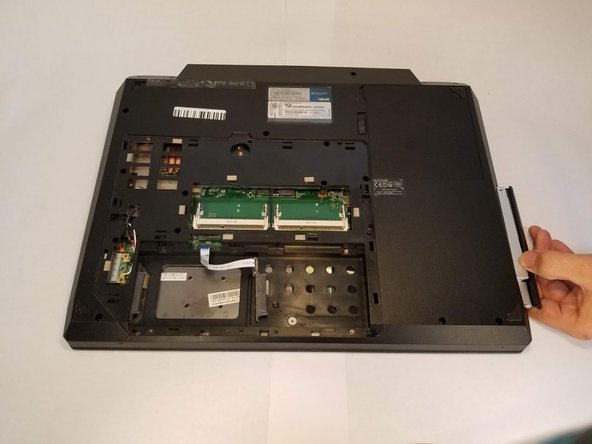
    • Inside the opening that the screw was in, use a nylon spudger or any thin tool to push against the inside edge of the disc/optical drive.

    • With the disc/optical drive slightly popped out of the socket, pull the rest of it out by hand.

결론

To reassemble your device, follow these instructions in reverse order.

Jackson Reynolds

회원 가입일: 09/18/18

346 평판

안내서 3개 작성하였습니다

University of North Texas, Team S3-G7, Raign Fall 2018 University of North Texas, Team S3-G7, Raign Fall 2018 회원

UNT-RAIGN-F18S3G7

3 회원들

안내서 4개 작성하였습니다

댓글 0개

댓글 쓰기

조회 통계:

24 시간 전: 1

7일 전: 2

30일 전: 3

전체 시간: 232