주요 콘텐츠로 건너뛰기

Asus ROG Laptop G752VL-DH71 RAM under keyboard Replacement

필요한 것

  1. Asus ROG Laptop G752VL-DH71 RAM under keyboard Replacement, Compartment cover removal: 1 단계, 이미지 1/1
    • Lift up rubber tab and unscrew screw, it will stay attached to cover.

    • Pull on tab to pull of cover.

  2. Asus ROG Laptop G752VL-DH71 RAM under keyboard Replacement, Back panel removal part 1, remove rubber plugs: 2 단계, 이미지 1/3 Asus ROG Laptop G752VL-DH71 RAM under keyboard Replacement, Back panel removal part 1, remove rubber plugs: 2 단계, 이미지 2/3 Asus ROG Laptop G752VL-DH71 RAM under keyboard Replacement, Back panel removal part 1, remove rubber plugs: 2 단계, 이미지 3/3
    • Remove 11 rubber plugs with small straight head screw driver.

    • I place all screws and plugs on a piece of tape sticky side up and label where they go.

  3. Asus ROG Laptop G752VL-DH71 RAM under keyboard Replacement, Back panel removal part 2, screw removal: 3 단계, 이미지 1/2 Asus ROG Laptop G752VL-DH71 RAM under keyboard Replacement, Back panel removal part 2, screw removal: 3 단계, 이미지 2/2
    • Remove 7, 1cm screws.

    • Remove 5, M2.5x6 screws.

  4. Asus ROG Laptop G752VL-DH71 RAM under keyboard Replacement, Back panel removal part 3, remove optical drive: 4 단계, 이미지 1/3 Asus ROG Laptop G752VL-DH71 RAM under keyboard Replacement, Back panel removal part 3, remove optical drive: 4 단계, 이미지 2/3 Asus ROG Laptop G752VL-DH71 RAM under keyboard Replacement, Back panel removal part 3, remove optical drive: 4 단계, 이미지 3/3
    • Remove 1, 1/6cm screw.

    • Pull out optical drive.

  5. Asus ROG Laptop G752VL-DH71 RAM under keyboard Replacement, Back panel removal part 4, screw removal: 5 단계, 이미지 1/2 Asus ROG Laptop G752VL-DH71 RAM under keyboard Replacement, Back panel removal part 4, screw removal: 5 단계, 이미지 2/2
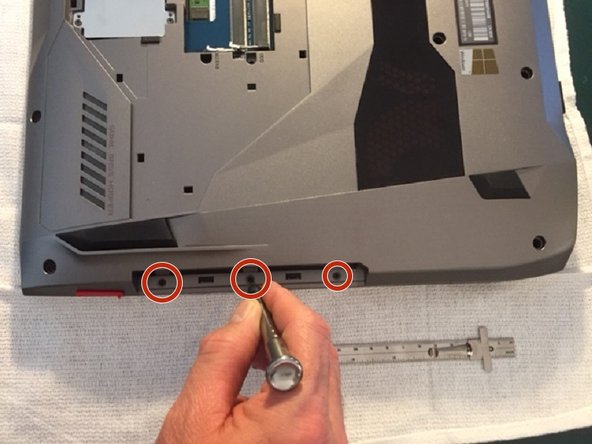
    • Remove 4, 1/4cm screws from bottom row.

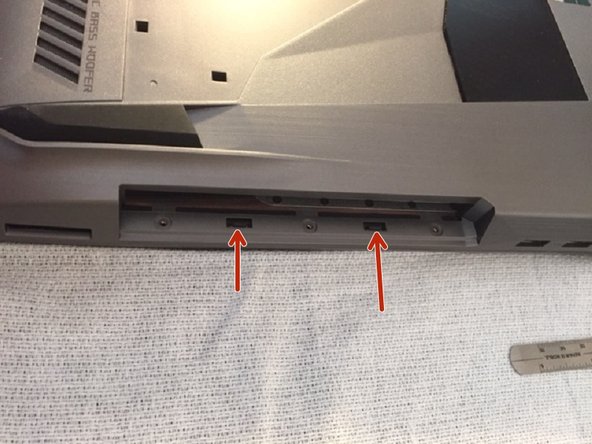
    • Remove 3, 1/3cm screws from under where you pulled out optical drive.

  6. Asus ROG Laptop G752VL-DH71 RAM under keyboard Replacement, Back panel removal part 5, prying front: 6 단계, 이미지 1/3 Asus ROG Laptop G752VL-DH71 RAM under keyboard Replacement, Back panel removal part 5, prying front: 6 단계, 이미지 2/3 Asus ROG Laptop G752VL-DH71 RAM under keyboard Replacement, Back panel removal part 5, prying front: 6 단계, 이미지 3/3
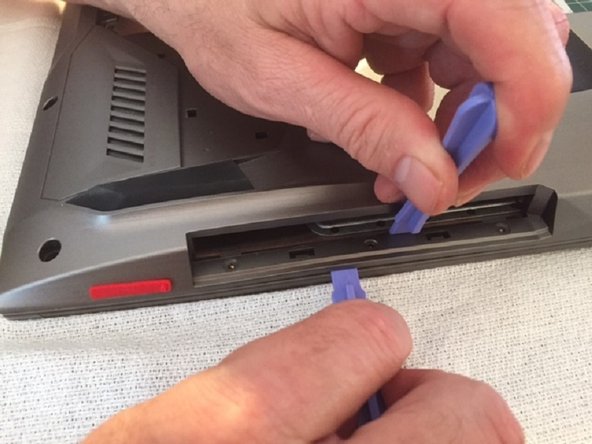
    • Start by using plastic tool by prying open the front center.

    • Stand it up if needed.

    • Work your way to the ends.

  7. Asus ROG Laptop G752VL-DH71 RAM under keyboard Replacement, Back panel removal part 6, side prying: 7 단계, 이미지 1/3 Asus ROG Laptop G752VL-DH71 RAM under keyboard Replacement, Back panel removal part 6, side prying: 7 단계, 이미지 2/3 Asus ROG Laptop G752VL-DH71 RAM under keyboard Replacement, Back panel removal part 6, side prying: 7 단계, 이미지 3/3
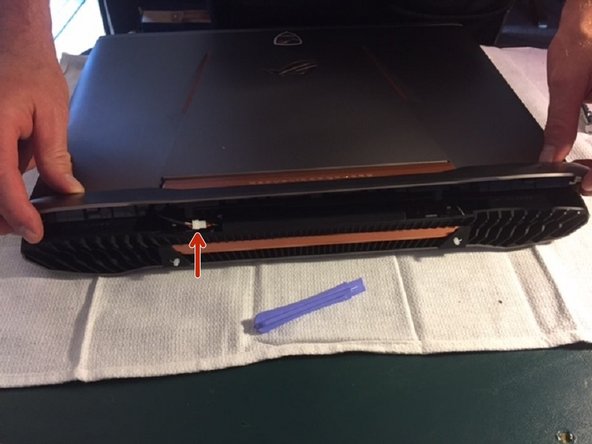
    • Start by prying the opposite side of the optical drive.

    • There are 2 small tabs that are locked where you pulled the optical drive out, you must unlock them.

    • Unlocking the 2 tabs using two plastic tools. Then continue prying open side.

  8. Asus ROG Laptop G752VL-DH71 RAM under keyboard Replacement, Hinge cover removal: 8 단계, 이미지 1/3 Asus ROG Laptop G752VL-DH71 RAM under keyboard Replacement, Hinge cover removal: 8 단계, 이미지 2/3 Asus ROG Laptop G752VL-DH71 RAM under keyboard Replacement, Hinge cover removal: 8 단계, 이미지 3/3
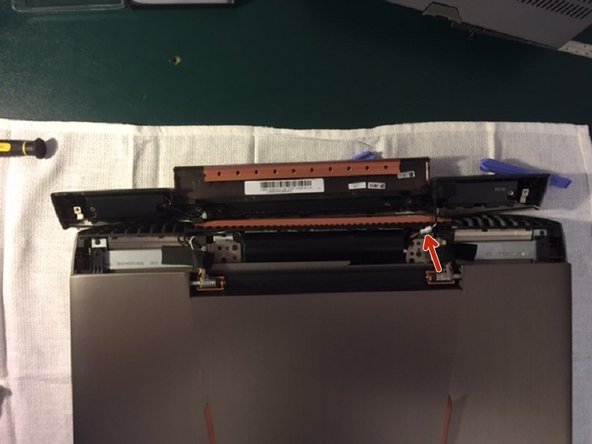
    • Pry open the hinge cover with plastic tool. Careful there is a speaker wire attached so open carefully.

    • Disconnect speaker wire.

  9. Asus ROG Laptop G752VL-DH71 RAM under keyboard Replacement, Keyboard removal: 9 단계, 이미지 1/3 Asus ROG Laptop G752VL-DH71 RAM under keyboard Replacement, Keyboard removal: 9 단계, 이미지 2/3 Asus ROG Laptop G752VL-DH71 RAM under keyboard Replacement, Keyboard removal: 9 단계, 이미지 3/3
    • Once hinge cover is removed and back panel has been pried then turn laptop over and open monitor to extend past 90*.

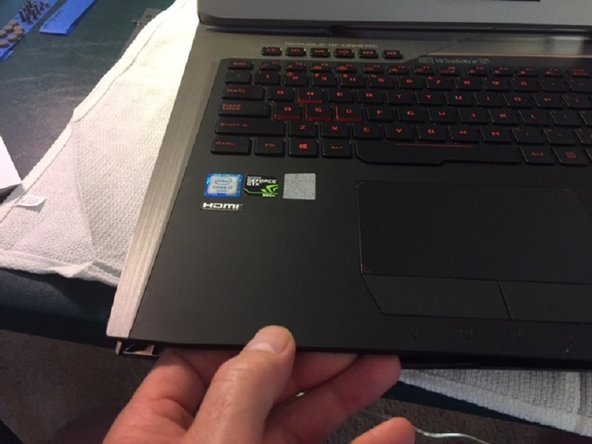
    • Lift up a little and pull keyboard out about an inch but no more because there are ribbon cables attached underneath .

  10. Asus ROG Laptop G752VL-DH71 RAM under keyboard Replacement, Cable detachment: 10 단계, 이미지 1/3 Asus ROG Laptop G752VL-DH71 RAM under keyboard Replacement, Cable detachment: 10 단계, 이미지 2/3 Asus ROG Laptop G752VL-DH71 RAM under keyboard Replacement, Cable detachment: 10 단계, 이미지 3/3
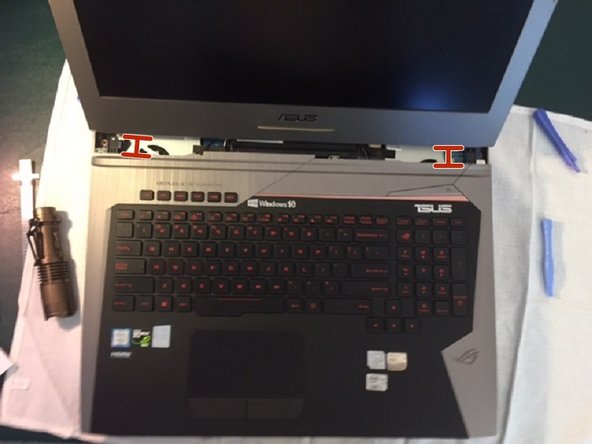
    • Slowly lift up keyboard to see the 4 ribbon cables and carefully pry up tabs where cables are connected.

  11. Asus ROG Laptop G752VL-DH71 RAM under keyboard Replacement, Battery wires disconnected: 11 단계, 이미지 1/1
    • Grab wires in middle and pull and wiggle gently to pull out wires from connection.

  12. Asus ROG Laptop G752VL-DH71 RAM under keyboard Replacement, RAM removal: 12 단계, 이미지 1/3 Asus ROG Laptop G752VL-DH71 RAM under keyboard Replacement, RAM removal: 12 단계, 이미지 2/3 Asus ROG Laptop G752VL-DH71 RAM under keyboard Replacement, RAM removal: 12 단계, 이미지 3/3
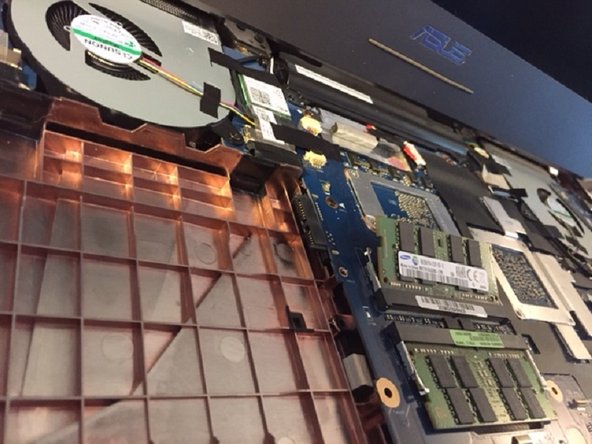
    • Notice to tabs on each side of RAM, pry them to the side.

    • When both tabs are pried to the side the RAM should pop up.

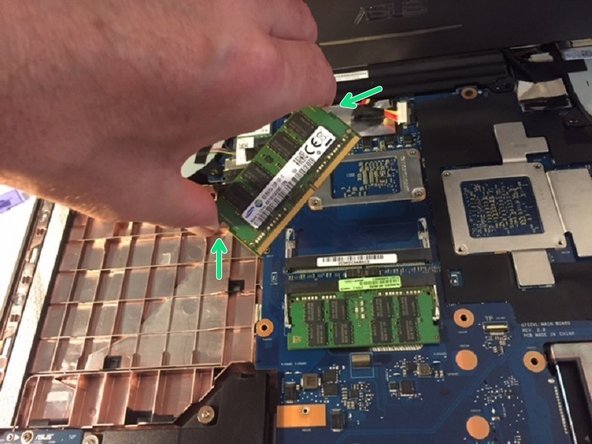
    • By grabbing the RAM on the sides, remove RAM.

결론

To reassemble your device, follow these instructions in reverse order.

다른 8명이 해당 안내서를 완성하였습니다.

Corbin Schon

회원 가입일: 01/26/16

593 평판

안내서 2개 작성하였습니다

댓글 3개

Thanks for this guide! I purchased some RAM and an SSD and wanted to upgrade my laptop. The instructions were clear, and I was able to follow along to max out my laptop’s RAM at 64GB. All I needed was a size #0 phillips head, and a couple of spudgers.

Menelik Seth - 답글

I’m glad it could help!

Thanks for the feedback.

Corbin Schon -

any suggestion on cable removal wish I could get a picture to enlarge seems to be the only worry area for me

any instructions on how to remove the cable I see what look like tabs or is there some kind of release

joe kamer - 답글

댓글 쓰기

조회 통계:

24 시간 전: 0

7일 전: 3

30일 전: 9

전체 시간: 3,528