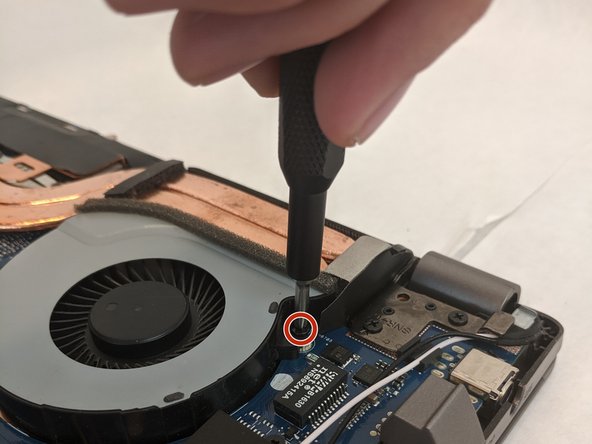
주요 콘텐츠로 건너뛰기

Asus ROG Strix GL702VS Fan Replacement

필요한 것

  1. Asus ROG Strix GL702VS Fan Replacement, Back Cover: 1 단계, 이미지 1/1
    • Flip the computer so the bottom of the laptop is facing up.

  2. Asus ROG Strix GL702VS Fan Replacement: 2 단계, 이미지 1/1
    • Remove the ten JIS #0 screws around the edge of the laptop.

    • The two bottom screws are slightly shorter

  3. Asus ROG Strix GL702VS Fan Replacement: 3 단계, 이미지 1/2 Asus ROG Strix GL702VS Fan Replacement: 3 단계, 이미지 2/2
    • Use a Jimmy to carefully free each side of the bottom casing.

  4. Asus ROG Strix GL702VS Fan Replacement: 4 단계, 이미지 1/1
    • Lift up the back casing from the computer.

    • You may hear clicking or snapping sounds. This is just the plastic clips coming loose.

  5. Asus ROG Strix GL702VS Fan Replacement, Cooling Fans: 5 단계, 이미지 1/3 Asus ROG Strix GL702VS Fan Replacement, Cooling Fans: 5 단계, 이미지 2/3 Asus ROG Strix GL702VS Fan Replacement, Cooling Fans: 5 단계, 이미지 3/3
    • Remove the four 4.8mm JIS #0 screws (two on each fan).

  6. Asus ROG Strix GL702VS Fan Replacement: 6 단계, 이미지 1/3 Asus ROG Strix GL702VS Fan Replacement: 6 단계, 이미지 2/3 Asus ROG Strix GL702VS Fan Replacement: 6 단계, 이미지 3/3
    • Remove the fan's connector on the motherboard using a pair of tweezers.

    • Be gentle, as the small clips and wires can be easily damaged.

  7. Asus ROG Strix GL702VS Fan Replacement: 7 단계, 이미지 1/2 Asus ROG Strix GL702VS Fan Replacement: 7 단계, 이미지 2/2
    • Gently lift each fan up and out of position.

결론

To reassemble your device, follow these instructions in reverse order.


다른 한 분이 해당 안내서를 완성하였습니다.

Conor H Allen

회원 가입일: 09/16/19

622 평판

안내서 5개 작성하였습니다

댓글 0개

댓글 쓰기

조회 통계:

24 시간 전: 0

7일 전: 1

30일 전: 18

전체 시간: 2,817