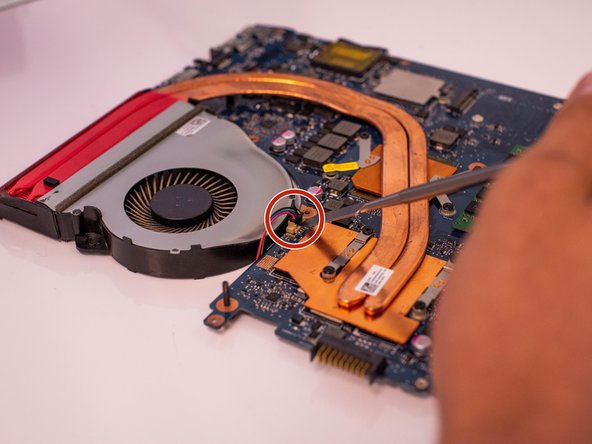
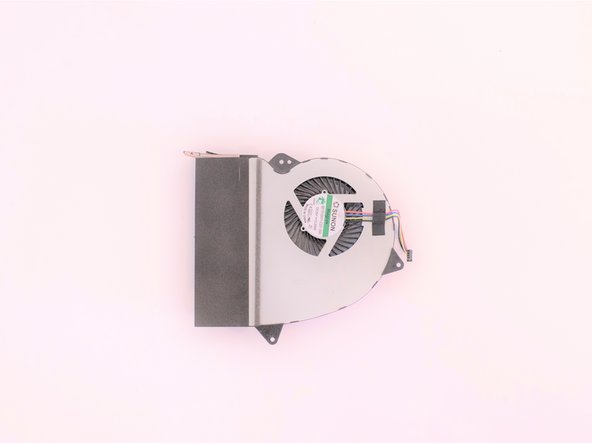
주요 콘텐츠로 건너뛰기

Asus ROG ZX50VW-BH17N10 Fan Replacement

필요한 것

  1. Asus ROG ZX50VW-BH17N10 Fan Replacement, Fan: 1 단계, 이미지 1/1
    • Remove the 1.6 mm and 9 mm screws from the back panel using the Phillips #1 screwdriver.

  2. Asus ROG ZX50VW-BH17N10 Fan Replacement: 2 단계, 이미지 1/3 Asus ROG ZX50VW-BH17N10 Fan Replacement: 2 단계, 이미지 2/3 Asus ROG ZX50VW-BH17N10 Fan Replacement: 2 단계, 이미지 3/3
    • Use the metal spudger to pry the back panel off.

  3. Asus ROG ZX50VW-BH17N10 Fan Replacement: 3 단계, 이미지 1/1
    • The following screws can be removed using the Phillips #1 screwdriver.

    • Remove the four 9 mm screws from the hard drive and use the black pull tab to remove it.

    • Remove the five 1.6 mm screws and three 9 mm screws from perimeter of the laptop's base.

    • Remove the 9 mm screw next to the RAM.

    • Flip the computer right-side up .

    • Caution when flipping the computer. Components may shift around and the hard drive will fall out if not removed prior to flipping.

  4. Asus ROG ZX50VW-BH17N10 Fan Replacement: 4 단계, 이미지 1/3 Asus ROG ZX50VW-BH17N10 Fan Replacement: 4 단계, 이미지 2/3 Asus ROG ZX50VW-BH17N10 Fan Replacement: 4 단계, 이미지 3/3
    • Gently pry the keyboard off being careful not to tug at any of the inner ribbons.

    • Keep the pry tool shallow. The ribbons are very fragile and can be severed easily.

    • Detach the three ribbons connecting the motherboard and the keyboard. Do this by flipping up the white latch and pulling the ribbon out. There should be one latch per ribbon.

  5. Asus ROG ZX50VW-BH17N10 Fan Replacement: 5 단계, 이미지 1/1
    • Gently remove the the keyboard.

    • Caution. There should be nothing attached to the keyboard at this point.

  6. Asus ROG ZX50VW-BH17N10 Fan Replacement: 6 단계, 이미지 1/3 Asus ROG ZX50VW-BH17N10 Fan Replacement: 6 단계, 이미지 2/3 Asus ROG ZX50VW-BH17N10 Fan Replacement: 6 단계, 이미지 3/3
    • Unscrew the three Phillips #1 screws from the motherboard.

  7. Asus ROG ZX50VW-BH17N10 Fan Replacement: 7 단계, 이미지 1/3 Asus ROG ZX50VW-BH17N10 Fan Replacement: 7 단계, 이미지 2/3 Asus ROG ZX50VW-BH17N10 Fan Replacement: 7 단계, 이미지 3/3
    이 단계에 사용된 도구:
    Tweezers
    $4.99
    구매
    • Detach the black and white plugs from the motherboard.

    • Remove the wireless AC chip from the motherboard using the tweezers.

    • Detach the last ribbon from the motherboard.

    • Using a metal spudger can severely damage the inner components of your device.

  8. Asus ROG ZX50VW-BH17N10 Fan Replacement: 8 단계, 이미지 1/1
    • Remove the three 7 mm screws attached to the fan using the Phillips #1 screwdriver.

  9. Asus ROG ZX50VW-BH17N10 Fan Replacement: 9 단계, 이미지 1/1
    • Take hold of the right side of the mother board and lift upwards.

    • At the same time, hold the fan in place as the motherboard is lifted upward.

    • Be sure that no other ribbons or wires are attached to the motherboard at this point.

  10. Asus ROG ZX50VW-BH17N10 Fan Replacement: 10 단계, 이미지 1/3 Asus ROG ZX50VW-BH17N10 Fan Replacement: 10 단계, 이미지 2/3 Asus ROG ZX50VW-BH17N10 Fan Replacement: 10 단계, 이미지 3/3
    • Carefully flip the motherboard over and place it down flat.

    • Detach the plug from the motherboard and remove the fan.

    • Using the metal spudger may severely damage the internal components of a device.

결론

To reassemble your device, follow these instructions in reverse order.

Naomi Rodriguez

회원 가입일: 09/17/19

747 평판

안내서 5개 작성하였습니다

댓글 0개

댓글 쓰기

조회 통계:

24 시간 전: 0

7일 전: 3

30일 전: 7

전체 시간: 335