필요한 것
-
-
Start by unscrewing the bottom case. There are two different size screws. One long one short.
-
The ones marked in red are the short ones. As for the ones in orange are the long ones.
-
-
-
Using a plastic spudger push back the retaining clasp for the battery plug. It is a sliding motion so push it to the right with the battery closest to you.
-
-
-
Marked in red and orange are the screws that hold on the cooler. They are all the same size but I would still keep track of if it was holding on a fan or a block.
-
Marked in yellow are the power and signal wires for the fans. Using a plastic spudger slowly walk the male plug out of its socket.
-
Using the same spudger's flat side pry around the two dies. The old thermal paste will fight back so take your time.
-
Carefully remove the display cable concealed with plastic on the leftmost side of the board - marked in blue.
-
Remove the wifi coax cables (black and white) concealed with plastic to the rightmost side of the board - marked in pink.
-
Only then the cooling unit can be freely removed.
-
-
-
-
You can see where the thermal paste was so make sure to apply it on the same surfaces.
-
I have marked two small parts that are easy to miss.
-
I used 70% rubbing alcohol, tissues, and the flat end of a spudger to remove the old paste.
-
I used a plastic spudger to spread the paste on the chips to make sure that it will make full contact.
-
-
-
Button up the device by placing and screwing on the bottom case.
-
The screws marked in orange are long. The ones marked in red are short.
-
-
-
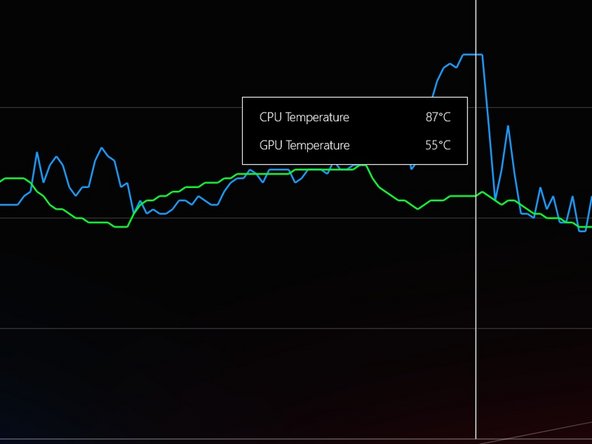
After new Thermal paste.
-
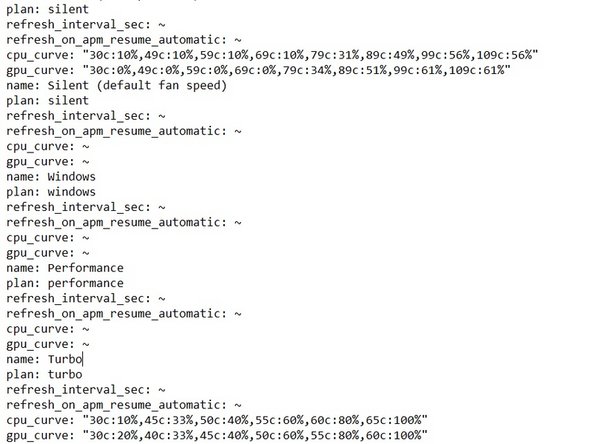
For the testing, I used 3D mark time spy without the demo. As well as a custom fan curve. The profile was set to turbo for both runs.
-


To reassemble your device, follow these instructions in reverse order.
To reassemble your device, follow these instructions in reverse order.
다른 12명이 해당 안내서를 완성하였습니다.
댓글 7개
Did you manage to get an answer to this? I didn't use metal tweezers but my laptop won't turn on and it's blinking as if it's trying to run but it can't!
Open up chips and look if there are cracks on chips, if there are, then you got a dead chip.
I followed this and even used ifixit tools and now my laptop won't boot. No bios, no charge light, no cpu light, no fans. I followed it exactly, grounded myself, didn't touch the motherboard, didn't even get up as to not accidentally generate static, worked on concrete and a wooden table, none of the connections are loose or damaged. It just won't turn on. What happened and how can I fix it?
I’d go in and check for any connections on the motherboard that you may have missed and also look out for any broken ones. Try reseating any connections such as the battery connector and display cable.