주요 콘텐츠로 건너뛰기

Asus ROG Zephyrus M15 GU502L Touchpad Replacement

필요한 것

  1. Asus ROG Zephyrus M15 GU502L Touchpad Replacement, Battery: 1 단계, 이미지 1/2 Asus ROG Zephyrus M15 GU502L Touchpad Replacement, Battery: 1 단계, 이미지 2/2
    • Remove fifteen 10 mm screws from the bottom cover using a Phillips #0 screwdriver.

  2. Asus ROG Zephyrus M15 GU502L Touchpad Replacement: 2 단계, 이미지 1/2 Asus ROG Zephyrus M15 GU502L Touchpad Replacement: 2 단계, 이미지 2/2
    • Use a plastic opening tool to separate the back cover from the laptop.

    • It is recommended that you separate the laptop cover from the side and run the tool along the edge of the cover to open it.

    • Be careful not to damage the cover when removing it from the laptop.

  3. Asus ROG Zephyrus M15 GU502L Touchpad Replacement: 3 단계, 이미지 1/1
    • Remove six 4.8 mm screws that secure the battery using a Phillips #00 screwdriver.

  4. Asus ROG Zephyrus M15 GU502L Touchpad Replacement: 4 단계, 이미지 1/2 Asus ROG Zephyrus M15 GU502L Touchpad Replacement: 4 단계, 이미지 2/2
    이 단계에 사용된 도구:
    Tweezers
    $4.99
    구매
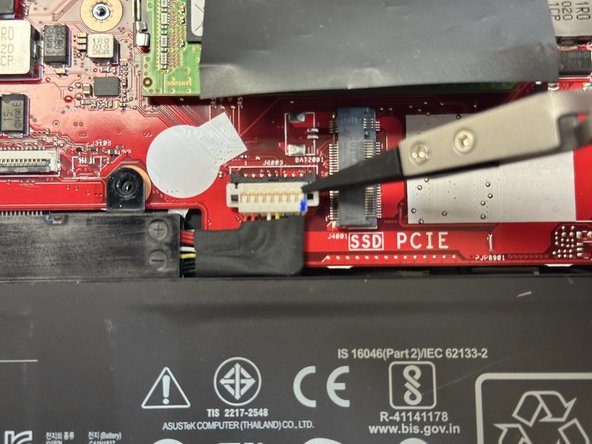
    • Disconnect the 8-pin battery that secures the battery to the motherboard.

    • Use the nylon tipped reverse tweezers to squeeze the edges, then pull out the connector.

  5. Asus ROG Zephyrus M15 GU502L Touchpad Replacement: 5 단계, 이미지 1/1
    • Remove the battery from the computer.

  6. Asus ROG Zephyrus M15 GU502L Touchpad Replacement, Touchpad: 6 단계, 이미지 1/1
    • Remove the 3mm screws that secure the touchpad using a Phillips #0 screwdriver.

  7. Asus ROG Zephyrus M15 GU502L Touchpad Replacement: 7 단계, 이미지 1/1
    • Remove the touch pad from the casing.

    • Be cautious picking up the touch pad as it is light.

결론

To reassemble your device, follow these instructions in reverse order.

Yahir Donis

회원 가입일: 09/07/23

339 평판

안내서 2개 작성하였습니다

Gateway, Team 69-69, Gonzalez Fall 2023 Gateway, Team 69-69, Gonzalez Fall 2023 회원

GCC-GONZALEZ-F23S69G69

4 회원들

안내서 4개 작성하였습니다

댓글 0개

댓글 쓰기

조회 통계:

24 시간 전: 2

7일 전: 6

30일 전: 17

전체 시간: 116