주요 콘텐츠로 건너뛰기

Asus TF300T Tablet Front Facing Camera Replacement

필요한 것

  1. Asus TF300T Tablet Front Facing Camera Replacement, Front Facing Camera: 1 단계, 이미지 1/2 Asus TF300T Tablet Front Facing Camera Replacement, Front Facing Camera: 1 단계, 이미지 2/2
    • Disconnect the dock and make sure the power is turned off.

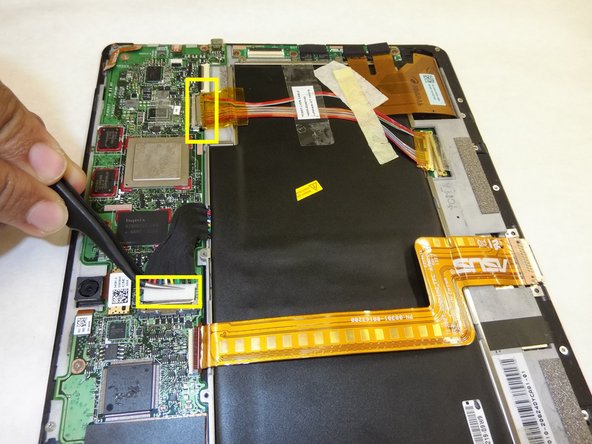
    • Use plastic opening tool to pry screen up and remove the main tablet body from outer rim casing.

    • Be gentle with the plastic opening tool near charging port. The thinner plastic may break easily.

  2. Asus TF300T Tablet Front Facing Camera Replacement: 2 단계, 이미지 1/3 Asus TF300T Tablet Front Facing Camera Replacement: 2 단계, 이미지 2/3 Asus TF300T Tablet Front Facing Camera Replacement: 2 단계, 이미지 3/3
    • Pull up on the black circuit board protector.

    • Turn off the hard power switch before working with the tablet. Use plastic tool to slide the switch to the position marked "off".

    • For most of the replacement operation, you do not have to remove the battery once you turned off the switch. Make sure that you do not short anything with the metal tools.

  3. Asus TF300T Tablet Front Facing Camera Replacement: 3 단계, 이미지 1/3 Asus TF300T Tablet Front Facing Camera Replacement: 3 단계, 이미지 2/3 Asus TF300T Tablet Front Facing Camera Replacement: 3 단계, 이미지 3/3
    • Use a Phillips #00 Screwdriver to remove the six 3mm screws that connect the upper part of the motherboard.

    • Use tweezers to remove red connecting wires. Remove the motherboard by lifting it upward.

  4. Asus TF300T Tablet Front Facing Camera Replacement: 4 단계, 이미지 1/1
    • Use tweezers to pull out the gold flap connected to the front camera.

    • Pull the disconnected gold flap to take out the camera.

결론

To reassemble your device, follow these instructions in reverse order.

Emma Sloan

회원 가입일: 05/17/17

101 평판

안내서 1개 작성함

IUPUI, Team S2-G2, Wilson Summer 2017 IUPUI, Team S2-G2, Wilson Summer 2017 회원

IUPUI-WILSON-SU17S2G2

3 회원들

안내서 8개 작성하였습니다

댓글 0개

댓글 쓰기

조회 통계:

24 시간 전: 0

7일 전: 0

30일 전: 1

전체 시간: 290