주요 콘텐츠로 건너뛰기

Asus Tablet MeMo Pad 7 ME7000C Rear Camera Replacement

필요한 것

  1. Asus Tablet MeMo Pad 7 ME7000C Rear Camera Replacement, Back Panel: 1 단계, 이미지 1/2 Asus Tablet MeMo Pad 7 ME7000C Rear Camera Replacement, Back Panel: 1 단계, 이미지 2/2
    • Flip over the tablet so the back cover is facing you. Hold the second button on the left below the volume buttons down until it powers off.

  2. Asus Tablet MeMo Pad 7 ME7000C Rear Camera Replacement: 2 단계, 이미지 1/3 Asus Tablet MeMo Pad 7 ME7000C Rear Camera Replacement: 2 단계, 이미지 2/3 Asus Tablet MeMo Pad 7 ME7000C Rear Camera Replacement: 2 단계, 이미지 3/3
    • Beginning in the upper corner of the tablet, use the blue plastic opening tool and run it along the seam. Do this slowly so you don't cause damage to the device.

    • If you are having trouble using the blue plastic opening tools, try using the black spudger instead.

  3. Asus Tablet MeMo Pad 7 ME7000C Rear Camera Replacement: 3 단계, 이미지 1/2 Asus Tablet MeMo Pad 7 ME7000C Rear Camera Replacement: 3 단계, 이미지 2/2
    • Pull the rear panel and the display screen away from each other.

  4. Asus Tablet MeMo Pad 7 ME7000C Rear Camera Replacement, Battery: 4 단계, 이미지 1/3 Asus Tablet MeMo Pad 7 ME7000C Rear Camera Replacement, Battery: 4 단계, 이미지 2/3 Asus Tablet MeMo Pad 7 ME7000C Rear Camera Replacement, Battery: 4 단계, 이미지 3/3
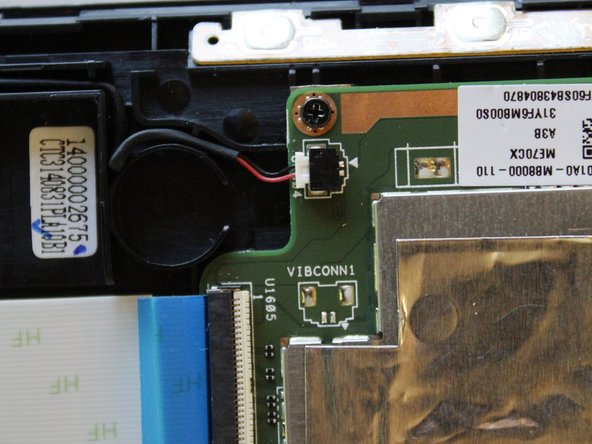
    • Using the spudger, gently press on the black button on the plug port to release the battery from the plug.

  5. Asus Tablet MeMo Pad 7 ME7000C Rear Camera Replacement: 5 단계, 이미지 1/2 Asus Tablet MeMo Pad 7 ME7000C Rear Camera Replacement: 5 단계, 이미지 2/2
    • Remove the battery from the device.

  6. Asus Tablet MeMo Pad 7 ME7000C Rear Camera Replacement, Speaker: 6 단계, 이미지 1/2 Asus Tablet MeMo Pad 7 ME7000C Rear Camera Replacement, Speaker: 6 단계, 이미지 2/2
    • Using the tweezers, disconnect the black clip.

  7. Asus Tablet MeMo Pad 7 ME7000C Rear Camera Replacement: 7 단계, 이미지 1/3 Asus Tablet MeMo Pad 7 ME7000C Rear Camera Replacement: 7 단계, 이미지 2/3 Asus Tablet MeMo Pad 7 ME7000C Rear Camera Replacement: 7 단계, 이미지 3/3
    • Use the Phillips #000 Screwdriver to unscrew the 3mm Phillips head screws on the right and left corners of the speaker.

    • Use the magnetic pad to keep track of your screws while working.

  8. Asus Tablet MeMo Pad 7 ME7000C Rear Camera Replacement: 8 단계, 이미지 1/1
    • Remove the speaker from the device.

  9. Asus Tablet MeMo Pad 7 ME7000C Rear Camera Replacement, Motherboard: 9 단계, 이미지 1/3 Asus Tablet MeMo Pad 7 ME7000C Rear Camera Replacement, Motherboard: 9 단계, 이미지 2/3 Asus Tablet MeMo Pad 7 ME7000C Rear Camera Replacement, Motherboard: 9 단계, 이미지 3/3
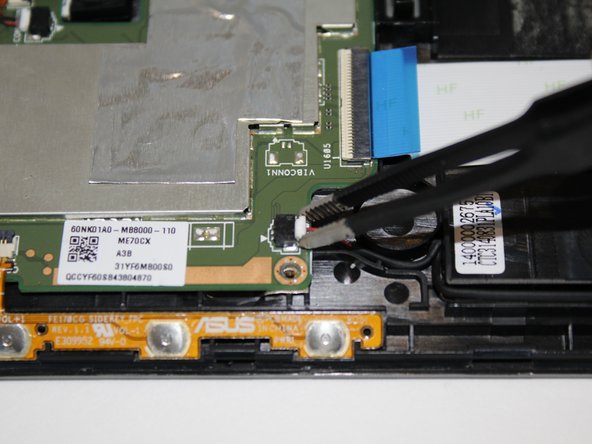
    • Gently unplug the microphone from the motherboard using a pair of blunt tweezers.

  10. Asus Tablet MeMo Pad 7 ME7000C Rear Camera Replacement: 10 단계, 이미지 1/3 Asus Tablet MeMo Pad 7 ME7000C Rear Camera Replacement: 10 단계, 이미지 2/3 Asus Tablet MeMo Pad 7 ME7000C Rear Camera Replacement: 10 단계, 이미지 3/3
    • Flip the cream tab above the blue ribbon up with the pair of tweezers to release the ribbon.

    • Using the blue tab, gently pull the ribbon away from the motherboard.

  11. Asus Tablet MeMo Pad 7 ME7000C Rear Camera Replacement: 11 단계, 이미지 1/3 Asus Tablet MeMo Pad 7 ME7000C Rear Camera Replacement: 11 단계, 이미지 2/3 Asus Tablet MeMo Pad 7 ME7000C Rear Camera Replacement: 11 단계, 이미지 3/3
    • Using the tweezers, flip back the black tab to release the volume ribbon.

    • Once released, gently pull ribbon away from motherboard using the tweezers.

  12. Asus Tablet MeMo Pad 7 ME7000C Rear Camera Replacement: 12 단계, 이미지 1/3 Asus Tablet MeMo Pad 7 ME7000C Rear Camera Replacement: 12 단계, 이미지 2/3 Asus Tablet MeMo Pad 7 ME7000C Rear Camera Replacement: 12 단계, 이미지 3/3
    • Pull back the silver adhesive with tweezers.

    • Gently use the tweezers to flip up the black release tabs on the gold ribbons.

  13. Asus Tablet MeMo Pad 7 ME7000C Rear Camera Replacement: 13 단계, 이미지 1/3 Asus Tablet MeMo Pad 7 ME7000C Rear Camera Replacement: 13 단계, 이미지 2/3 Asus Tablet MeMo Pad 7 ME7000C Rear Camera Replacement: 13 단계, 이미지 3/3
    • Once the black tabs are lifted, use the spudger to pull the gold tabs away from the motherboard.

  14. Asus Tablet MeMo Pad 7 ME7000C Rear Camera Replacement: 14 단계, 이미지 1/2 Asus Tablet MeMo Pad 7 ME7000C Rear Camera Replacement: 14 단계, 이미지 2/2
    • Using the Phillips #000 screwdriver unscrew the four 3mm screws.

    • Use the magnetic board to keep track of your screws.

  15. Asus Tablet MeMo Pad 7 ME7000C Rear Camera Replacement: 15 단계, 이미지 1/2 Asus Tablet MeMo Pad 7 ME7000C Rear Camera Replacement: 15 단계, 이미지 2/2
    • Hold both sides of the motherboard and gently lift up to remove the motherboard from the device.

    • If you feel tension or the motherboard is not coming off properly, make sure all the connections have been disconnected properly.

  16. Asus Tablet MeMo Pad 7 ME7000C Rear Camera Replacement, Rear Camera: 16 단계, 이미지 1/3 Asus Tablet MeMo Pad 7 ME7000C Rear Camera Replacement, Rear Camera: 16 단계, 이미지 2/3 Asus Tablet MeMo Pad 7 ME7000C Rear Camera Replacement, Rear Camera: 16 단계, 이미지 3/3
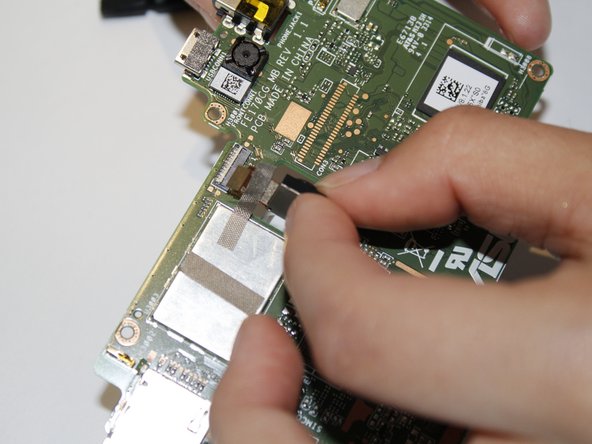
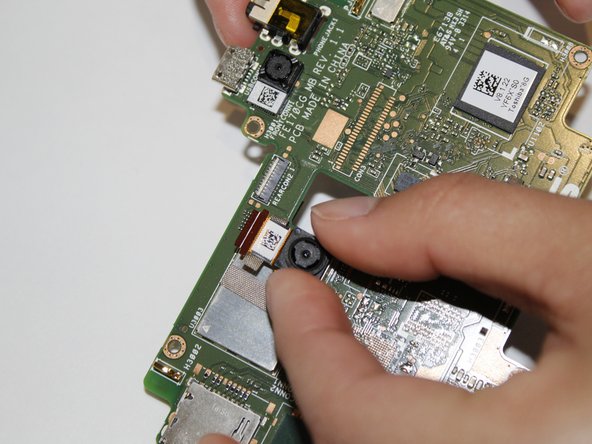
    • Using the tweezers flip the cream tab up to release the camera ribbon.

    • Gently lift the silver adhesive to remove the camera ribbon from motherboard.

    • Pull the silver tape away from camera.

  17. Asus Tablet MeMo Pad 7 ME7000C Rear Camera Replacement: 17 단계, 이미지 1/1
    • Make sure you leave the tape attached to the motherboard as you will need it to fix the new camera.

결론

To reassemble your device, follow these instructions in reverse order.

Katie

회원 가입일: 04/10/18

714 평판

안내서 6개 작성하였습니다

댓글 0개

댓글 쓰기

조회 통계:

24 시간 전: 2

7일 전: 5

30일 전: 7

전체 시간: 339