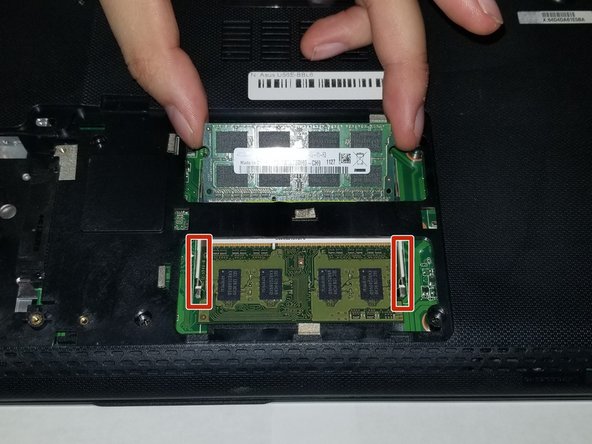
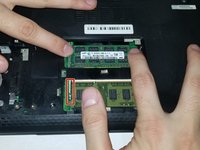
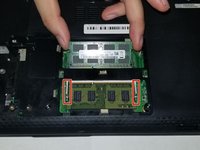
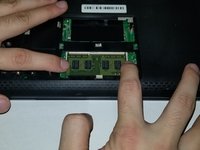
주요 콘텐츠로 건너뛰기

Asus U56E-BBL6 Keyboard Replacement

필요한 것

  1. Asus U56E-BBL6 Keyboard Replacement, Battery: 1 단계, 이미지 1/1
    • Make sure you unplugged the laptop before you begin the replacement process.

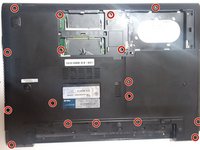
    • Locate the battery locking tabs on the upper right and left corner.

    • Press the tabs in towards each other.

  2. Asus U56E-BBL6 Keyboard Replacement: 2 단계, 이미지 1/1
    • Pull the battery outwards to remove it.

  3. Asus U56E-BBL6 Keyboard Replacement, Back Panel: 3 단계, 이미지 1/2 Asus U56E-BBL6 Keyboard Replacement, Back Panel: 3 단계, 이미지 2/2
    • Using a Phillips #00 screwdriver, remove the screws.

  4. Asus U56E-BBL6 Keyboard Replacement: 4 단계, 이미지 1/1
    • Lift backplate and remove from the case.

  5. Asus U56E-BBL6 Keyboard Replacement, RAM: 5 단계, 이미지 1/1
    • Once inside the panel, locate your RAM sticks.

  6. Asus U56E-BBL6 Keyboard Replacement: 6 단계, 이미지 1/2 Asus U56E-BBL6 Keyboard Replacement: 6 단계, 이미지 2/2
    • This device is embedded with two RAM sticks.

    • Push the metal brackets carefully to release and remove the RAM stick .

  7. Asus U56E-BBL6 Keyboard Replacement: 7 단계, 이미지 1/2 Asus U56E-BBL6 Keyboard Replacement: 7 단계, 이미지 2/2
    • Repeat the previous step for removing the other RAM stick.

  8. Asus U56E-BBL6 Keyboard Replacement, Keyboard: 8 단계, 이미지 1/1
    • Using a Phillips #00, remove the four screws.

  9. Asus U56E-BBL6 Keyboard Replacement: 9 단계, 이미지 1/2 Asus U56E-BBL6 Keyboard Replacement: 9 단계, 이미지 2/2
    • Using a Phillips #00 screwdriver, remove the screws.

  10. Asus U56E-BBL6 Keyboard Replacement: 10 단계, 이미지 1/1
    • Use a plastic opening tool around the entire edge.

    • Separate the case from the keyboard.

  11. Asus U56E-BBL6 Keyboard Replacement: 11 단계, 이미지 1/1
    • Ensure the laptop is face up for this step.

    • Gently lift the keyboard from the base of the laptop.

    • Be careful of the ribbon cables connecting the keyboard.

  12. Asus U56E-BBL6 Keyboard Replacement: 12 단계, 이미지 1/1
    • Gently tug the ribbon cables free from their slots.

  13. Asus U56E-BBL6 Keyboard Replacement: 13 단계, 이미지 1/2 Asus U56E-BBL6 Keyboard Replacement: 13 단계, 이미지 2/2
    • Using both hands, pull the keyboard back and out, fully separating the keyboard from the laptop.

결론

To reassemble your device, follow these instructions in reverse order.

Josiah Allard

회원 가입일: 10/26/18

733 평판

안내서 6개 작성하였습니다

UMass Dartmouth, Team S2-G8, Peak Fall 2018 UMass Dartmouth, Team S2-G8, Peak Fall 2018 회원

UMASSD-PEAK-F18S2G8

3 회원들

안내서 6개 작성하였습니다

댓글 2개

The Keyboard still has to be removed from the Top Case! Your not done yet!

philw395 - 답글

I removed the Keyboard from the Top Case and replaced the Keyboard. It wasn’t too bad with my Heat Gun and all-in-one painters tool…yes you heard right, my handy dandy painters tool that has served me well for years. Anyway, the only problem area taking the Keyboard out and snapping it back in (if you want to call it that) was by the DVD Player. Good Luck!

philw395 - 답글

댓글 쓰기

조회 통계:

24 시간 전: 1

7일 전: 3

30일 전: 10

전체 시간: 764