주요 콘텐츠로 건너뛰기

Asus VivoBook Q200E-BSI3T08 Trackpad Replacement

필요한 것

  1. Asus VivoBook Q200E-BSI3T08 Trackpad Replacement, Back Panel: 1 단계, 이미지 1/1
    • Turn off the computer and unplug the charge cable.

    • If the computer is on or plugged in, it could cause electric shock.

    • Turn the computer upside down.

  2. Asus VivoBook Q200E-BSI3T08 Trackpad Replacement: 2 단계, 이미지 1/1
    • Remove the nine Philips #00 screws holding the back panel in place (four 5.6mm, four 7.7mm, and one 9.2mm).

  3. Asus VivoBook Q200E-BSI3T08 Trackpad Replacement: 3 단계, 이미지 1/2 Asus VivoBook Q200E-BSI3T08 Trackpad Replacement: 3 단계, 이미지 2/2
    • Use a plastic opening tool to gently remove the back panel.

  4. Asus VivoBook Q200E-BSI3T08 Trackpad Replacement, Battery: 4 단계, 이미지 1/1
    • Remove the eight 4.7mm Philips #00 screws holding the battery in place.

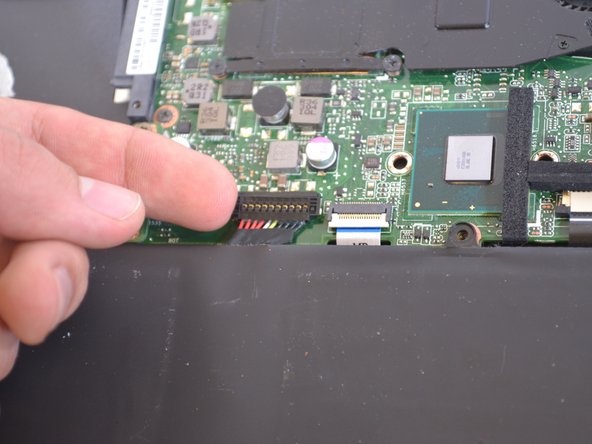
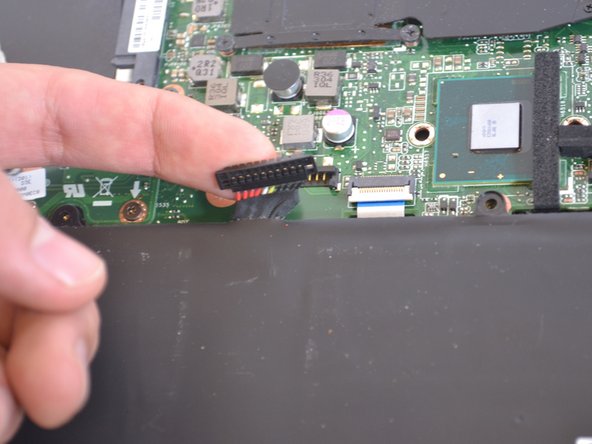
  5. Asus VivoBook Q200E-BSI3T08 Trackpad Replacement: 5 단계, 이미지 1/3 Asus VivoBook Q200E-BSI3T08 Trackpad Replacement: 5 단계, 이미지 2/3 Asus VivoBook Q200E-BSI3T08 Trackpad Replacement: 5 단계, 이미지 3/3
    • The battery is attached by a set of wires.

    • Use your finger to disconnect the set of wires. It should come off very easily.

  6. Asus VivoBook Q200E-BSI3T08 Trackpad Replacement: 6 단계, 이미지 1/2 Asus VivoBook Q200E-BSI3T08 Trackpad Replacement: 6 단계, 이미지 2/2
    • Now just lift the battery out of place.

  7. Asus VivoBook Q200E-BSI3T08 Trackpad Replacement, Trackpad: 7 단계, 이미지 1/1
    • Disconnect the small blue TP(trackpad) labeled data bus.

  8. Asus VivoBook Q200E-BSI3T08 Trackpad Replacement: 8 단계, 이미지 1/1
    • Identify the ten 2.94mm screws on the metal bracket.

  9. Asus VivoBook Q200E-BSI3T08 Trackpad Replacement: 9 단계, 이미지 1/1
    • Unscrew the ten 2.94mm screws with the Philips #00 Head.

  10. Asus VivoBook Q200E-BSI3T08 Trackpad Replacement: 10 단계, 이미지 1/1
    • Remove all of the metallic tape holding the metal bracket to the components surrounding it.

  11. Asus VivoBook Q200E-BSI3T08 Trackpad Replacement: 11 단계, 이미지 1/1
    • Lift the metal bracket away from the laptop.

  12. Asus VivoBook Q200E-BSI3T08 Trackpad Replacement: 12 단계, 이미지 1/1
    • Unscrew the four 3.5mm screws with Phillips #00 Head.

    • This black plastic panel holds the trackpad in place.

  13. Asus VivoBook Q200E-BSI3T08 Trackpad Replacement: 13 단계, 이미지 1/1
    • Lift the trackpad up from the laptop and slide it out of the housing.

결론

To reassemble your device, follow these instructions in reverse order.

Mitchell Jackson

회원 가입일: 05/17/17

742 평판

안내서 7개 작성하였습니다

IUPUI, Team S4-G4, Wilson Summer 2017 IUPUI, Team S4-G4, Wilson Summer 2017 회원

IUPUI-WILSON-SU17S4G4

4 회원들

안내서 7개 작성하였습니다

댓글 0개

댓글 쓰기

조회 통계:

24 시간 전: 0

7일 전: 3

30일 전: 12

전체 시간: 570