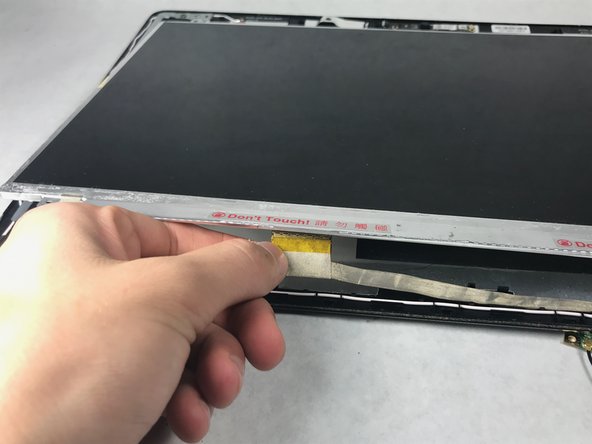
주요 콘텐츠로 건너뛰기

Asus X501A-RH31 LCD Replacement

필요한 것

  1. Asus X501A-RH31 LCD Replacement, Battery: 1 단계, 이미지 1/1
    • Turn the laptop over so that the back is facing upwards.

  2. Asus X501A-RH31 LCD Replacement: 2 단계, 이미지 1/1
    • To unlock the left tab, make sure the tab on the left has red showing.

  3. Asus X501A-RH31 LCD Replacement: 3 단계, 이미지 1/2 Asus X501A-RH31 LCD Replacement: 3 단계, 이미지 2/2
    • To unlock the right tab, push the right slider to the left with one hand.

    • Push the battery out with the other hand.

  4. Asus X501A-RH31 LCD Replacement, Keyboard: 4 단계, 이미지 1/2 Asus X501A-RH31 LCD Replacement, Keyboard: 4 단계, 이미지 2/2
    • Using the Phillips #00 screwdriver unscrew all nine screws from the bottom of the laptop, as well as the additional two screws inside the battery compartment.

    • Nine of the screws are 5 mm long, 4.5 mm in diameter, while two screws closest to the hinges are 7 mm long.

  5. Asus X501A-RH31 LCD Replacement: 5 단계, 이미지 1/1
    • Turn the laptop over and open the top so the keyboard is facing you.

  6. Asus X501A-RH31 LCD Replacement: 6 단계, 이미지 1/2 Asus X501A-RH31 LCD Replacement: 6 단계, 이미지 2/2
    • Pry off the keyboard cover on the edge using the plastic opening tool.

    • Start from one side. Once it is lose, carry out the same procedure on the front and other side.

    • Only do little sections at a time as the keyboard may break if you attempt to take the whole thing off from a single point.

  7. Asus X501A-RH31 LCD Replacement: 7 단계, 이미지 1/1
    • Slowly lift the keyboard upward, but do not remove completely.

    • Remove the two data cables that attach the keyboard to the motherboard.

  8. Asus X501A-RH31 LCD Replacement: 8 단계, 이미지 1/1
    이 단계에 사용된 도구:
    Tweezers
    $4.99
    구매
    • Use tweezers to pull the white plastic piece up that is attached to the data cable.

    • Repeat this process for the big black cable as well.

    • Use caution when unlatching the data cables from the motherboard. The cables are extremely delicate and can break.

  9. Asus X501A-RH31 LCD Replacement, Fan: 9 단계, 이미지 1/1
    • Unscrew the three screws using the Phillips #00 screwdriver.

    • The three screws are 5 mm in length, 4.2 mm in diameter.

  10. Asus X501A-RH31 LCD Replacement: 10 단계, 이미지 1/1
    • Unscrew the three screws on the left hand side of the big motherboard.

    • This will loosen the motherboard, which will allow for better access to the cables in the next step.

    • The three screws are 5 mm in length, 4.2 mm in diameter and Phillips head screws.

  11. Asus X501A-RH31 LCD Replacement: 11 단계, 이미지 1/3 Asus X501A-RH31 LCD Replacement: 11 단계, 이미지 2/3 Asus X501A-RH31 LCD Replacement: 11 단계, 이미지 3/3
    • Remove the connector cable attached to the bottom of the motherboard.

    • Take the black plastic spudger and press down on the lower half of the white plastic piece to remove the connector cable.

  12. Asus X501A-RH31 LCD Replacement, Motherboard: 12 단계, 이미지 1/2 Asus X501A-RH31 LCD Replacement, Motherboard: 12 단계, 이미지 2/2
    • Unscrew the six screws that hold the motherboard to the bottom of the laptop using a Phillips #00 screwdriver.

    • The six screws are 4.2 mm long, 5 mm in diameter.

  13. Asus X501A-RH31 LCD Replacement: 13 단계, 이미지 1/2 Asus X501A-RH31 LCD Replacement: 13 단계, 이미지 2/2
    이 단계에 사용된 도구:
    Tweezers
    $4.99
    구매
    • Unlatch the data cable by using tweezers to lift the white tab and release the cable.

  14. Asus X501A-RH31 LCD Replacement: 14 단계, 이미지 1/2 Asus X501A-RH31 LCD Replacement: 14 단계, 이미지 2/2
    • Remove the cable on the left side of the motherboard.

    • Use tweezers to pull the white tab up in order to release this cable.

  15. Asus X501A-RH31 LCD Replacement: 15 단계, 이미지 1/1
    • On the left side is a small piece of the motherboard. Unscrew the two screws holding this piece down with the Phillips #00 screwdriver.

    • The two screws are 6 mm long, 4.2 mm in diameter.

  16. Asus X501A-RH31 LCD Replacement: 16 단계, 이미지 1/3 Asus X501A-RH31 LCD Replacement: 16 단계, 이미지 2/3 Asus X501A-RH31 LCD Replacement: 16 단계, 이미지 3/3
    • Release the connector cable on the back right side of the motherboard.

    • Peel off the tape with tweezers so that the cable can be released.

    • Using the black plastic spudger, push the back half of the cable towards the screen.

  17. Asus X501A-RH31 LCD Replacement: 17 단계, 이미지 1/2 Asus X501A-RH31 LCD Replacement: 17 단계, 이미지 2/2
    • Grip the motherboard firmly and pull the board leftward and upwards so that the ports on the right side escape their frames.

  18. Asus X501A-RH31 LCD Replacement: 18 단계, 이미지 1/2 Asus X501A-RH31 LCD Replacement: 18 단계, 이미지 2/2
    • On the back of the motherboard there are two screws that attach the LCD connector to the motherboard.

    • Unscrew the two screws using the Phillips #00 screwdriver.

    • These screws are 3 mm in length, 3.5 mm in diameter.

    • Pull the connector downwards and out.

  19. Asus X501A-RH31 LCD Replacement, Hinges: 19 단계, 이미지 1/1
    • To detach the hinges, use the Phillips #00 screwdriver to unscrew the two top screws on both the left and right hinges.

    • The four screws are all the same. They are 6.2 mm in length, 4 mm in diameter.

  20. Asus X501A-RH31 LCD Replacement: 20 단계, 이미지 1/1
    • Once both sides of the laptop are unscrewed, gently pull the upper half of the laptop off of the bottom half.

  21. Asus X501A-RH31 LCD Replacement: 21 단계, 이미지 1/2 Asus X501A-RH31 LCD Replacement: 21 단계, 이미지 2/2
    • Use the black plastic spudger to pry off the black squares on the bottom of the laptop screen, this reveals two screws.

    • Take caution when removing these squares as they will bend and crease.

  22. Asus X501A-RH31 LCD Replacement: 22 단계, 이미지 1/1
    • Use the Phillips #00 screwdriver to unscrew the two screws at the bottom of the laptop screen.

    • The two screws are 6 mm long, 4mm in diameter.

  23. Asus X501A-RH31 LCD Replacement: 23 단계, 이미지 1/1
    • Place the black plastic spudger between the top cover of the screen and the bottom of the laptop frame that rests on the table.

    • Push down on the black plastic spudger to pry the top cover off the screen of the laptop.

    • The screen is fragile and too much pressure applied will damage the screen.

  24. Asus X501A-RH31 LCD Replacement: 24 단계, 이미지 1/1
    • At the bottom of the screen there are two screws on each hinge.

    • Unscrew the four screws using the Phillips #00 screwdriver.

    • The four screws are 3.5 mm long, 4.5 mm in diameter.

  25. Asus X501A-RH31 LCD Replacement: 25 단계, 이미지 1/2 Asus X501A-RH31 LCD Replacement: 25 단계, 이미지 2/2
    • At the top of the screen there are two screws on the left side and two screws on the right side of the laptop.

    • Using the Phillips head #00 screwdriver, unscrew the inside screw and then the outside screw.

    • All four screws are the same size. They are 4 mm in length, 4.2 mm in diameter.

  26. Asus X501A-RH31 LCD Replacement, LCD: 26 단계, 이미지 1/1
    • Lift the screen up off the back panel enough to have access to the LCD cable connector, but not all the way.

    • Pull the cable gently down and out of the connector to disconnect it.

결론

To reassemble your device, follow these instructions in reverse order.

다른 한 분이 해당 안내서를 완성하였습니다.

Romana Hruby

회원 가입일: 10/20/17

587 평판

안내서 5개 작성하였습니다

UMass Dartmouth, Team S3-G3, Bailey Fall 2017 UMass Dartmouth, Team S3-G3, Bailey Fall 2017 회원

UMASSD-BAILEY-F17S3G3

3 회원들

안내서 8개 작성하였습니다

댓글 한 개

Awesome write up. Thanks a bunch!

Couple amendments based off of my experience:

Step 12: There may be more screws on the far right side of the motherboard

Step 23: You have to split the plastic hinge protrusions to get the bezel off

Marius Lukosevicius - 답글

댓글 쓰기

조회 통계:

24 시간 전: 0

7일 전: 4

30일 전: 11

전체 시간: 723