주요 콘텐츠로 건너뛰기

Asus X751MA-DH01TQ Fan Replacement

필요한 것

  1. Asus X751MA-DH01TQ Fan Replacement, Fan: 1 단계, 이미지 1/2 Asus X751MA-DH01TQ Fan Replacement, Fan: 1 단계, 이미지 2/2
    • Turn the laptop upside down.

    • Remove all ten screws using a 00 Phillips head screwdriver.

  2. Asus X751MA-DH01TQ Fan Replacement: 2 단계, 이미지 1/1
    • Use a plastic opening tool to take the keyboard off of the base.

    • Gently take off the keyboard from the base.

  3. Asus X751MA-DH01TQ Fan Replacement: 3 단계, 이미지 1/2 Asus X751MA-DH01TQ Fan Replacement: 3 단계, 이미지 2/2
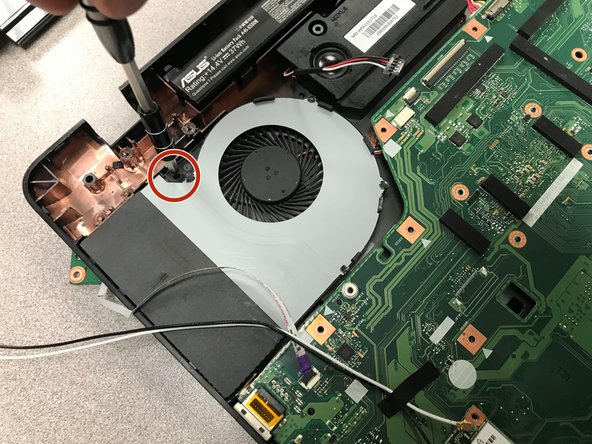
    • Remove the two screws directly above the fan.

  4. Asus X751MA-DH01TQ Fan Replacement: 4 단계, 이미지 1/2 Asus X751MA-DH01TQ Fan Replacement: 4 단계, 이미지 2/2
    • Unscrew the 11 screws that hold the motherboard to the base of the computer with a 00 Phillips screwdriver.

  5. Asus X751MA-DH01TQ Fan Replacement: 5 단계, 이미지 1/2 Asus X751MA-DH01TQ Fan Replacement: 5 단계, 이미지 2/2
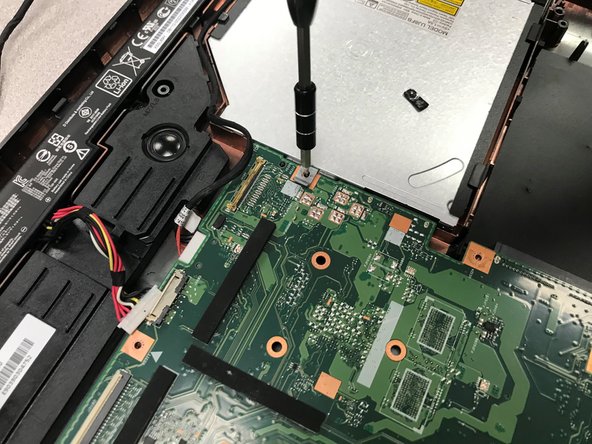
    • Remove the one screw on the right side of the motherboard that keeps the cd tray in place.

  6. Asus X751MA-DH01TQ Fan Replacement: 6 단계, 이미지 1/2 Asus X751MA-DH01TQ Fan Replacement: 6 단계, 이미지 2/2
    • Gently take the motherboard off the base and flip it over.

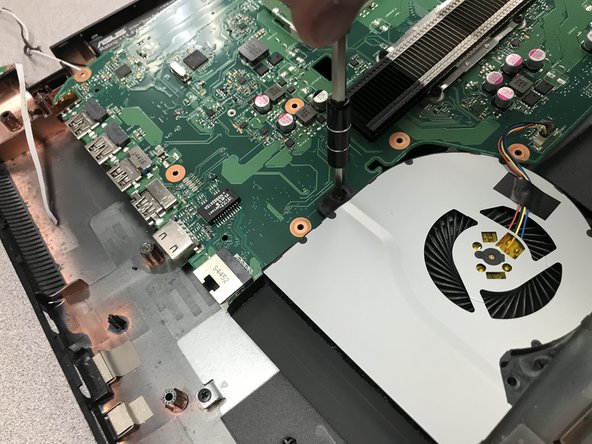
    • Remove the screws securing the fan to the motherboard.

  7. Asus X751MA-DH01TQ Fan Replacement: 7 단계, 이미지 1/2 Asus X751MA-DH01TQ Fan Replacement: 7 단계, 이미지 2/2
    • Remove the Phillips #00 screw that holds the fan to the motherboard.

  8. Asus X751MA-DH01TQ Fan Replacement: 8 단계, 이미지 1/2 Asus X751MA-DH01TQ Fan Replacement: 8 단계, 이미지 2/2
    • On the bottom of the motherboard, locate the wire plugged in and pull it out to completely detach the fan from the motherboard.

결론

To reassemble your device, follow these instructions in reverse order.

다른 한 분이 해당 안내서를 완성하였습니다.

Darren Kim

회원 가입일: 09/18/18

657 평판

안내서 3개 작성하였습니다

댓글 0개

댓글 쓰기

조회 통계:

24 시간 전: 0

7일 전: 8

30일 전: 15

전체 시간: 359