주요 콘텐츠로 건너뛰기

Asus Z54C-JS31 Keyboard Replacement

필요한 것

  1. Asus Z54C-JS31 Keyboard Replacement, Battery: 1 단계, 이미지 1/3 Asus Z54C-JS31 Keyboard Replacement, Battery: 1 단계, 이미지 2/3 Asus Z54C-JS31 Keyboard Replacement, Battery: 1 단계, 이미지 3/3
    • Turn the laptop upside down so that the underside is facing up and locate the two switches that are on each side of the battery.

    • Slide the switch on the top right corner to the right.

    • Slide and hold the switch on the top left corner to the left and carefully remove the battery.

  2. Asus Z54C-JS31 Keyboard Replacement, Keyboard: 2 단계, 이미지 1/2 Asus Z54C-JS31 Keyboard Replacement, Keyboard: 2 단계, 이미지 2/2
    • Turn the laptop to its normal position and open the display to show the keyboard.

    • Gently push back the five tabs holding the keyboard down using the plastic opening tool.

  3. Asus Z54C-JS31 Keyboard Replacement: 3 단계, 이미지 1/3 Asus Z54C-JS31 Keyboard Replacement: 3 단계, 이미지 2/3 Asus Z54C-JS31 Keyboard Replacement: 3 단계, 이미지 3/3
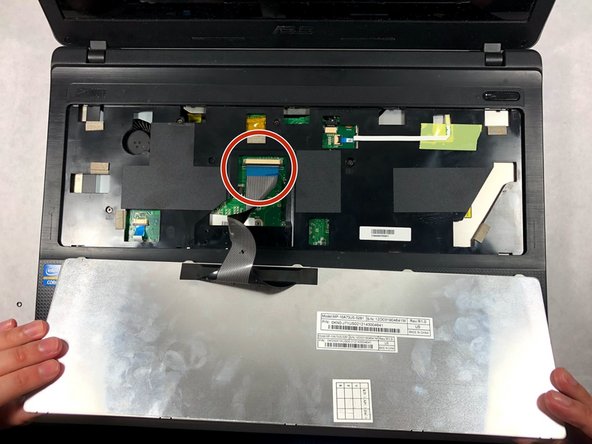
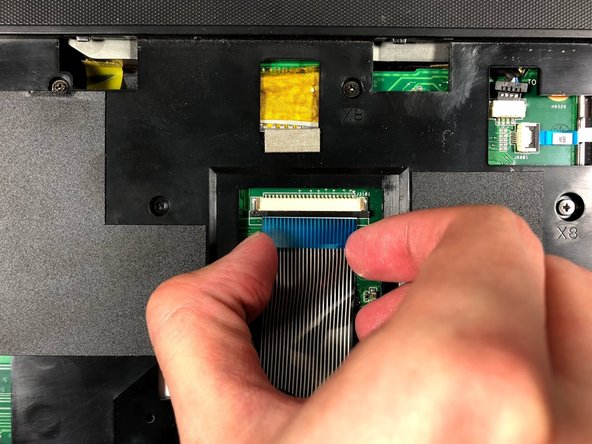
    • Once the keyboard is free, disconnect the ribbon cable from the zero insertion force (ZIF) connector by flipping up the locking flap and pulling the cable out.

결론

To reassemble your device, follow these instructions in reverse order.

Mark DeSimone

회원 가입일: 10/19/17

801 평판

안내서 8개 작성하였습니다

UMass Dartmouth, Team S3-G1, Bailey Fall 2017 UMass Dartmouth, Team S3-G1, Bailey Fall 2017 회원

UMASSD-BAILEY-F17S3G1

2 회원들

안내서 8개 작성하였습니다

댓글 0개

댓글 쓰기

조회 통계:

24 시간 전: 1

7일 전: 2

30일 전: 8

전체 시간: 165