주요 콘텐츠로 건너뛰기

Asus ZenBook Flip UX360C Wi-Fi Wireless Card Replacement

필요한 것

  1. Asus ZenBook Flip UX360C Wi-Fi Wireless Card Replacement, Motherboard: 1 단계, 이미지 1/1
    • Remove all ten T5 screws on the back cover near the edges.

    • Remove two Phillips #1 screws located under the rubber feet near the screen.

  2. Asus ZenBook Flip UX360C Wi-Fi Wireless Card Replacement: 2 단계, 이미지 1/3 Asus ZenBook Flip UX360C Wi-Fi Wireless Card Replacement: 2 단계, 이미지 2/3 Asus ZenBook Flip UX360C Wi-Fi Wireless Card Replacement: 2 단계, 이미지 3/3
    • Use a metal spudger to gently separate the keyboard from the computer case.

    • Do not completely remove the keyboard as there are two ribbon cables that connect the keyboard to the motherboard.

    • Lift the keyboard slightly, and use a plastic spudger to release the two ZIF connections to free each ribbon cable.

    • Remove the keyboard.

  3. Asus ZenBook Flip UX360C Wi-Fi Wireless Card Replacement: 3 단계, 이미지 1/1
    • Use the Phillips #1 screwdriver to remove all 5 mm screws.

  4. Asus ZenBook Flip UX360C Wi-Fi Wireless Card Replacement: 4 단계, 이미지 1/1
    • Use a plastic opening tool or nylon spudger to lift the monitor connections off of the main board.

  5. Asus ZenBook Flip UX360C Wi-Fi Wireless Card Replacement: 5 단계, 이미지 1/2 Asus ZenBook Flip UX360C Wi-Fi Wireless Card Replacement: 5 단계, 이미지 2/2
    • Clip off the battery from the main board.

    • Use of a metal spudger can cause damage to the device or harm to the user, especially near the battery! Use an ESD safe tool for this step instead.

  6. Asus ZenBook Flip UX360C Wi-Fi Wireless Card Replacement: 6 단계, 이미지 1/2 Asus ZenBook Flip UX360C Wi-Fi Wireless Card Replacement: 6 단계, 이미지 2/2
    • Remove the black foam above the screw on the I/O board.

    • Remove the 5 mm #1 Phillips head screw.

    • Use of a metal spudger can cause damage to the device or harm to the user, especially near the battery! Use an ESD safe tool for this step instead.

  7. Asus ZenBook Flip UX360C Wi-Fi Wireless Card Replacement: 7 단계, 이미지 1/2 Asus ZenBook Flip UX360C Wi-Fi Wireless Card Replacement: 7 단계, 이미지 2/2
    • Pull the I/O board away from the chip to detach it.

    • Remove the I/O board and main board.

  8. Asus ZenBook Flip UX360C Wi-Fi Wireless Card Replacement, Wi-Fi Wireless Card: 8 단계, 이미지 1/3 Asus ZenBook Flip UX360C Wi-Fi Wireless Card Replacement, Wi-Fi Wireless Card: 8 단계, 이미지 2/3 Asus ZenBook Flip UX360C Wi-Fi Wireless Card Replacement, Wi-Fi Wireless Card: 8 단계, 이미지 3/3
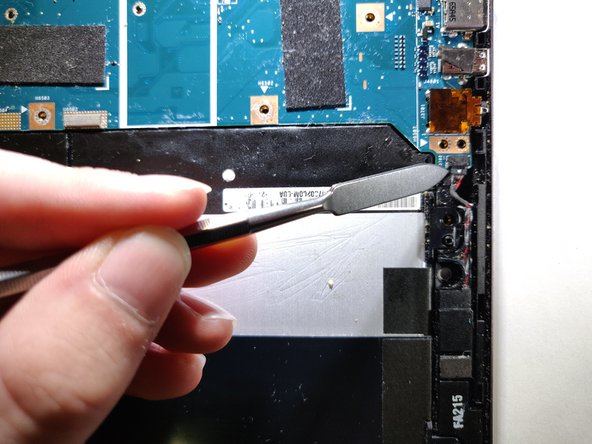
    • Use the metal spudger to remove the chip connections.

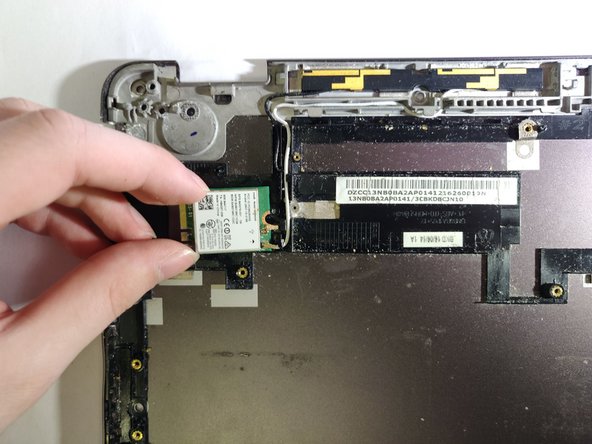
    • Gently pull the chip up and to the left to remove it from the device.

결론

To reassemble your device, follow these instructions in reverse order.

Daniel Updyke

회원 가입일: 02/25/19

73 평판

안내서 1개 작성함

댓글 0개

댓글 쓰기

조회 통계:

24 시간 전: 2

7일 전: 7

30일 전: 14

전체 시간: 1,287