소개
Follow this guide if you need to replace the hard drive of your Asus Zenbook UX303L. The hard drive is the part of the computer where all the data is stored on the computer. Whether your hard drive is failing or needs a storage upgrade, this guide will show you step by step how to remove and replace your hard drive. It is important to remember when working on any computer to wear an anti-static wrist band so that any static electricity doesn’t damage the internal components of the computer.
필요한 것
-
-
Remove all nine screws from the bottom of the device using a T5 screwdriver.
-
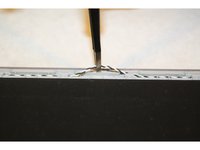
Remove two additional screws, if present, from beneath the rubber pads. (Pry up each rubber pad to access its screw.)
-
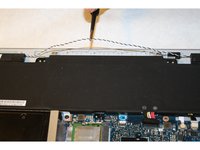
Carefully remove the bottom cover. The cover doesn't just lift up, you have to lift it to a approx. 45° angle, then pull towards the exterior (there are two small plastic claws that maintain the cover attached)
-
-
-
-
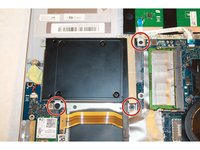
Remove the 3 screws surrounding the hard drive using the PH-1 screwdriver.
-
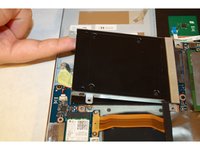
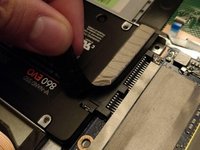
Gently lift and detach the hard drive, and pull it out.
-
If your model has never been opened, you might have this "cushion sticker" that makes it difficult to unplug the hard drive. You can just peel it and put it back later.
-


To reassemble your device, follow these instructions in reverse order.
To reassemble your device, follow these instructions in reverse order.
다른 21명이 해당 안내서를 완성하였습니다.
팀

Sam Houston State, Team 1-3, Blackburne Fall 2015 Sam Houston State, Team 1-3, Blackburne Fall 2015 회원
SHSU-BLACKBURNE-F15S1G3
3 회원들
안내서 4개를 작성함
댓글 4개
This guide worked fine for me. I have two suggestions that made my disassembly easier.
First, I used the standard blue guitar pick to gently pop the back cover off near the hinge. Nothing special here.
Second, the power connector in Step 5 lifts up to disconnect. I found using the blue pry bar to lift the side of the connector much easier than tweezers.
Good, clear, complete guide.
Great guide, worked for me.
I second Greg’s comment: Step 5’s battery connector lifts up, so using something like iFixit’s blue pry bar might be easier.
Additionally, for Step 7, the 3 screws might be hidden under cushion stickers. These can be peeled off and put back later.
Mein Laptop geht nach dem Umbau nicht mehr einzuschalten. Selbst die kleine Akku LED leuchtet nicht mehr, sobald das Netzkabel dran gesteckt ist. :(
I have the same issue. After putting everything back together, there is no charging light when the power cable is connect. Also nothing happens when pressing the power button.
I tried removing the battery and the CMOS battery, holding the power button for 30-40 seconds before re-assemblingt the device. But that did not help.
Felix -