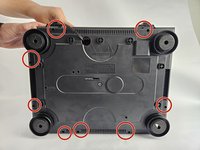
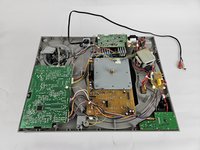
주요 콘텐츠로 건너뛰기

Audio-Technica AT-LP120-USB Outer Shell Replacement

필요한 것

  1. Audio-Technica AT-LP120-USB Outer Shell Replacement, Outer Shell: 1 단계, 이미지 3개 중 1개 Audio-Technica AT-LP120-USB Outer Shell Replacement, Outer Shell: 1 단계, 이미지 3개 중 2개 Audio-Technica AT-LP120-USB Outer Shell Replacement, Outer Shell: 1 단계, 이미지 3개 중 3개
    • Remove the inner steel plate that spins on the turntable.

    • Carefully lift up the plate.

    • Place it near your device out of the way.

  2. Audio-Technica AT-LP120-USB Outer Shell Replacement: 2 단계, 이미지 1개 중 1개
    • Remove the power cord in the back of the device.

  3. Audio-Technica AT-LP120-USB Outer Shell Replacement: 3 단계, 이미지 1개 중 1개
    • Ensure that the Tone Arm clamp is in place.

  4. Audio-Technica AT-LP120-USB Outer Shell Replacement: 4 단계, 이미지 2개 중 1개 Audio-Technica AT-LP120-USB Outer Shell Replacement: 4 단계, 이미지 2개 중 2개
    • Use a Phillips #2 screwdriver to remove the eight 2 mm screws holding the back casing into place.

    • Carefully remove the back casing from the device to expose the interior.

결론

To reassemble your device, follow these instructions in reverse order.

다른 한 분이 해당 안내서를 완성하였습니다.

작성자

3다른 기여자 명과 함께

David

회원 가입일: 10/31/24

253 평판

안내서 2개를 작성함

Cuesta, Team 20-3, Krynen Fall 2024 Cuesta, Team 20-3, Krynen Fall 2024 회원

CUESTA-KRYNEN-F24S20G3

5 회원들

안내서 6개를 작성함

0가이드 댓글

댓글 쓰기

조회 통계:

지난 24시간: 1

지난 7일: 5

지난 30일: 15

전체 시간: 148