주요 콘텐츠로 건너뛰기

BLU R2 Plus Front-Facing Camera Replacement

필요한 것

  1. BLU R2 Plus Front-Facing Camera Replacement, Power Off: 1 단계, 이미지 1개 중 1개
    • Be sure that your BLU R2 Plus is completely powered off and has less than 25% battery left. This will lower the chance of your battery catching fire and your logic board/motherboard shorting out.

  2. BLU R2 Plus Front-Facing Camera Replacement, Releasing the Back Cover: 2 단계, 이미지 3개 중 1개 BLU R2 Plus Front-Facing Camera Replacement, Releasing the Back Cover: 2 단계, 이미지 3개 중 2개 BLU R2 Plus Front-Facing Camera Replacement, Releasing the Back Cover: 2 단계, 이미지 3개 중 3개
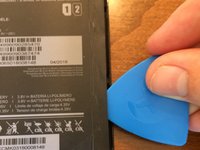
    • Insert your pick in the top left-hand corner where the little indent is.

    • Slide the pick all the way around the phone until the back cover is loose and ready to be released.

  3. BLU R2 Plus Front-Facing Camera Replacement, Remove the Back Cover: 3 단계, 이미지 1개 중 1개
    • Remove the back cover and set it aside.

  4. BLU R2 Plus Front-Facing Camera Replacement, Reveal the Screws: 4 단계, 이미지 2개 중 1개 BLU R2 Plus Front-Facing Camera Replacement, Reveal the Screws: 4 단계, 이미지 2개 중 2개
    • On both sides of the battery, use an opening pick to peel up the edge of the sticker covering the battery shield in order to expose the screws securing the plastic plating.

  5. BLU R2 Plus Front-Facing Camera Replacement, Tape the sticker: 5 단계, 이미지 1개 중 1개
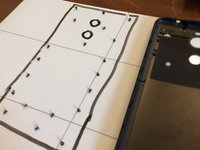
    • Use tape to hold back the battery sticker so it's easier to unscrew the plates.

  6. BLU R2 Plus Front-Facing Camera Replacement, Unscrew Upper Plastic Plate: 6 단계, 이미지 2개 중 1개 BLU R2 Plus Front-Facing Camera Replacement, Unscrew Upper Plastic Plate: 6 단계, 이미지 2개 중 2개
    이 단계에 사용된 도구:
    Magnetic Project Mat
    $19.95
    • Use a Phillips #00 screwdriver to remove the 9 screws from the upper plastic plate.

    • Use a magnetic mat to organize your screws and prevent you from losing them.

  7. BLU R2 Plus Front-Facing Camera Replacement, Upper Plate Removal: 7 단계, 이미지 3개 중 1개 BLU R2 Plus Front-Facing Camera Replacement, Upper Plate Removal: 7 단계, 이미지 3개 중 2개 BLU R2 Plus Front-Facing Camera Replacement, Upper Plate Removal: 7 단계, 이미지 3개 중 3개
    • Use an opening pick to unclip the upper plastic plate from the phone.

    • Once unclipped, slide it up and out of the phone.

    • Be careful not to break the small arms of the plate upon removal.

  8. BLU R2 Plus Front-Facing Camera Replacement, Front-Facing Camera Removal: 8 단계, 이미지 3개 중 1개 BLU R2 Plus Front-Facing Camera Replacement, Front-Facing Camera Removal: 8 단계, 이미지 3개 중 2개 BLU R2 Plus Front-Facing Camera Replacement, Front-Facing Camera Removal: 8 단계, 이미지 3개 중 3개
    이 단계에 사용된 도구:
    Tweezers
    $4.99
    • Use a spudger to unclip the ribbon cable from the motherboard/logic board. Carefully use blunt tweezers or angled tweezers to pull the ribbon cable out of the socket. Then use the tweezers to wiggle the camera out of its socket.

    • Be very careful not to break the ribbon cable as it's very fragile. This doesn't really matter if you're taking the camera out as it's already broken.

결론

To reassemble your device, follow these instructions in reverse order.

다른 한 분이 해당 안내서를 완성하였습니다.

작성자

2다른 기여자 명과 함께

Derek Thomas

회원 가입일: 09/02/21

778 평판

안내서 5개를 작성함

0가이드 댓글

댓글 쓰기

조회 통계:

지난 24시간: 0

지난 7일: 2

지난 30일: 8

전체 시간: 96