주요 콘텐츠로 건너뛰기

Beats Pill XL Speaker Replacement

필요한 것

  1. Beats Pill XL Speaker Replacement, Case: 1 단계, 이미지 1/2 Beats Pill XL Speaker Replacement, Case: 1 단계, 이미지 2/2
    • Using a plastic opening tool, pry the casing from the rest of the device.

    • Pry all the way around the edge and then pull apart.

    • It should be relatively easy, to pull apart. Don't be afraid to apply a necessary force.

  2. Beats Pill XL Speaker Replacement: 2 단계, 이미지 1/1
    • Using your thumb, remove the 8 rubber plugs in order to get to the screws.

    • Simply rub them towards the speakers and they will slide out enough to grip the edge and pull them out.

    • In the picture provided, we labeled four of them on one side of the Beats Pill XL. The other four are symmetrical to these four on the other side of the device.

  3. Beats Pill XL Speaker Replacement: 3 단계, 이미지 1/2 Beats Pill XL Speaker Replacement: 3 단계, 이미지 2/2
    • Using a Phillips #2 screwdriver, remove the 8 (10mm maxi-loc Phillips #2) screws that hold the casing together.

  4. Beats Pill XL Speaker Replacement: 4 단계, 이미지 1/2 Beats Pill XL Speaker Replacement: 4 단계, 이미지 2/2
    • Pull apart the front casing from the back casing, slowly. Try to avoid any tension on any of the connected cables.

    • Separate at a slow constant force to avoid damage to the ribbon cables.

  5. Beats Pill XL Speaker Replacement: 5 단계, 이미지 1/2 Beats Pill XL Speaker Replacement: 5 단계, 이미지 2/2
    • Gently pull on the plastic tab at the base of the ribbon cable to remove it from the motherboard.

    • Never pull the cables by the cord, as this could cause damage to the cables and/or motherboard. Always disconnect the cables from the base by the motherboard.

  6. Beats Pill XL Speaker Replacement: 6 단계, 이미지 1/2 Beats Pill XL Speaker Replacement: 6 단계, 이미지 2/2
    • Using your thumb and index finger, pull upwards on the base of the the power cable to remove it from the motherboard.

    • Even though there are two batteries, there is only one cable connecting the two to the motherboard.

  7. Beats Pill XL Speaker Replacement, Speaker: 7 단계, 이미지 1/1
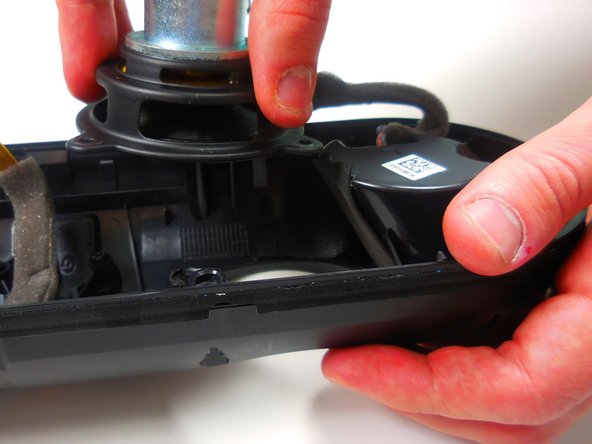
    • After completing the guide for removing the case, remove the cables connecting the speakers.

    • Simply pull up on them without pulling on the wires themselves.

  8. Beats Pill XL Speaker Replacement: 8 단계, 이미지 1/1
    • Set the half of the device not containing the speakers to the side.

  9. Beats Pill XL Speaker Replacement: 9 단계, 이미지 1/1
    • Using a Phillips #2 screwdriver, remove the 4 (8mm maxi-loc Phillips #2) screws holding the speaker to the case.

  10. Beats Pill XL Speaker Replacement: 10 단계, 이미지 1/2 Beats Pill XL Speaker Replacement: 10 단계, 이미지 2/2
    • While holding the case with one hand, pull up on the speaker you wish to replace.

    • This guide showed how to replace one of the two larger speakers, but the two smaller speakers are replaced the same way.

결론

To reassemble your device, follow these instructions in reverse order.

다른 2명이 해당 안내서를 완성하였습니다.

Michael

회원 가입일: 03/11/15

659 평판

안내서 2개 작성하였습니다

Colorado Springs, Team 9-2, Panko Spring 2015 Colorado Springs, Team 9-2, Panko Spring 2015 회원

UCCS-PANKO-S15S9G2

3 회원들

안내서 7개 작성하였습니다

댓글 5개

Where can I find replacement speakers?

One1sol - 답글

Where can I find replacement speakers?

Please

Esam Khalil - 답글

Where can i find the replacement speaker

Michael - 답글

I’m trying to find where to buy the speakers as well, anyone have an idea who or where they sell them?

ateks - 답글

Where can I find the replacement speakers..??

Godwin Varghese - 답글

댓글 쓰기

조회 통계:

24 시간 전: 0

7일 전: 3

30일 전: 24

전체 시간: 6,579