주요 콘텐츠로 건너뛰기

Bed Head Wave Artist Deep Waver Power Lead Connector Replacement

필요한 것

  1. Bed Head Wave Artist Deep Waver Power Lead Connector Replacement, Lower Handle Housing: 1 단계, 이미지 1/2 Bed Head Wave Artist Deep Waver Power Lead Connector Replacement, Lower Handle Housing: 1 단계, 이미지 2/2
    • Before disassembling your Deep Waver, be sure to unplug the device to avoid electric shock, and make sure the heating elements of the device are cool to avoid burns.

    • Unlock the handle of your Deep Waver to gain access to the screws you need to remove.

    • Remove two 10 mm Phillips #01 screws from the lower handle housing.

    • Remove one 10 mm Phillips #02 screw from the lower handle housing.

  2. Bed Head Wave Artist Deep Waver Power Lead Connector Replacement: 2 단계, 이미지 1/1
    • Pry the black screw cover off the side of the lower handle housing using a fine-point spudger or pick. This side will have the model number and other product information embossed on it.

  3. Bed Head Wave Artist Deep Waver Power Lead Connector Replacement: 3 단계, 이미지 1/1
    • Remove one 10 mm Phillips 1 screw from the handle joint.

  4. Bed Head Wave Artist Deep Waver Power Lead Connector Replacement: 4 단계, 이미지 1/1
    • Pry the black screw cover off the other side of the lower handle housing. This side will have the power switch located on it.

  5. Bed Head Wave Artist Deep Waver Power Lead Connector Replacement: 5 단계, 이미지 1/1
    • Cut along the length of the black housing retainer with a rotary tool to split and remove the retainer.

  6. Bed Head Wave Artist Deep Waver Power Lead Connector Replacement: 6 단계, 이미지 1/1
    • Split the lower handle housing apart using a plastic opening tool.

    • Begin splitting the housing at one end rather than the center to avoid cracking the casing.

  7. Bed Head Wave Artist Deep Waver Power Lead Connector Replacement, Power Lead Connector: 7 단계, 이미지 1/2 Bed Head Wave Artist Deep Waver Power Lead Connector Replacement, Power Lead Connector: 7 단계, 이미지 2/2
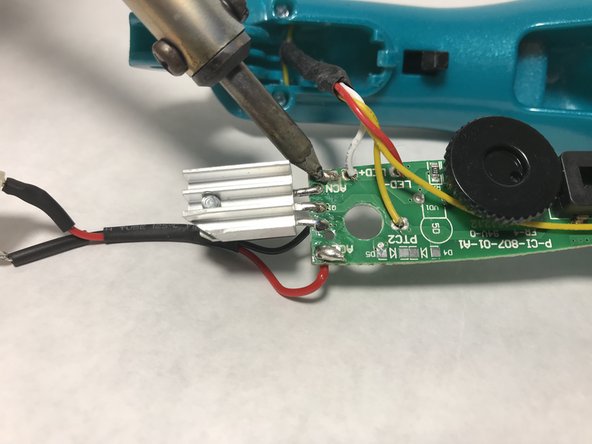
    • Apply heat to both terminals of the power leads with a soldering iron. This will melt the solder so each power lead can be removed.

    • Gently pull on each power lead to remove them from the circuit board.

결론

To reassemble your device, follow these instructions in reverse order. Once each half of the housing have been put back together, install a new Housing Retainer to replace the one you cut off.

Grant Peters

회원 가입일: 11/06/17

401 평판

안내서 4개 작성하였습니다

IUPUI, Team S6-G3, Baechle Fall 2017 IUPUI, Team S6-G3, Baechle Fall 2017 회원

IUPUI-BAECHLE-F17S6G3

3 회원들

안내서 4개 작성하였습니다

댓글 0개

댓글 쓰기

조회 통계:

24 시간 전: 0

7일 전: 1

30일 전: 8

전체 시간: 385