주요 콘텐츠로 건너뛰기

Bicycle Seat Replacement and Positioning for One-Bolt Seatposts

필요한 것

  1. Bicycle Seat Replacement and Positioning for One-Bolt Seatposts, Loosen Seat Bolt: 1 단계, 이미지 1/3 Bicycle Seat Replacement and Positioning for One-Bolt Seatposts, Loosen Seat Bolt: 1 단계, 이미지 2/3 Bicycle Seat Replacement and Positioning for One-Bolt Seatposts, Loosen Seat Bolt: 1 단계, 이미지 3/3
    • Before you begin the replacement, find the properly sized hex key for your bike's seat clamp bolt. It should fit snugly in the bolt and the bolt should turn with the hex key without slipping.

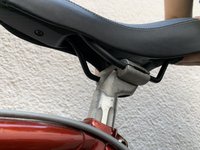
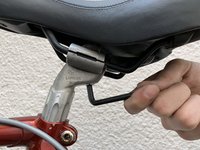
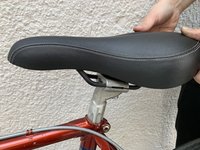
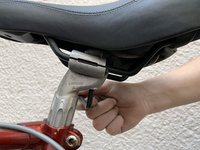
    • Access the bolt securing the seat clamp from underneath the saddle.

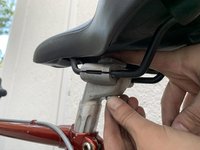
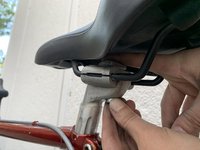
    • Use a hex key to loosen the bolt by turning counter clockwise until the seat can be removed from the clamp.

  2. Bicycle Seat Replacement and Positioning for One-Bolt Seatposts, Remove Seat: 2 단계, 이미지 1/2 Bicycle Seat Replacement and Positioning for One-Bolt Seatposts, Remove Seat: 2 단계, 이미지 2/2
    • Remove the seat from the clamp.

    • It is possible that your clamp will disassemble into separate parts once the bolt is loosened. If the clamp has fully disassembled, keep track of its bolt, bottom plate, top plate, and nut.

  3. Bicycle Seat Replacement and Positioning for One-Bolt Seatposts, Align Clamp and Place on Rails: 3 단계, 이미지 1/2 Bicycle Seat Replacement and Positioning for One-Bolt Seatposts, Align Clamp and Place on Rails: 3 단계, 이미지 2/2
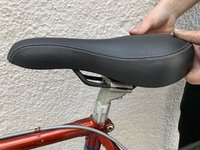
    • Position the new seat's rails into the seat clamp with the clamp lying approximately flat and in the center of the rails.

  4. Bicycle Seat Replacement and Positioning for One-Bolt Seatposts, Replace Bolt and Clamp: 4 단계, 이미지 1/3 Bicycle Seat Replacement and Positioning for One-Bolt Seatposts, Replace Bolt and Clamp: 4 단계, 이미지 2/3 Bicycle Seat Replacement and Positioning for One-Bolt Seatposts, Replace Bolt and Clamp: 4 단계, 이미지 3/3
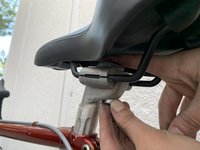
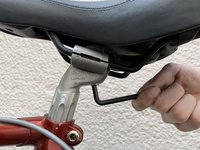
    • Replace the bolt by twisting it in the clockwise direction while holding the top nut in place.

    • This step may not be necessary if the clamp was not fully disassembled when removing the old seat.

  5. Bicycle Seat Replacement and Positioning for One-Bolt Seatposts, Tighten Bolt: 5 단계, 이미지 1/3 Bicycle Seat Replacement and Positioning for One-Bolt Seatposts, Tighten Bolt: 5 단계, 이미지 2/3 Bicycle Seat Replacement and Positioning for One-Bolt Seatposts, Tighten Bolt: 5 단계, 이미지 3/3
    • Turn the bolt clockwise with the hex key to partially tighten the seat so it is stable enough to hold your weight.

  6. Bicycle Seat Replacement and Positioning for One-Bolt Seatposts, Check Position of Seat: 6 단계, 이미지 1/1
    • Improper bike seat positioning can lead to discomfort while riding and even stress injuries.

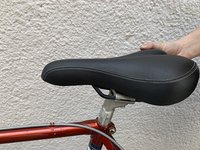
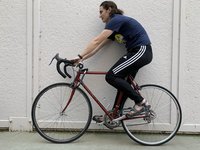
    • Test the position of the new seat by sitting on it. You should be in a neutral position (like in the photo) which allows you to comfortably reach the handlebars. You should not have any uncomfortable pressure when you sit.

    • Check for a moderately arched back without strain in the shoulders, wrists, or hands.

  7. Bicycle Seat Replacement and Positioning for One-Bolt Seatposts, Adjust Seat if Cramped: 7 단계, 이미지 1/3 Bicycle Seat Replacement and Positioning for One-Bolt Seatposts, Adjust Seat if Cramped: 7 단계, 이미지 2/3 Bicycle Seat Replacement and Positioning for One-Bolt Seatposts, Adjust Seat if Cramped: 7 단계, 이미지 3/3
    • If you feel cramped through the elbows and shoulders, have an uncomfortable negative arch in your back, or your upper torso is positioned directly above your arms (potentially causing wrist pain), your seat may be too far forward.

    • If your seat is too close to the handlebars, push the seat back and test it for comfort again.

  8. Bicycle Seat Replacement and Positioning for One-Bolt Seatposts, Adjust Seat if Overextended: 8 단계, 이미지 1/3 Bicycle Seat Replacement and Positioning for One-Bolt Seatposts, Adjust Seat if Overextended: 8 단계, 이미지 2/3 Bicycle Seat Replacement and Positioning for One-Bolt Seatposts, Adjust Seat if Overextended: 8 단계, 이미지 3/3
    • If you are overextending your arms, overarching your back, or feeling discomfort when reaching for the breaks, your seat may be too far backwards.

    • If your seat is too far away from the handlebars, push the seat forward and test it for comfort again.

  9. Bicycle Seat Replacement and Positioning for One-Bolt Seatposts, Ensure Seat is Straight: 9 단계, 이미지 1/3 Bicycle Seat Replacement and Positioning for One-Bolt Seatposts, Ensure Seat is Straight: 9 단계, 이미지 2/3 Bicycle Seat Replacement and Positioning for One-Bolt Seatposts, Ensure Seat is Straight: 9 단계, 이미지 3/3
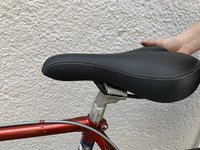
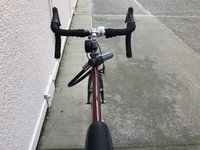
    • Straighten the seat by checking for parallel alignment with the bike frame.

    • Fully tighten the seat post bolt once you are satisfied with the positioning.

결론

Happy riding!

다른 3명이 해당 안내서를 완성하였습니다.

Anna Garverick

회원 가입일: 02/17/20

223 평판

안내서 1개 작성함

UC Davis, Team S1-G7, Andersen Winter 2020 UC Davis, Team S1-G7, Andersen Winter 2020 회원

UCD-ANDERSEN-W20S1G7

3 회원들

안내서 1개 작성하였습니다

댓글 0개

댓글 쓰기

조회 통계:

24 시간 전: 5

7일 전: 50

30일 전: 192

전체 시간: 14,956