주요 콘텐츠로 건너뛰기

Black and Decker 3-Cup Rice Cooker Spring Replacement

필요한 것

  1. Black and Decker 3-Cup Rice Cooker Spring Replacement, Remove the Lid and Bowl: 1 단계, 이미지 1/1
    • Make sure the device is unplugged before beginning disassembly!

    • Lift the lid and bowl from the top of the device.

  2. Black and Decker 3-Cup Rice Cooker Spring Replacement, Turn the Device Upside-Down: 2 단계, 이미지 1/1
    • Turn the device upside-down, so that the four legs of the device point upwards.

  3. Black and Decker 3-Cup Rice Cooker Spring Replacement, Remove the Rubber Cushions: 3 단계, 이미지 1/2 Black and Decker 3-Cup Rice Cooker Spring Replacement, Remove the Rubber Cushions: 3 단계, 이미지 2/2
    • Each of the four legs has a rubber cushion on its bottom. For each cushion, insert a plastic opening tool between the plastic leg and rubber cushion, and pry off the rubber cushion.

  4. Black and Decker 3-Cup Rice Cooker Spring Replacement, Remove the Spanning Screw: 4 단계, 이미지 1/1
    • Using a spanner screwdriver, remove the one 10mm long 7mm diameter spanner screw from the side of the brass panel.

  5. Black and Decker 3-Cup Rice Cooker Spring Replacement, Remove the Leg Screws: 5 단계, 이미지 1/1
    • Using a Phillips screwdriver, remove the 10mm long 7mm diameter Phillips-head screws from the inside of all four legs.

    • The smaller leg at the bottom is now loose and not attached to the device. Set it aside.

  6. Black and Decker 3-Cup Rice Cooker Spring Replacement, Remove the Brass Plate: 6 단계, 이미지 1/1
    • Lift the brass plate off the device and set it aside.

  7. Black and Decker 3-Cup Rice Cooker Spring Replacement, Color the Wires: 7 단계, 이미지 1/2 Black and Decker 3-Cup Rice Cooker Spring Replacement, Color the Wires: 7 단계, 이미지 2/2
    • Color coordinating wire groups make it easier to identify the wire groups during reassembly.

    • Inside the device, there are three junctions with wires joined by Phillips-head screws. The first is connected to two wires, and the other two are connected to three wires each.

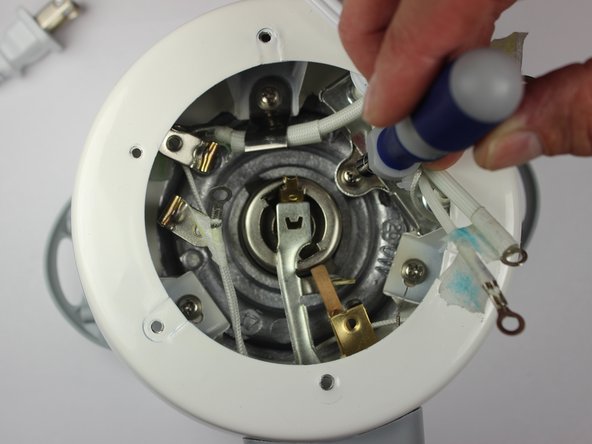
    • Unscrew the screw at the junction near the opposite side of the device from the front panel.

    • Label each of the two wires at this junction with a single color of tape.

  8. Black and Decker 3-Cup Rice Cooker Spring Replacement, Label the Second Wire Junction: 8 단계, 이미지 1/2 Black and Decker 3-Cup Rice Cooker Spring Replacement, Label the Second Wire Junction: 8 단계, 이미지 2/2
    • Unscrew the screw at the junction just clockwise from the button panel.

    • Label the three wires of this junction with tape of a second color.

  9. Black and Decker 3-Cup Rice Cooker Spring Replacement, Label the Third Wire Junction: 9 단계, 이미지 1/2 Black and Decker 3-Cup Rice Cooker Spring Replacement, Label the Third Wire Junction: 9 단계, 이미지 2/2
    • Unscrew the screw from the wire junction just behind the front panel.

    • Label the three wires at this junction with a third color of tape.

  10. Black and Decker 3-Cup Rice Cooker Spring Replacement, Unlock the brass latch: 10 단계, 이미지 1/2 Black and Decker 3-Cup Rice Cooker Spring Replacement, Unlock the brass latch: 10 단계, 이미지 2/2
    • Using a pair of pliers, bend the spring latch from a "[" shape to a "c" shape so that it fits through the silver-colored latch that holds it. Then pull the silver-colored beam up so that it detaches from the brass beam.

  11. Black and Decker 3-Cup Rice Cooker Spring Replacement, Unscrew the surrounding screws: 11 단계, 이미지 1/2 Black and Decker 3-Cup Rice Cooker Spring Replacement, Unscrew the surrounding screws: 11 단계, 이미지 2/2
    • Unscrew the four 10 mm long 7mm diameter Phillips screws attached to the hotplate

  12. Black and Decker 3-Cup Rice Cooker Spring Replacement, Remove the hotplate Piece: 12 단계, 이미지 1/2 Black and Decker 3-Cup Rice Cooker Spring Replacement, Remove the hotplate Piece: 12 단계, 이미지 2/2
    • Carefully turn the device over, either allowing the hotplate portion of the device to fall out, or catching it as it falls out.

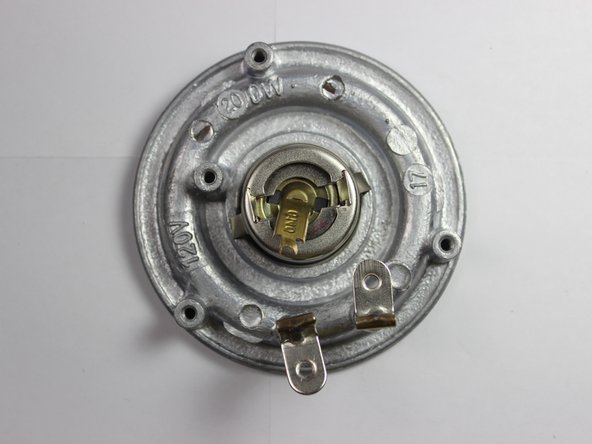
    • For the next step, make sure the hotplate portion of the device has its flat side facing down.

  13. Black and Decker 3-Cup Rice Cooker Spring Replacement, Unlock the Hotplate: 13 단계, 이미지 1/2 Black and Decker 3-Cup Rice Cooker Spring Replacement, Unlock the Hotplate: 13 단계, 이미지 2/2
    • Position a pair of pliers so that they are outside the hotplate's two inner silver-colored rectangular plates.

    • Carefully push the plates together to unlock the inner portion of the hotplate.

  14. Black and Decker 3-Cup Rice Cooker Spring Replacement, Expose the Spring: 14 단계, 이미지 1/1
    • Remove the non-spring portion of the hotplate by lifting it up, exposing the spring and brass locking latch underneath.

  15. Black and Decker 3-Cup Rice Cooker Spring Replacement, Remove the Spring: 15 단계, 이미지 1/1
    • Remove the 47 mm by 30 mm spring, by pulling it up and off the locking latch.

    • If the spring is in multiple pieces, does not compress and spring back easily, or otherwise does not behave like a spring, you will need to replace it.

    • To reassemble your device, follow these instructions in reverse order. The two silver latches will need to be bent outwards separately, and the brass latch will need to be bent back into a "["or "(" shape by holding the pliers to a 90 degree angle of that in the instructions.

결승점

다른 6명이 해당 안내서를 완성하였습니다.

Lillian Heng

회원 가입일: 09/26/14

679 평판

안내서 4개 작성하였습니다

Cal Poly, Team 12-1, Forte Fall 2014 Cal Poly, Team 12-1, Forte Fall 2014 회원

CPSU-FORTE-F14S12G1

5 회원들

안내서 7개 작성하였습니다

댓글 0개

댓글 쓰기

조회 통계:

24 시간 전: 1

7일 전: 5

30일 전: 11

전체 시간: 5,399