주요 콘텐츠로 건너뛰기

Black and Decker BDERO100 Power Cord Replacement

필요한 것

  1. Black and Decker BDERO100 Power Cord Replacement, Chassis: 1 단계, 이미지 1/2 Black and Decker BDERO100 Power Cord Replacement, Chassis: 1 단계, 이미지 2/2
    • Use the nylon spudger to remove the rubber ring from the filter attachment section.

    • The easiest way to do this is to place the spudger sideways and pulling out the ring.

  2. Black and Decker BDERO100 Power Cord Replacement: 2 단계, 이미지 1/2 Black and Decker BDERO100 Power Cord Replacement: 2 단계, 이미지 2/2
    • Use the TR20 Torx Security bit driver to unscrew the five 18.75mm Phillips screws from the warning label side of the chassis.

  3. Black and Decker BDERO100 Power Cord Replacement: 3 단계, 이미지 1/2 Black and Decker BDERO100 Power Cord Replacement: 3 단계, 이미지 2/2
    • Grab the plastic opening tool and place it on the separation line between both sides of the chassis.

    • Separate both sides and open the device.

    • Be careful not to lose or detach any internal parts while opening the sander.

  4. Black and Decker BDERO100 Power Cord Replacement: 4 단계, 이미지 1/2 Black and Decker BDERO100 Power Cord Replacement: 4 단계, 이미지 2/2
    • Hold the chassis and separate it from the device.

  5. Black and Decker BDERO100 Power Cord Replacement, Power Cord: 5 단계, 이미지 1/3 Black and Decker BDERO100 Power Cord Replacement, Power Cord: 5 단계, 이미지 2/3 Black and Decker BDERO100 Power Cord Replacement, Power Cord: 5 단계, 이미지 3/3
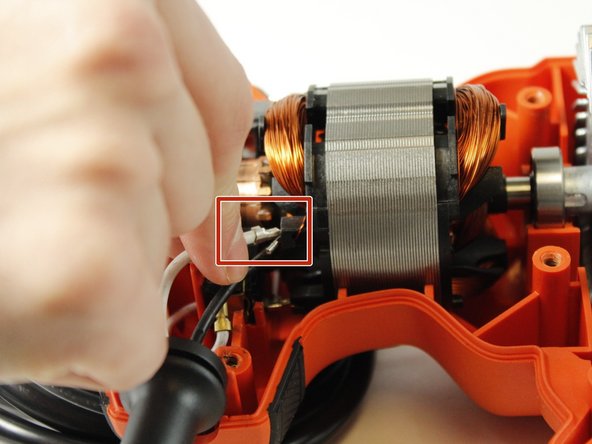
    • Use the bit driver with the JIS - J1 bit to remove the two 12.5 mm phillips screws holding the cord clamp to the chassis.

  6. Black and Decker BDERO100 Power Cord Replacement: 6 단계, 이미지 1/3 Black and Decker BDERO100 Power Cord Replacement: 6 단계, 이미지 2/3 Black and Decker BDERO100 Power Cord Replacement: 6 단계, 이미지 3/3
    • Gently pull the white cable that connects the power cord to the motor to detach it.

  7. Black and Decker BDERO100 Power Cord Replacement: 7 단계, 이미지 1/2 Black and Decker BDERO100 Power Cord Replacement: 7 단계, 이미지 2/2
    • With yout hands, hold and separate the power button from the external case by pulling gently.

  8. Black and Decker BDERO100 Power Cord Replacement: 8 단계, 이미지 1/2 Black and Decker BDERO100 Power Cord Replacement: 8 단계, 이미지 2/2
    • Select the cable that connects the power button to the power button.

  9. Black and Decker BDERO100 Power Cord Replacement: 9 단계, 이미지 1/1
    • Expose the cable and lock system by removing the cover.

    • When attaching the new power cord you will need to make sure to cover this lock system with electrical tape.

  10. Black and Decker BDERO100 Power Cord Replacement: 10 단계, 이미지 1/2 Black and Decker BDERO100 Power Cord Replacement: 10 단계, 이미지 2/2
    • Push the security pin with the plastic spudger and simultaneously, pull gently on the cable to separate it from the button.

결론

To reassemble your device, follow these instructions in reverse order.

다른 한 분이 해당 안내서를 완성하였습니다.

Irene Zubillaga

회원 가입일: 02/10/16

617 평판

안내서 5개 작성하였습니다

USF Tampa, Team 1-5, Sullivan Spring 2016 USF Tampa, Team 1-5, Sullivan Spring 2016 회원

USFT-SULLIVAN-S16S1G5

4 회원들

안내서 6개 작성하였습니다

댓글 0개

댓글 쓰기

조회 통계:

24 시간 전: 0

7일 전: 0

30일 전: 8

전체 시간: 623