주요 콘텐츠로 건너뛰기

Black and Decker DCM100R Heating Element Replacement

필요한 것

  1. Black and Decker DCM100R Heating Element Replacement, Heating Element: 1 단계, 이미지 1/2 Black and Decker DCM100R Heating Element Replacement, Heating Element: 1 단계, 이미지 2/2
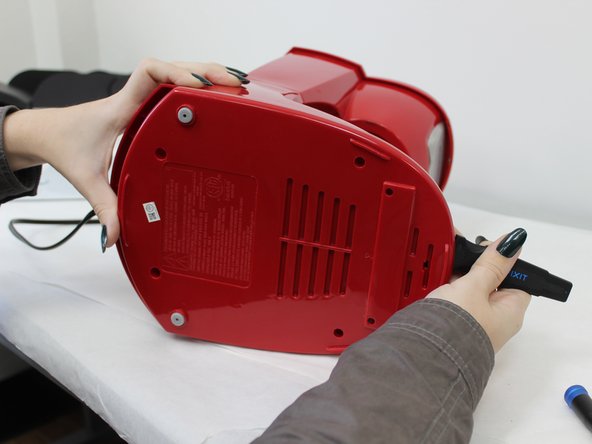
    • Turn the coffee maker on its side.

    • Remove the four 6 mm Phillips #2 that secure the baseplate.

  2. Black and Decker DCM100R Heating Element Replacement: 2 단계, 이미지 1/3 Black and Decker DCM100R Heating Element Replacement: 2 단계, 이미지 2/3 Black and Decker DCM100R Heating Element Replacement: 2 단계, 이미지 3/3
    • Insert the jimmy at the back of the panel and slide it around to the front.

  3. Black and Decker DCM100R Heating Element Replacement: 3 단계, 이미지 1/3 Black and Decker DCM100R Heating Element Replacement: 3 단계, 이미지 2/3 Black and Decker DCM100R Heating Element Replacement: 3 단계, 이미지 3/3
    • Apply pressure to the backside of the panel until it releases.

    • Remove the plate.

  4. Black and Decker DCM100R Heating Element Replacement: 4 단계, 이미지 1/2 Black and Decker DCM100R Heating Element Replacement: 4 단계, 이미지 2/2
    • Remove the two 10 mm Phillips #2 screws securing the metal support brace.

    • Remove the brace and set aside.

  5. Black and Decker DCM100R Heating Element Replacement: 5 단계, 이미지 1/2 Black and Decker DCM100R Heating Element Replacement: 5 단계, 이미지 2/2
    이 단계에 사용된 도구:
    Tweezers
    $4.99
    구매
    • Pull back the tubing and wiring to reveal the hot plate.

    • To hold these out of your way, you can use the Nylon Tipped Tweezers to pin them back to the back panel.

  6. Black and Decker DCM100R Heating Element Replacement: 6 단계, 이미지 1/2 Black and Decker DCM100R Heating Element Replacement: 6 단계, 이미지 2/2
    • Use a Phillips #2 screwdriver to remove the five 8 mm screws that secure the mounting bracket and hot plate.

  7. Black and Decker DCM100R Heating Element Replacement: 7 단계, 이미지 1/2 Black and Decker DCM100R Heating Element Replacement: 7 단계, 이미지 2/2
    • Use a pair of pliers to gently pull the mounting bracket out of place.

  8. Black and Decker DCM100R Heating Element Replacement: 8 단계, 이미지 1/3 Black and Decker DCM100R Heating Element Replacement: 8 단계, 이미지 2/3 Black and Decker DCM100R Heating Element Replacement: 8 단계, 이미지 3/3
    • Remove the hot plate from the mounting bracket.

    • Remove the O-ring from the hot plate.

결론

To reassemble your device, follow these instructions in reverse order.

Ella Barbour

회원 가입일: 09/13/23

207 평판

안내서 1개 작성함

University of North Texas, Team 6-6, Kilpatrick Fall 2023 University of North Texas, Team 6-6, Kilpatrick Fall 2023 회원

UNT-KILPATRICK-F23S6G6

4 회원들

안내서 5개 작성하였습니다

댓글 0개

댓글 쓰기

조회 통계:

24 시간 전: 1

7일 전: 3

30일 전: 19

전체 시간: 128