주요 콘텐츠로 건너뛰기

Black and Decker LDX172C Trigger Switch Replacement

필요한 것

  1. Black and Decker LDX172C Trigger Switch Replacement, Trigger Switch: 1 단계, 이미지 1/1
    • Before beginning, make sure the motor direction switch is in the neutral position.

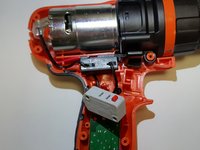
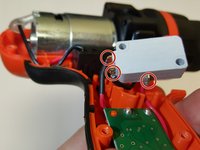
    • Place the drill on the work surface with the chuck facing downward. Locate and remove the two #2 X 10mm Phillips screws located right of the motor.

  2. Black and Decker LDX172C Trigger Switch Replacement: 2 단계, 이미지 1/1
    • Rotate the drill to it's left side - the chuck should be facing to the right. Locate and remove the eight #2 X 5mm Phillips fasteners from the body of the drill.

  3. Black and Decker LDX172C Trigger Switch Replacement: 3 단계, 이미지 1/1
    • Carefully remove the right half of the body from the drill.

    • The trigger mechanism is spring loaded and may eject from the drill when the body is removed.

  4. Black and Decker LDX172C Trigger Switch Replacement: 4 단계, 이미지 1/3 Black and Decker LDX172C Trigger Switch Replacement: 4 단계, 이미지 2/3 Black and Decker LDX172C Trigger Switch Replacement: 4 단계, 이미지 3/3
    • Remove trigger from drill by pulling the mechanism directly up off the holding pins.

    • The leads from the switch are removed by using a heating the solder until they come free.

    • Re-solder the leads to the new switch.

    • Repeat directions in reverse to reassemble.

결론

To reassemble your device, follow these instructions in reverse order.

jakebontragersinger

회원 가입일: 02/13/16

119 평판

안내서 1개 작성함

IUPUI, Team 3-3, Wilson Spring 2016 IUPUI, Team 3-3, Wilson Spring 2016 회원

IUPUI-WILSON-S16S3G3

4 회원들

안내서 6개 작성하였습니다

댓글 0개

댓글 쓰기

조회 통계:

24 시간 전: 1

7일 전: 6

30일 전: 18

전체 시간: 3,207