주요 콘텐츠로 건너뛰기

Black and Decker TO1303SB Door Spring Removal/Replacement

필요한 것

  1. Black and Decker TO1303SB Door Spring Removal/Replacement, Top Cover: 1 단계, 이미지 1/2 Black and Decker TO1303SB Door Spring Removal/Replacement, Top Cover: 1 단계, 이미지 2/2
    • Remove the six 9.5mm screws on the back panel using a #2 Phillips screwdriver.

  2. Black and Decker TO1303SB Door Spring Removal/Replacement: 2 단계, 이미지 1/1
    • Remove the two 13mm screws, located between the feet on the bottom of the cover, using a Torx T15 screw driver.

    • On the TO1313SB, a Security Torx T15 driver is required — the screws have a center pin that prevents use of a regular T15 driver.

  3. Black and Decker TO1303SB Door Spring Removal/Replacement: 3 단계, 이미지 1/1
    • Using the metal spudger, carefully pry out the rubber base on each foot to access the screws.

  4. Black and Decker TO1303SB Door Spring Removal/Replacement: 4 단계, 이미지 1/1
    • Remove the 11.5 mm screws using a #2 Phillips screwdriver.

  5. Black and Decker TO1303SB Door Spring Removal/Replacement: 5 단계, 이미지 1/2 Black and Decker TO1303SB Door Spring Removal/Replacement: 5 단계, 이미지 2/2
    • Remove the back cover by gently pulling the sides of the cover apart from the rest of the oven. Then, tilt the cover towards the face and pull back at an upward angle. The cover should slide right off.

  6. Black and Decker TO1303SB Door Spring Removal/Replacement, Door Spring: 6 단계, 이미지 1/3 Black and Decker TO1303SB Door Spring Removal/Replacement, Door Spring: 6 단계, 이미지 2/3 Black and Decker TO1303SB Door Spring Removal/Replacement, Door Spring: 6 단계, 이미지 3/3
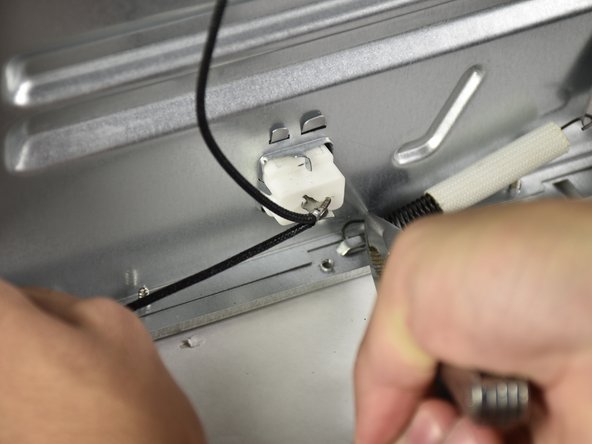
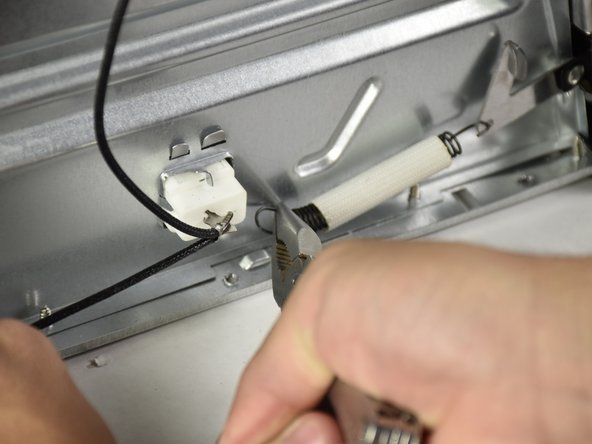
    • With the needle nose pliers, grasp the hook of the rear spring as close as you can to the coils. Stretch the spring back and, with a twisting motion, pull the hook out of its catch.

    • It is recommended to close the door before doing this.

    • Slowly relieve the tension after pulling it out of the catch or else it may damage the spring attachment.

  7. Black and Decker TO1303SB Door Spring Removal/Replacement: 7 단계, 이미지 1/1
    • Pull the front hook out of the spring attachment.

    • When replacing the spring, it is recommended to start by reattaching the hook onto the rear catch, then the front spring attachment. Attaching to the front spring attachment first will cause unnecessary stress to the attachment and may cause it to deform.

결론

To reassemble your device, follow these instructions in reverse order.

다른 2명이 해당 안내서를 완성하였습니다.

Barrett Lowe

회원 가입일: 10/08/15

207 평판

안내서 2개 작성하였습니다

Cal Poly, Team 5-11, Maness Fall 2015 Cal Poly, Team 5-11, Maness Fall 2015 회원

CPSU-MANESS-F15S5G11

4 회원들

안내서 5개 작성하였습니다

댓글 5개

Where did you find the replacement spring?

Pupule Pupule - 답글

Pupule Pupule: I would suggest looking at an Ace Hardware for that spring. I believe the have a good selection of those in the drawers near the bolts. Some Home Depot’s may have them too … if they are in stock. Good Luck

John -

Thank You for this article. I went through all of this and found that the spring was fine but where the spring attached to the door had completely broken off. Would I need a whole new door or can I replace the bracket the glass attaches to?

Thanks.

John - 답글

Does any one know what that black screw or bolt is on the back of the device? I got a different model but also have that bolt. It only seems to hold a small screw on the inside. I wonder why this part sticks out like that and what its for

Rombout Versluijs - 답글

For the stopper for recommended safe distance while it is in use and heated up.

Supa*Star - 답글

댓글 쓰기

조회 통계:

24 시간 전: 2

7일 전: 13

30일 전: 103

전체 시간: 8,883