이 버전에는 잘못된 편집 사항이 있을 수 있습니다. 최신 확인된 스냅샷으로 전환하십시오.
필요한 것
-
이 단계는 번역되지 않았습니다. 번역을 도와주십시오
-
Insert a plastic opening tool into the small notch on the rear cover of the phone.
-
Pry the rear cover up from the phone.
-
-
이 단계는 번역되지 않았습니다. 번역을 도와주십시오
-
Locate the slit between the top of the battery and the casing.
-
Gently apply pressure on the top of the battery to trigger the spring release.
-
-
-
이 단계는 번역되지 않았습니다. 번역을 도와주십시오
-
Using hairdryer or heat gun, warm the front panel to soften the adhesive beneath.
-
Starting from one side, use a plastic opening tool to pry up the screen cover.
-
Once one side is loose, gently peel up the entire cover.
-
-
이 단계는 번역되지 않았습니다. 번역을 도와주십시오
-
Insert the plastic opening tool in the seam along the side of the device.
-
Slide the tool along the length of the seam, applying moderate force with the plastic opening tool.
-
Carefully remove the faceplate.
-
-
이 단계는 번역되지 않았습니다. 번역을 도와주십시오
-
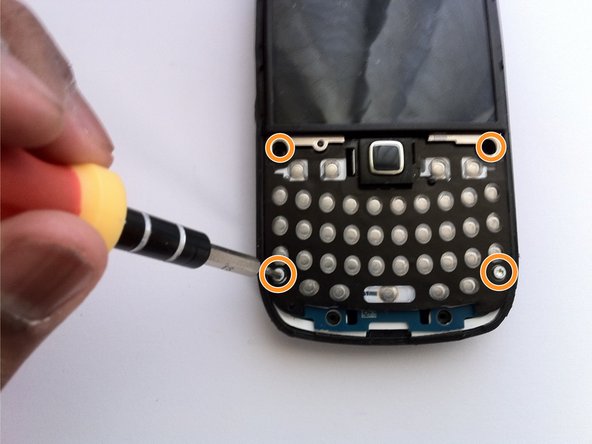
Remove four T6 Torx screws from the front of the phone.
-
Using tweezers, remove the keyboard buttons from the phone.
-
-
이 단계는 번역되지 않았습니다. 번역을 도와주십시오
-
Remove the two T6 Torx screws securing the small plastic bracket at the bottom of the phone.
-
Remove the four T6 Torx screws from the corners of the keyboard.
-
-
이 단계는 번역되지 않았습니다. 번역을 도와주십시오
-
Using a plastic opening tool, gently pry the motherboard assembly from the device's frame.
-


다른 32명이 해당 안내서를 완성하였습니다.
팀

Cal Poly, Team 9-62, Walters Spring 2011 Cal Poly, Team 9-62, Walters Spring 2011 회원
CPSU-WALTERS-S11S9G62
5 회원들
안내서 5개 작성하였습니다