이 버전에는 잘못된 편집 사항이 있을 수 있습니다. 최신 확인된 스냅샷으로 전환하십시오.
필요한 것
-
이 단계는 번역되지 않았습니다. 번역을 도와주십시오
-
Turn the phone over so that the back cover faces up.
-
Locate the groove at the bottom center of the phone.
-
Press the groove with your thumb to release the edge of the case from the phone.
-
-
이 단계는 번역되지 않았습니다. 번역을 도와주십시오
-
Use your thumb and index finger to carefully open the sides of the phone.
-
Start from the bottom and work your fingers up along the sides of the phone until the back cover is completely separated from the body of the phone.
-
-
이 단계는 번역되지 않았습니다. 번역을 도와주십시오
-
Lift the bottom corner of the battery with your fingers.
-
Remove the battery from the body of the phone.
-
-
-
이 단계는 번역되지 않았습니다. 번역을 도와주십시오
-
Use a T3 or T4 (sub-models vary) Torx screwdriver to remove the nine screws shown in the picture.
-
-
이 단계는 번역되지 않았습니다. 번역을 도와주십시오
-
Gently lift the plastic housing off the phone and set it aside. You can now see the motherboard.
-
-
이 단계는 번역되지 않았습니다. 번역을 도와주십시오
-
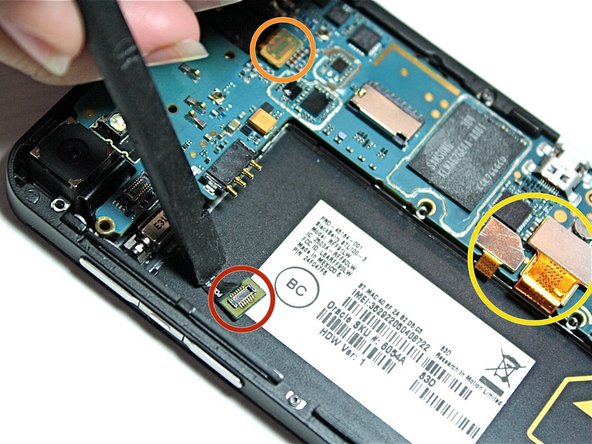
Use the spudger to detach the green flat-top connector located under the rear camera. Slowly push the connector up and back. Refer to the first and second images.
-
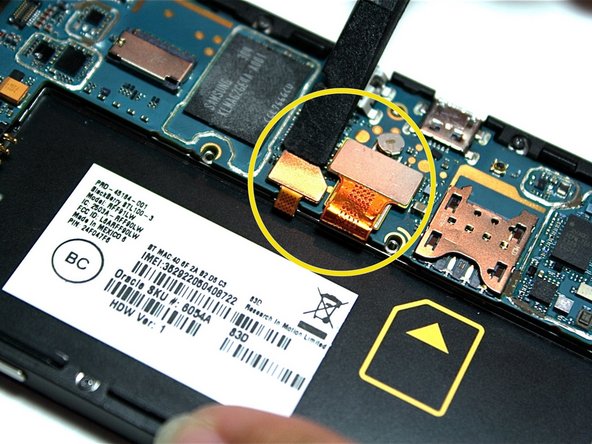
Use the spudger to detach and lift the orange flat-top connector seen in the second image. Slowly push the connector up and back.
-
Then, detach the remaining three flat-top connectors one at a time to release the motherboard from the housing. The third connector is hidden underneath the largest one.
-
-
이 단계는 번역되지 않았습니다. 번역을 도와주십시오
-
Carefully remove the motherboard and set it aside on an antistatic surface.
-
-
이 단계는 번역되지 않았습니다. 번역을 도와주십시오
-
Use a T2 Torx screwdriver to remove the first small screw located at the top right. Refer to the second image.
-
Then unscrew the four screws that surround the case. Refer to the third image.
-
-
이 단계는 번역되지 않았습니다. 번역을 도와주십시오
-
Turn the phone over so that the touch screen faces you.
-
Slide a plastic opening tool around the rectangular edge of the phone to separate the touch screen from the case. Start from either of the bottom corners and work your way around the phone to loosen the screen.
-
Gently separate the screen from the phone case. Now, the phone is ready for a new screen.
-


다른 30명이 해당 안내서를 완성하였습니다.
팀

CSU Fullerton, Team 1-2, Bruce Fall 2014 CSU Fullerton, Team 1-2, Bruce Fall 2014 회원
CSUF-BRUCE-F14S1G2
3 회원들
안내서 4개 작성하였습니다
댓글 7개
In the Tools list is a T4 Screwdriver and in Step 4 you write T3 Torx. Wich is the right one and for what kind of Z10 is it (STL100-2, STL100-3, etc.) ?
Torx bits increase in diameter with increases in size and it is very possible to have a driver one size smaller than the head and still drive the screw. You will know you have the correct exact Torx driver for the head you are using when it fits perfectly without any slack. Also, there would be no benefit to them changing screw head sizes during production as all the parts are manufactured with that head in mind. I swapped my screen with a T1 and a T3. However, the looseness of the T3 driver in the screw head that I encountered is a strong indication of the correct size actually being a T4. The T1 wasnt as loose but it WAS loose so I would not be surprised if the smaller heads WERE officially sized as T2. So as long as you have at least a T1 & a T3, you are good to go but a T2 & a T4 is just as good a combination for this fix.
T2 sent from iFixit didn't loosen the T2 screws on the Z10. Had to pull out a pocket knife and stick the pointed end of the blade into the screw and loosen it a bit before the T2 screw driver would work.
What was the MPN of the replacement screen you ordered? I too have a RFF91LW and need to replace my screen.
where can i buy replacement screen?
rakeshkota - 답글