주요 콘텐츠로 건너뛰기

Blackberry Torch 9810 Screen Replacement

필요한 것

  1. Blackberry Torch 9810 Screen Replacement, Phone cover: 1 단계, 이미지 1/2 Blackberry Torch 9810 Screen Replacement, Phone cover: 1 단계, 이미지 2/2
    • Remove the back cover of the phone

  2. Blackberry Torch 9810 Screen Replacement, Battery Removal: 2 단계, 이미지 1/1
    • Remove the battery

  3. Blackberry Torch 9810 Screen Replacement, Remove Screws: 3 단계, 이미지 1/1
    • Unscrew the four screws using the T6 screw driver

    • If you remove the screw in red, you void the warranty!

  4. Blackberry Torch 9810 Screen Replacement, Wiggle Wiggle: 4 단계, 이미지 1/2 Blackberry Torch 9810 Screen Replacement, Wiggle Wiggle: 4 단계, 이미지 2/2
    • Remove front silver trim by using plastic opening tools and wiggle it off.

    • This is difficult to remove, but it should come off if you do it with caution.

  5. Blackberry Torch 9810 Screen Replacement, More Screws: 5 단계, 이미지 1/1
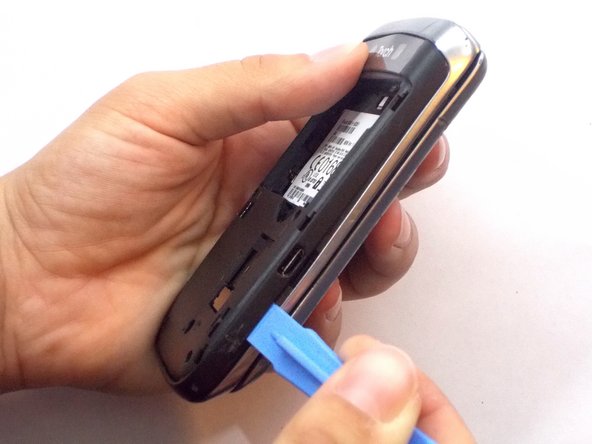
    • Once you remove the rim cover, you should find two more screws on the top. Unscrew them using the T6 screw driver.

  6. Blackberry Torch 9810 Screen Replacement, Remove the Back: 6 단계, 이미지 1/3 Blackberry Torch 9810 Screen Replacement, Remove the Back: 6 단계, 이미지 2/3 Blackberry Torch 9810 Screen Replacement, Remove the Back: 6 단계, 이미지 3/3
    • Use the plastic removal tool to remove the entire back cover.

  7. Blackberry Torch 9810 Screen Replacement, Small Antenna Wire: 7 단계, 이미지 1/1
    • Unplug the black antenna wire from the logic board.

  8. Blackberry Torch 9810 Screen Replacement, Remove Ribbon Cables: 8 단계, 이미지 1/2 Blackberry Torch 9810 Screen Replacement, Remove Ribbon Cables: 8 단계, 이미지 2/2
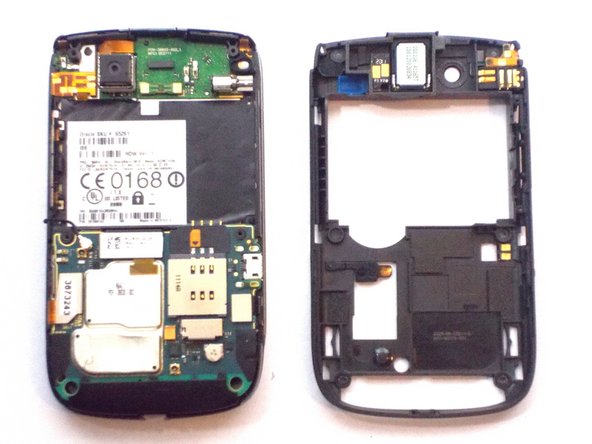
    • Peel off the three ribbon cables

    • They are orange and located on each side as well as on the top of the logic board

    • The cable circled in yellow is glued to the silver cap. Pull the ribbon cable upward towards the battery area.

  9. Blackberry Torch 9810 Screen Replacement, Logic Board: 9 단계, 이미지 1/1
    • Take out your logic board

  10. Blackberry Torch 9810 Screen Replacement, Remove More Screws: 10 단계, 이미지 1/1
    • Unscrew six small gold screws

  11. Blackberry Torch 9810 Screen Replacement, Remove the Screen: 11 단계, 이미지 1/1
    • Separate the screen from its frame

    • After this step, you will need a torx bit smaller than a T-4. The circled display assembly can be replaced as a unit if you wish. In that case, this is the final step.

  12. Blackberry Torch 9810 Screen Replacement, Apply Heat to the Screen: 12 단계, 이미지 1/1
    • Heat the digitizer

  13. Blackberry Torch 9810 Screen Replacement, Remove the Digizer: 13 단계, 이미지 1/2 Blackberry Torch 9810 Screen Replacement, Remove the Digizer: 13 단계, 이미지 2/2
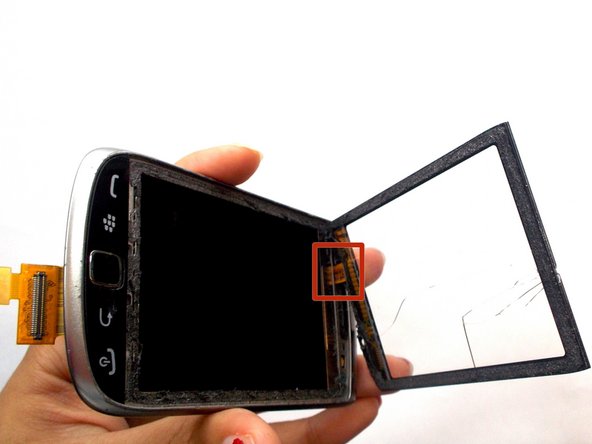
    • Remove gold sticky film that attaches the digitizer to the screen

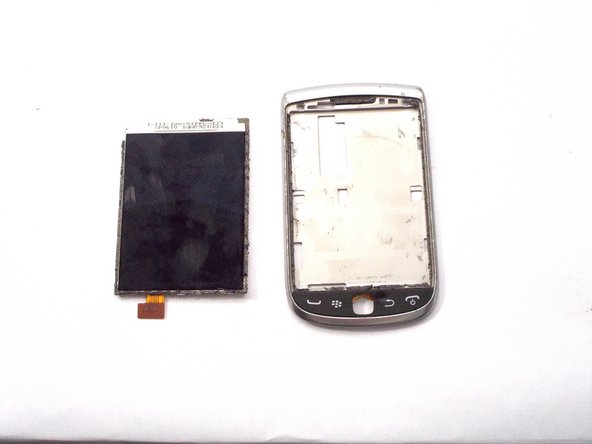
    • Separate the digitizer from its screen

    • Be careful not to tear the ribbon cable on the left side of the digitizer. That will be removed in a later step.

  14. Blackberry Torch 9810 Screen Replacement, Remove More Screws: 14 단계, 이미지 1/1
    • Move the digitizer to remove both circled screws with a T-4 bit.

    • The screw in red is under the screen, be careful of the ribbon cable in the top left corner.

  15. Blackberry Torch 9810 Screen Replacement, Remove Even More Screws: 15 단계, 이미지 1/1
    • Remove the circled screws with a T-2 bit.

    • Some kits do not have a bit small enough bit for these screws. If you do not have the proper bit, you should either buy one or simply replace the whole screen and digitizer assembly.

    • The silver plate may be covering up the screws. If you do not see them, slide it to the other end of the assembly.

  16. Blackberry Torch 9810 Screen Replacement, Separate the Screen Assembly: 16 단계, 이미지 1/1
    • Use a plastic opening tool to separate the assembly.

  17. Blackberry Torch 9810 Screen Replacement, Remove the Digitizer: 17 단계, 이미지 1/1
    • This ribbon cable comes out with a simple tug.

    • Pull the digitizer off the face of the phone and carefully guiding the ribbon cable out of the slot.

  18. Blackberry Torch 9810 Screen Replacement, Remove the Screen: 18 단계, 이미지 1/2 Blackberry Torch 9810 Screen Replacement, Remove the Screen: 18 단계, 이미지 2/2
    • Remove the screen using the opening tools.

    • The entire back of the screen is glued to the assembly, making it more difficult to remove. Since this part is already broken, don't be afraid to force it out.

결론

To reassemble your device, follow these instructions in reverse order.

다른 3명이 해당 안내서를 완성하였습니다.

Jocelyn Adorno

회원 가입일: 10/16/14

296 평판

안내서 4개 작성하였습니다

UMass Dartmouth, Team 6-6, Vijaybhaskar Fall 2014 UMass Dartmouth, Team 6-6, Vijaybhaskar Fall 2014 회원

UMASSD-VIJAYBHASKAR-F14S6G6

3 회원들

안내서 4개 작성하였습니다

댓글 한 개

Superb wish I could get the heating instrument can u just describe?

Freddy - 답글

댓글 쓰기

조회 통계:

24 시간 전: 1

7일 전: 10

30일 전: 22

전체 시간: 5,094